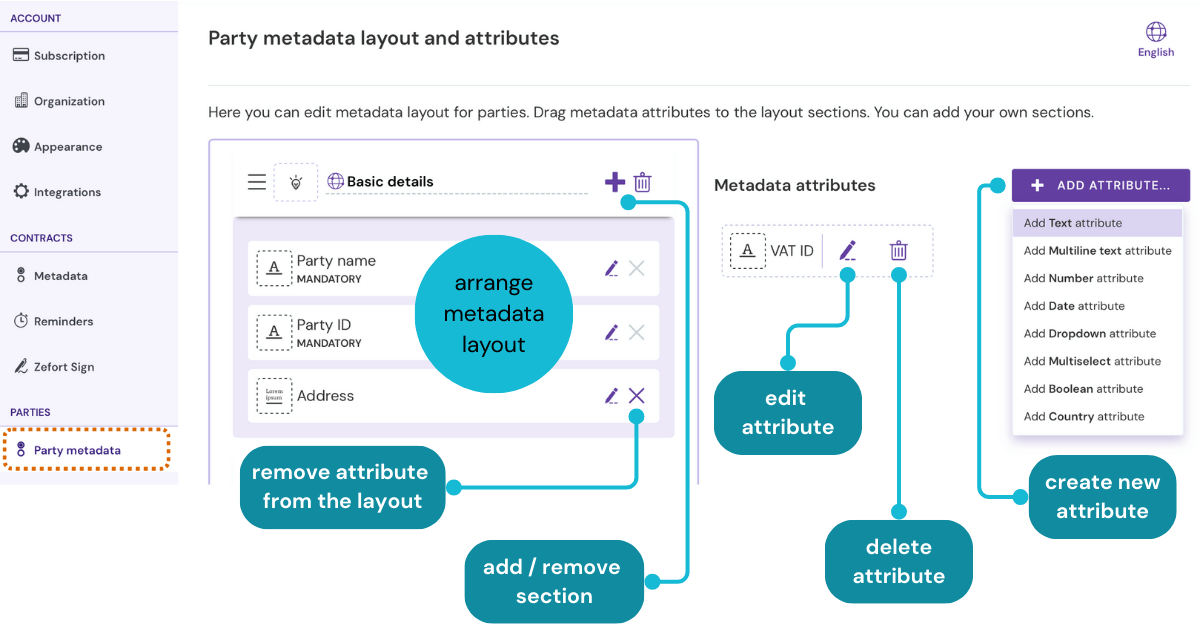
You can now customize metadata for parties too! With this new feature, admins can create, manage, and organize metadata attributes for parties — making it easier to structure and display the information that matters most.
Key features:
- Create custom metadata attributes — Choose from text, numbers, dates, dropdowns, and more
- Organize metadata layout — Group attributes into named sections for a clearer layout
This feature is available under Account Settings > Party Metadata, see further instructions in this support article. Check it out and start customizing your party data today!
Don’t have custom metadata option on your account yet? Contact our sales for more details!
We’re excited to introduce a new feature that lets you seamlessly embed Zefort forms into your website. Instead of sharing just a link, you can now display the form directly on your site!
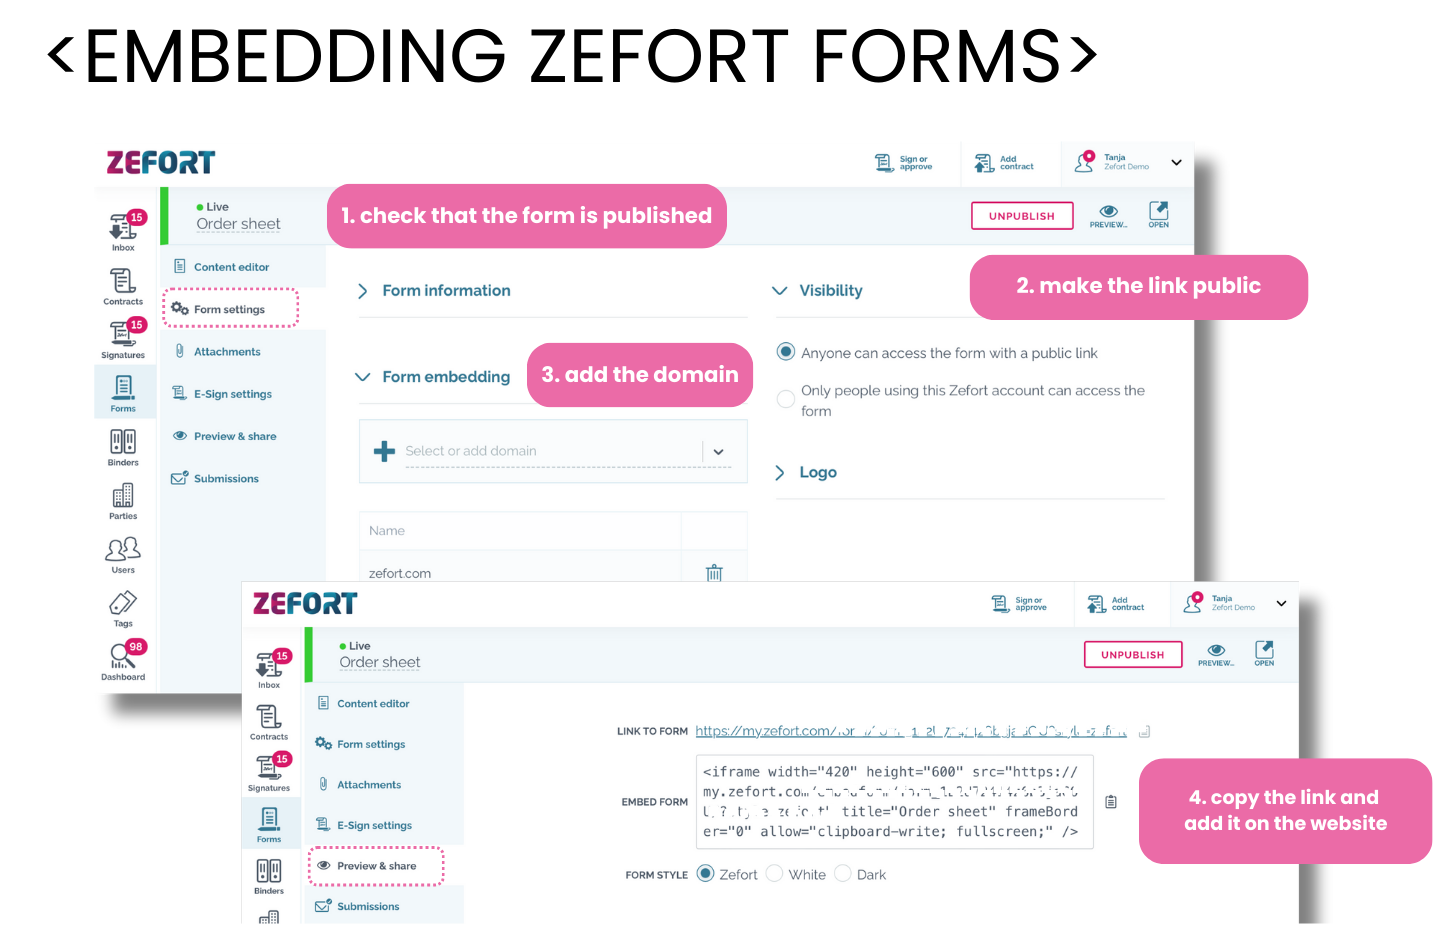
Here’s how to do it:
- Open the form you want to embed and ensure it is published.
- Navigate to Form Settings:
- Under Form Embedding, add or select the domain where the form will be embedded.
- In Visibility, choose “Anyone can access the form with a public link.”
- Go to the Preview & Share tab, and under Embed Form, copy the provided link.
- Paste the embed link into your website’s code.
That’s it—embedding a Zefort form is that simple!
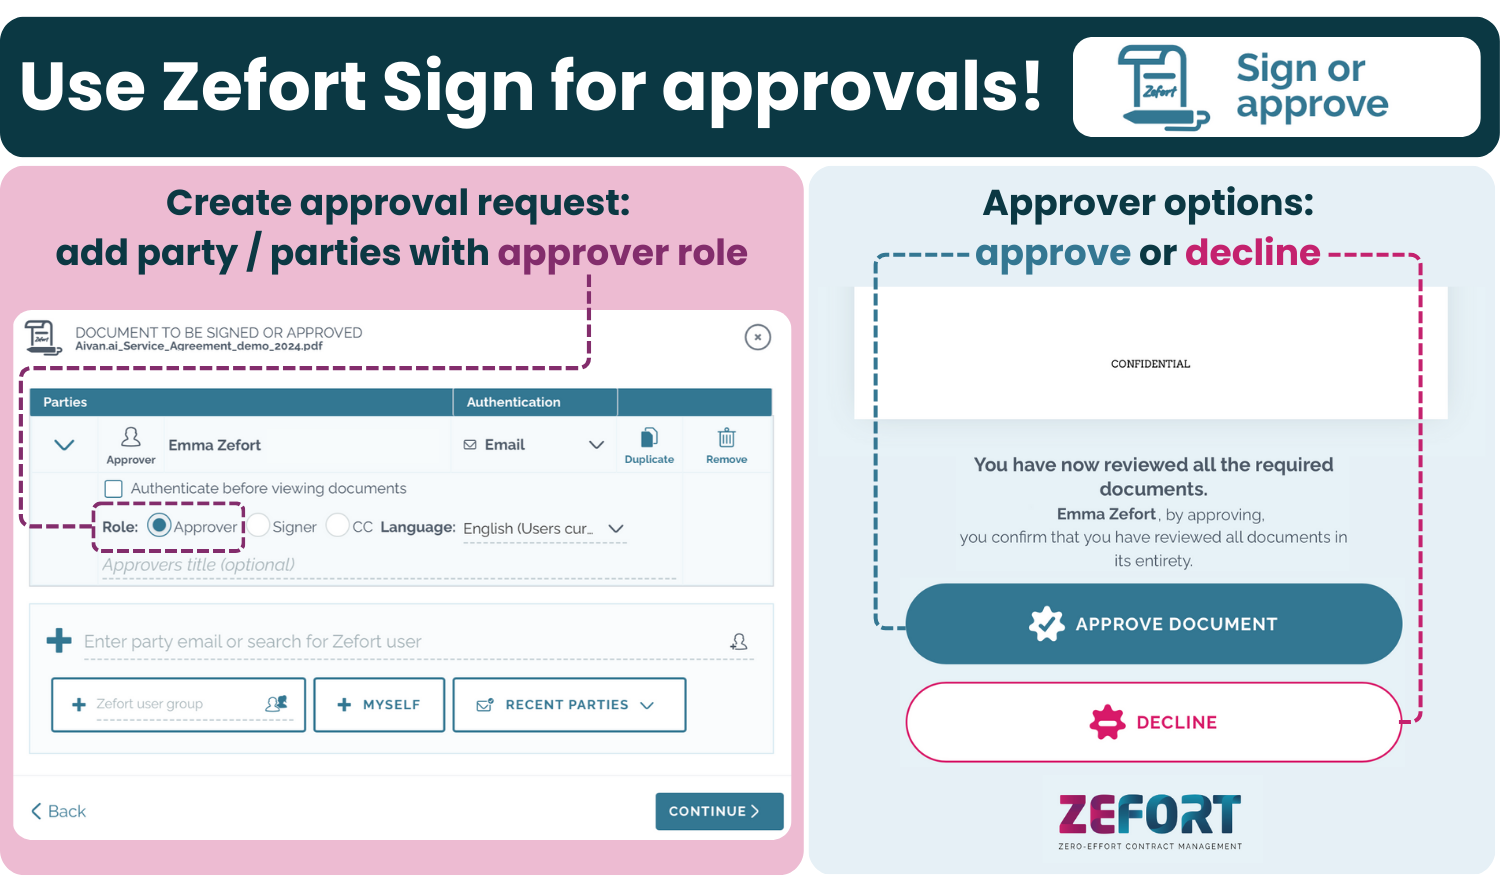
Not every document requires a signature – sometimes, an approval is all you need. With Zefort Sign, you can now easily approve documents without signing!
To use this feature, skip adding the signers in the signature process and use approver(s) instead – an effortless way to get your documents approved without requiring formal signatures.
Would you like to try Zefort Sign? Get in touch with our sales team for additional information or learn more here!
Exciting new feature for Zefort Sign and Forms users!
You can now launch a form directly from a contract, and the completed document will be automatically added to document’s attachments.
How to use this feature:
- Open the document in Zefort and go to the Files & Emails tab.
- Click “Select form…” and choose the appropriate form.
- Fill in the form and submit it.
- Zefort Forms will create the document, which will be automatically attached to the contract. If the form has fields link with contract’s metadata, those will be automatically updated.
- The document can be approved or signed using Zefort Sign.
To use this feature, your account must have both Zefort Sign and Zefort Forms functionalities enabled, and the user needs to hold an editor or admin license. Additionally, there should be pre-made forms available in Zefort Forms.
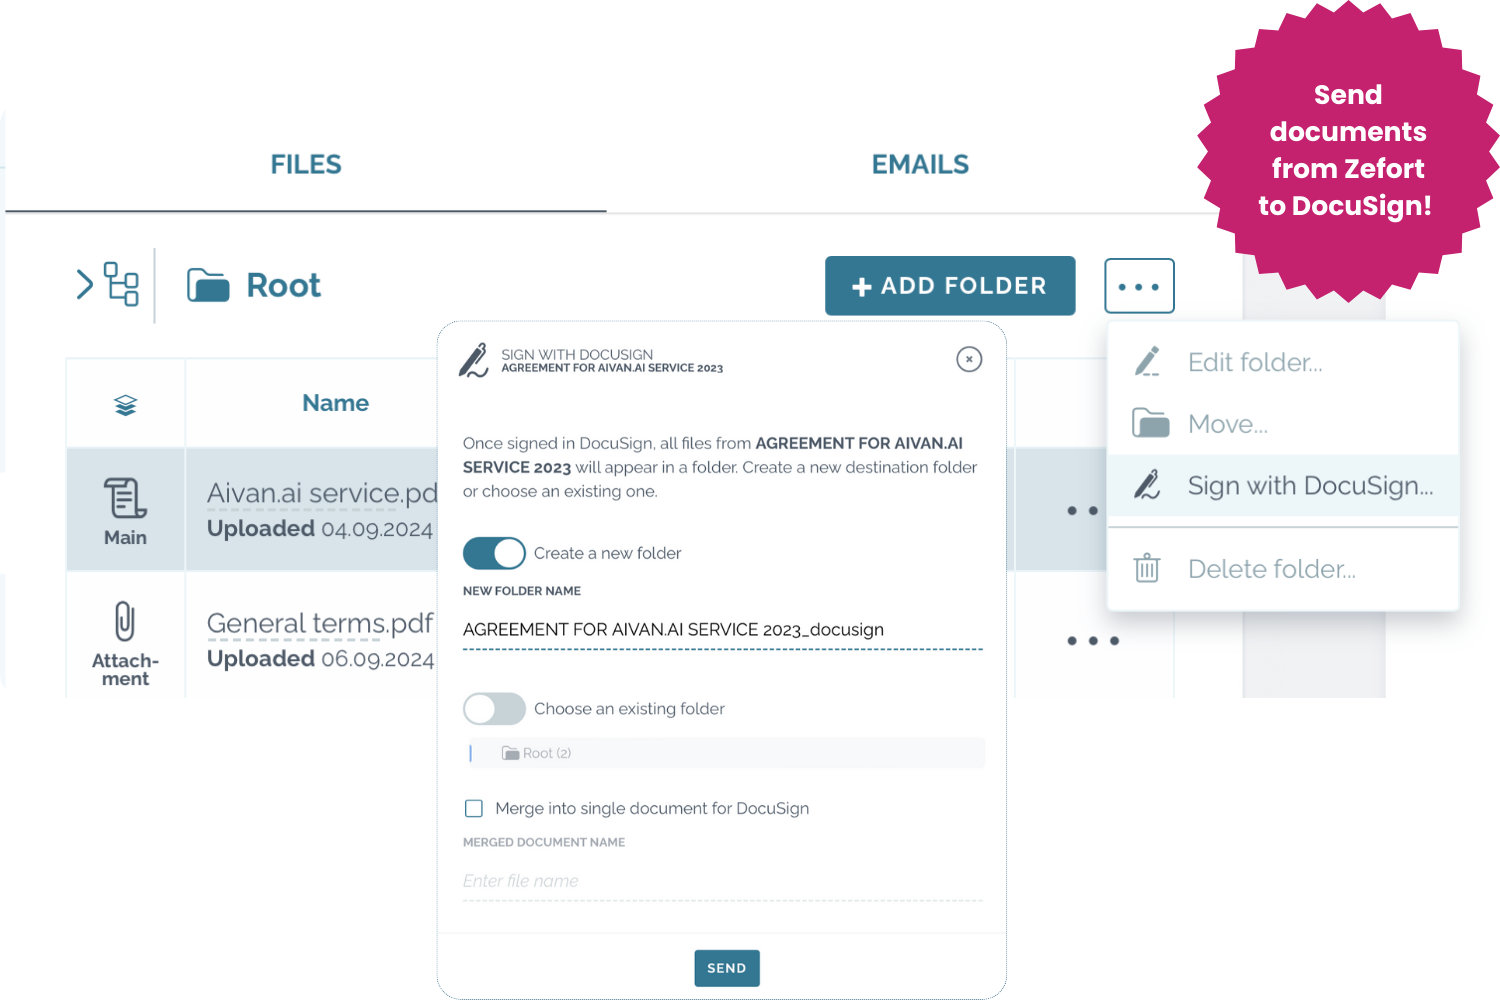
There is now another type of Docusign integration available in Zefort: DocuSign Personal!
With DocuSign Personal you can send a contract from Zefort to be signed with Docusign. Once the signature process is complete in Docusign, the signed contract is automatically added to Zefort.
Read more in the support article!
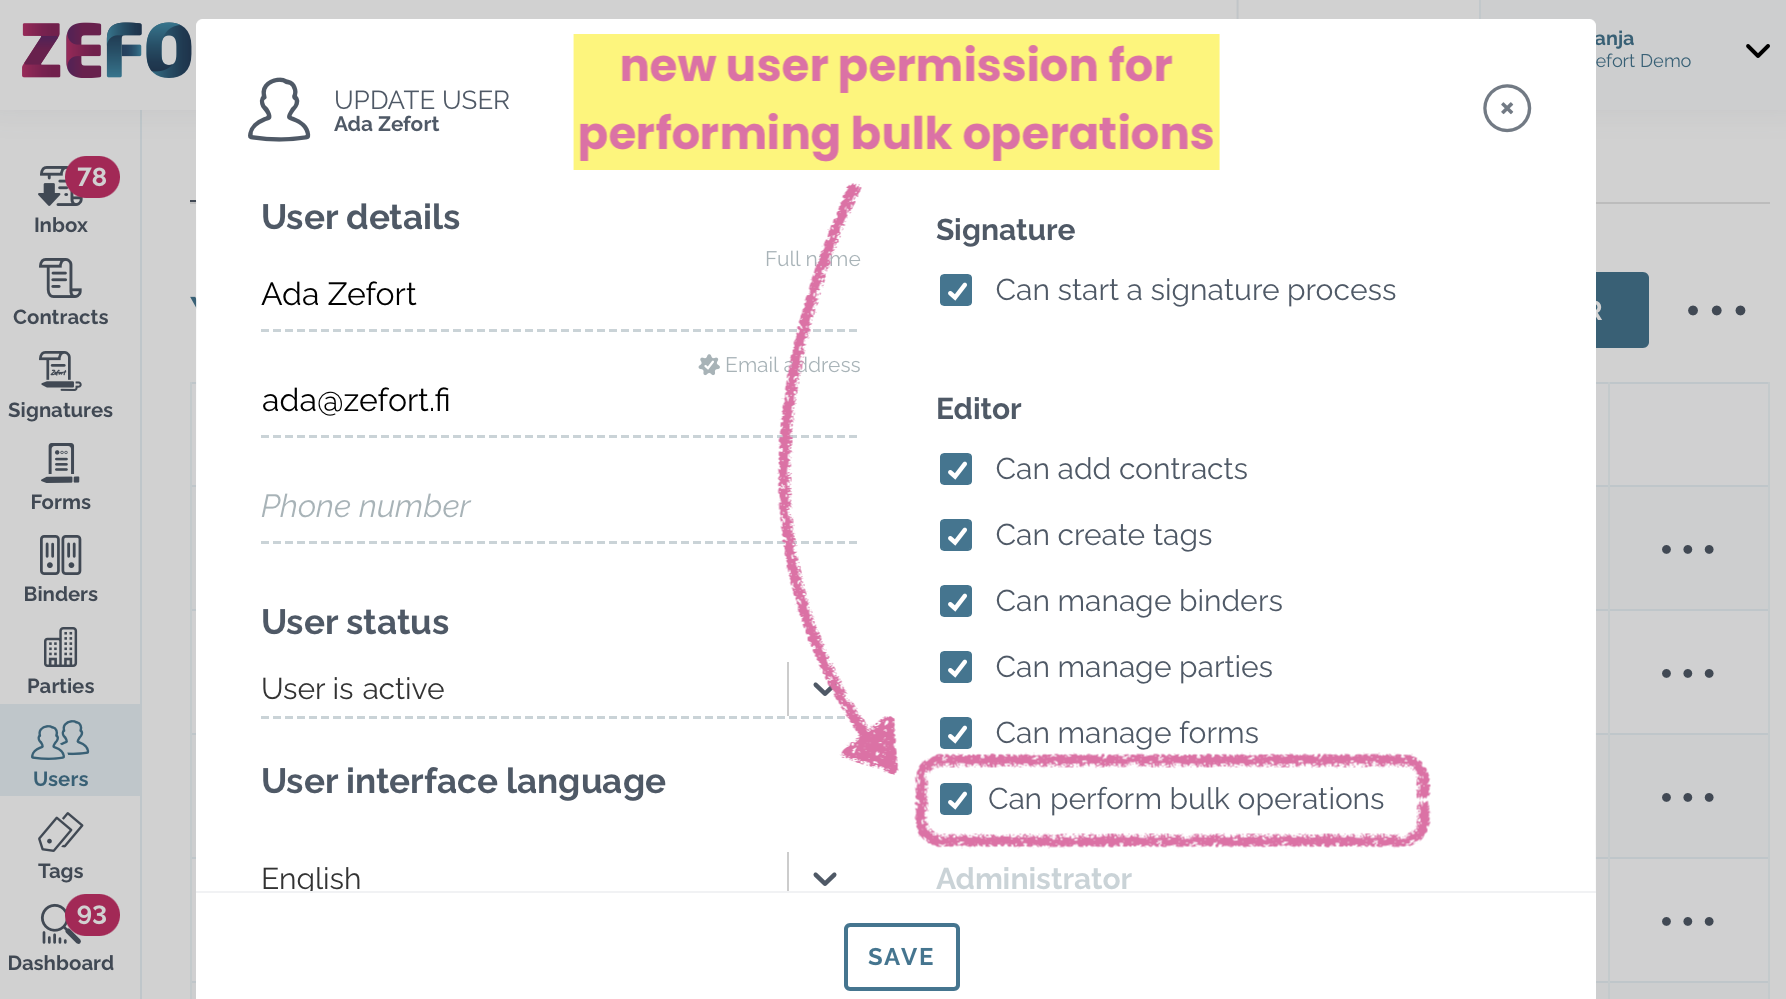
Hello admins!
We want to inform you that the permission to perform bulk edits has been updated. When creating a new user with editor or admin license, you must now need specify whether they are allowed to perform bulk actions on contracts. To grant bulk editing, select the option “Can perform bulk operations“.
Additionally, you can set the default bulk edit permissions for new users in Account settings > Organization > Users. This allows you to choose whether new users will have bulk edit permissions enabled or disabled by default.
Please note that existing users remain unaffected: bulk operations are enabled in their current permissions. You only need to take action if you wish to remove the bulk edit permission from an existing user.
Previously, the signature process was only visible to the initiating user and admins with full rights. This limitation understandably could cause issues when users were on vacation or otherwise unavailable. In response to customer requests, we’ve increased visibility and allowed selected users to edit the signature process.
We’ve implemented a new feature: by granting editor or admin users full permission to the contract via binders, they can now view and edit the signature processes associated with the contract. However, users with only edit or view permissions still cannot access the signature process; this allows you to share the process with selected users only.
Assign your contracts in process to your substitute with full permission, relax and enjoy summer 

Want to translate the metadata attributes to other languages? Well no you can!
- Select enabled languages in your account: go to Account settings > Appearance > Enabled languages.
- Go to Account settings > Metadata to manage the translations:
- attribute title
- placeholder
- tooltip
- options etc.
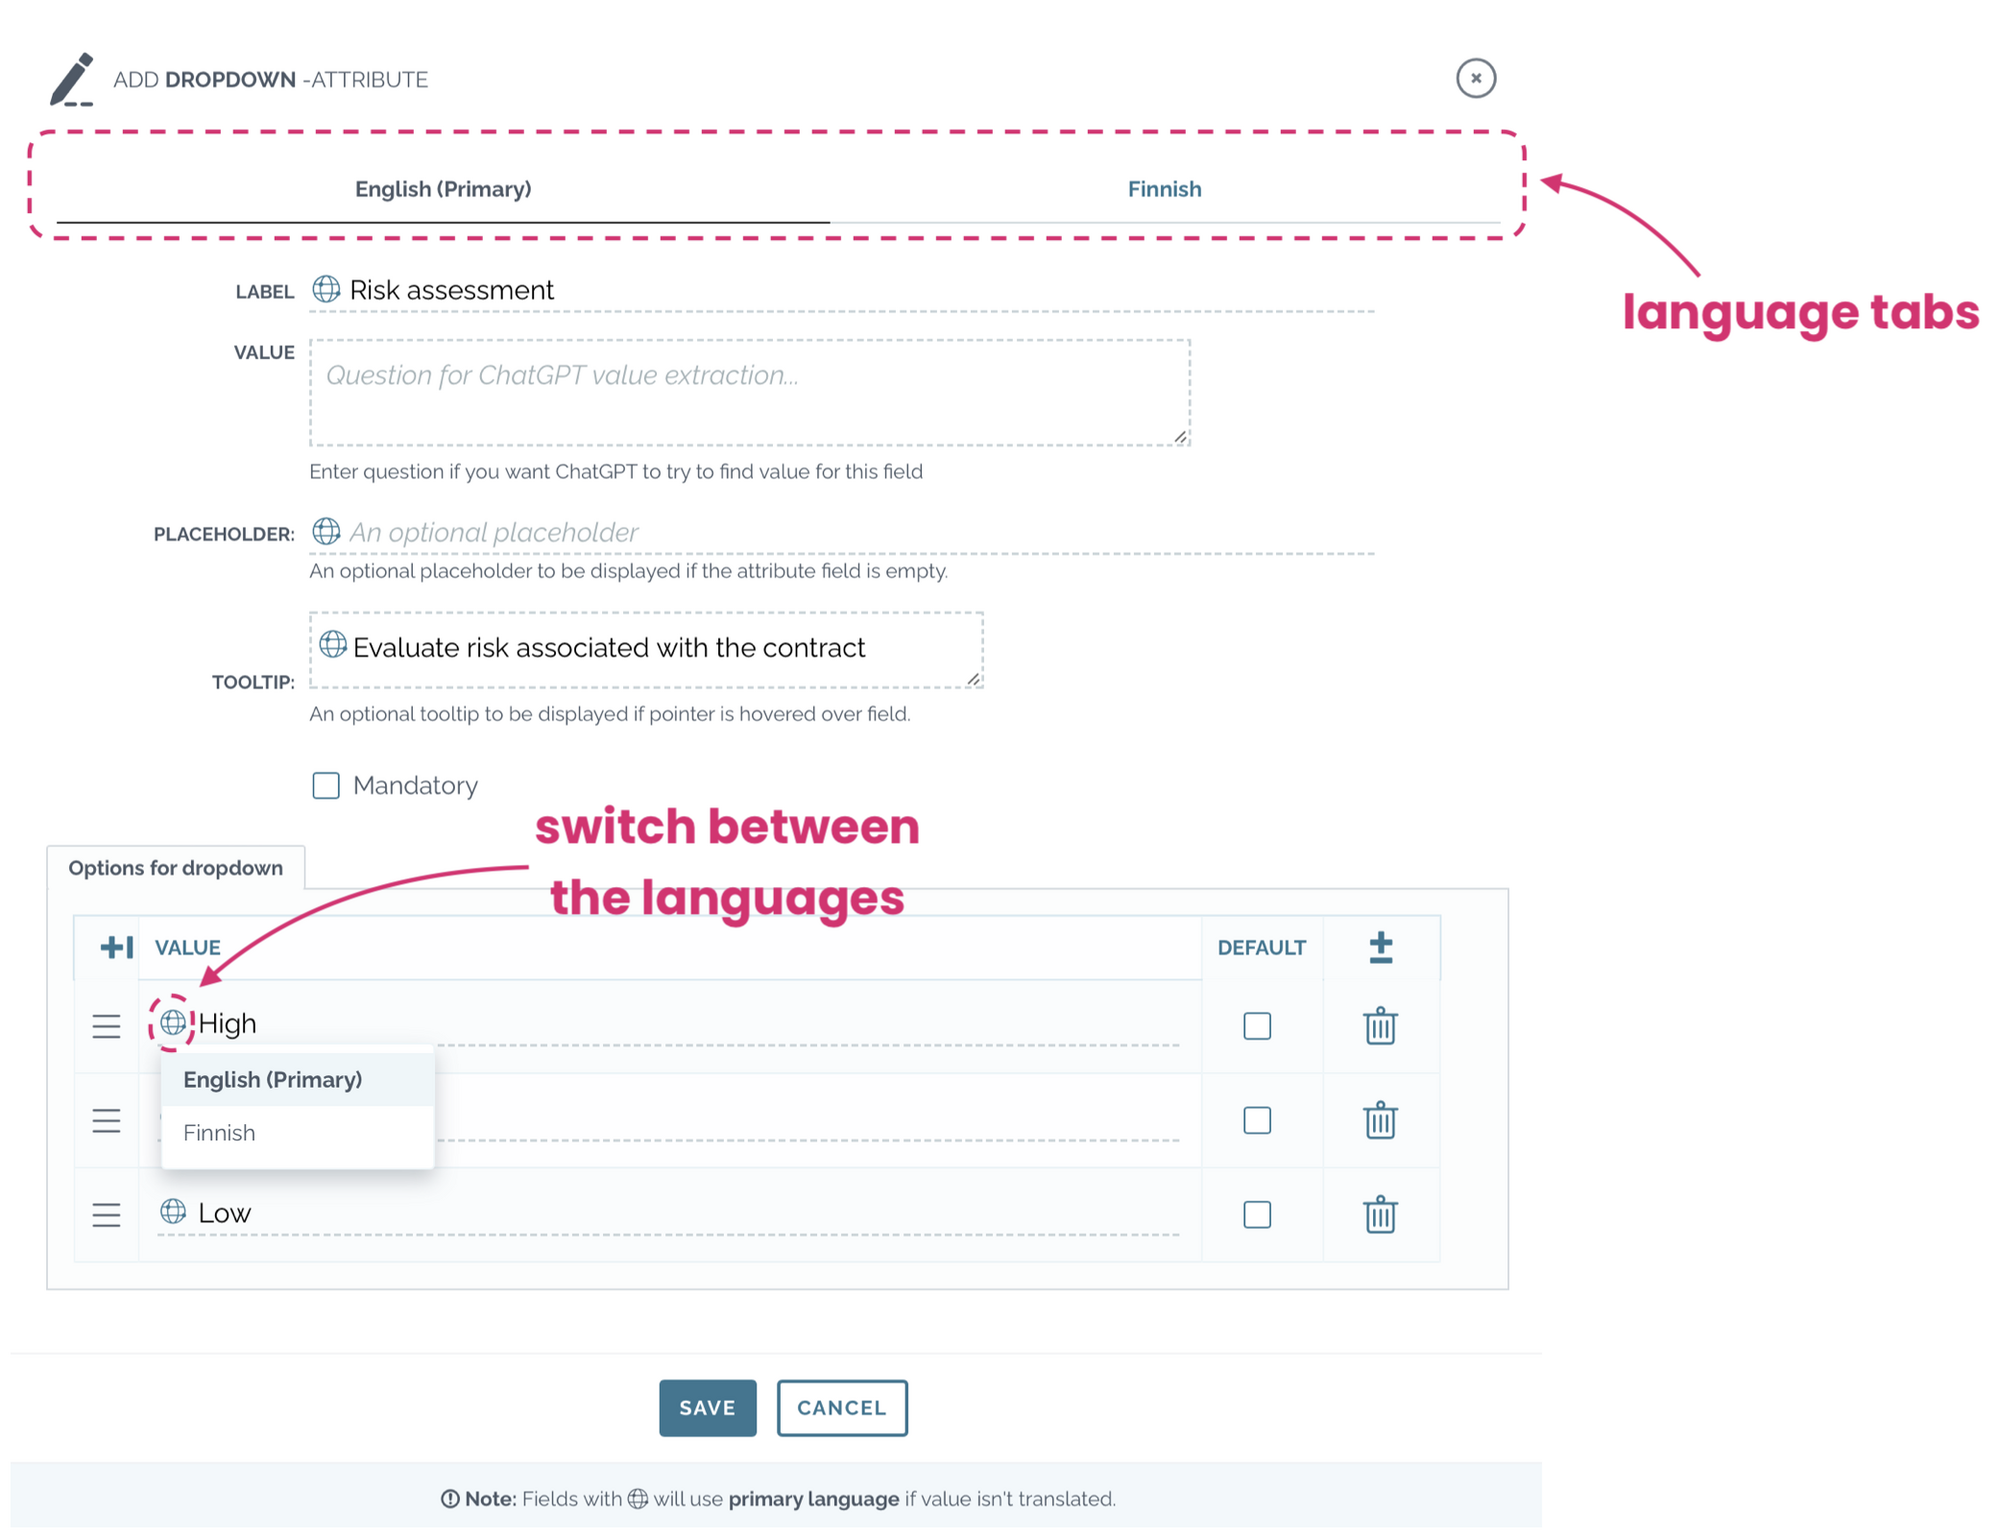
Users will see the translated attributes in their UI, if the language they are using is supported and the metadata attribute has been translated. In other case, the primary language selected for the account is used.
Check more detailed instructions here.
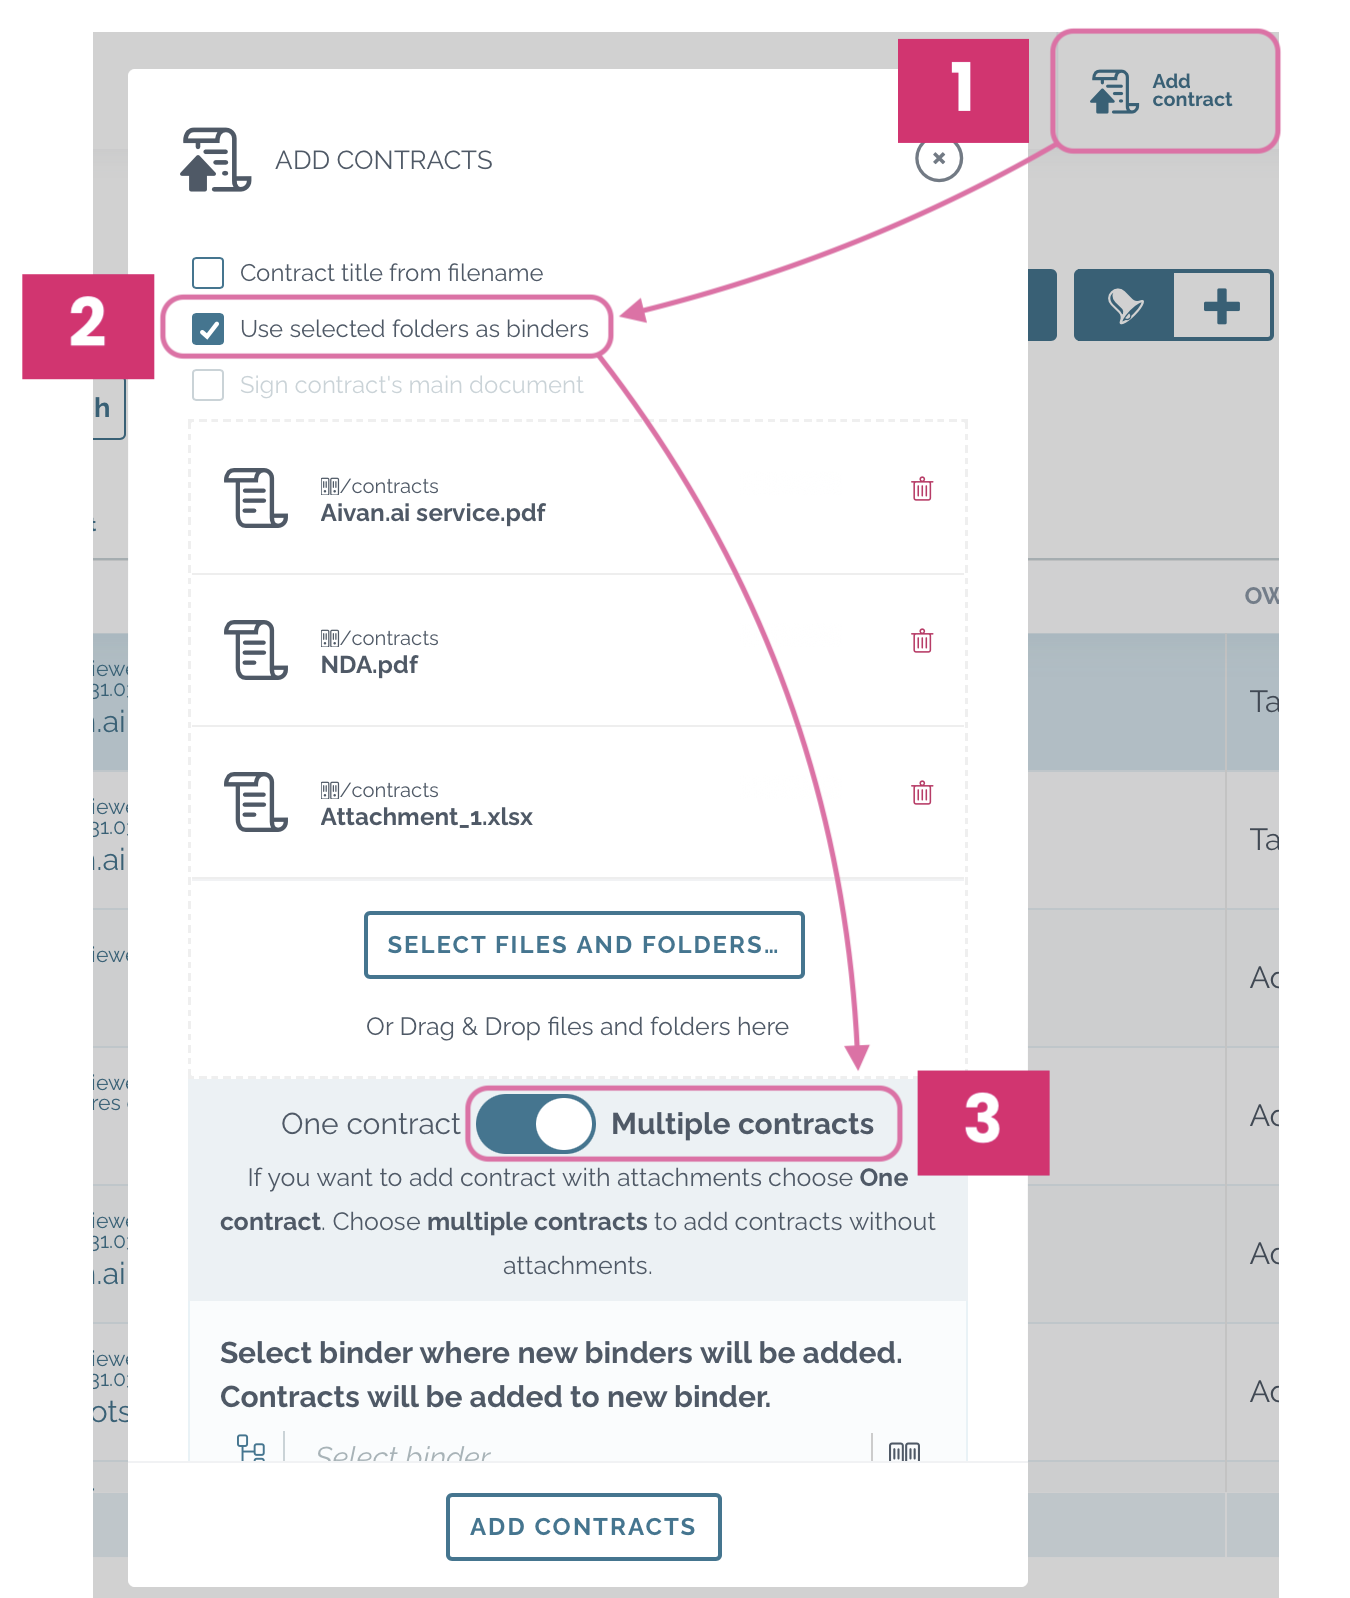
Users can now upload entire folder(s), creating corresponding binders in Zefort!
When uploading a folder with the “Add contract” function, click “Use selected folders as binders” and select “Multiple contracts“. All folders including a document are created in Zefort, and the files in the folders are all uploaded as separate contracts.
After uploading, remember to check and change the binder permissions, if needed.
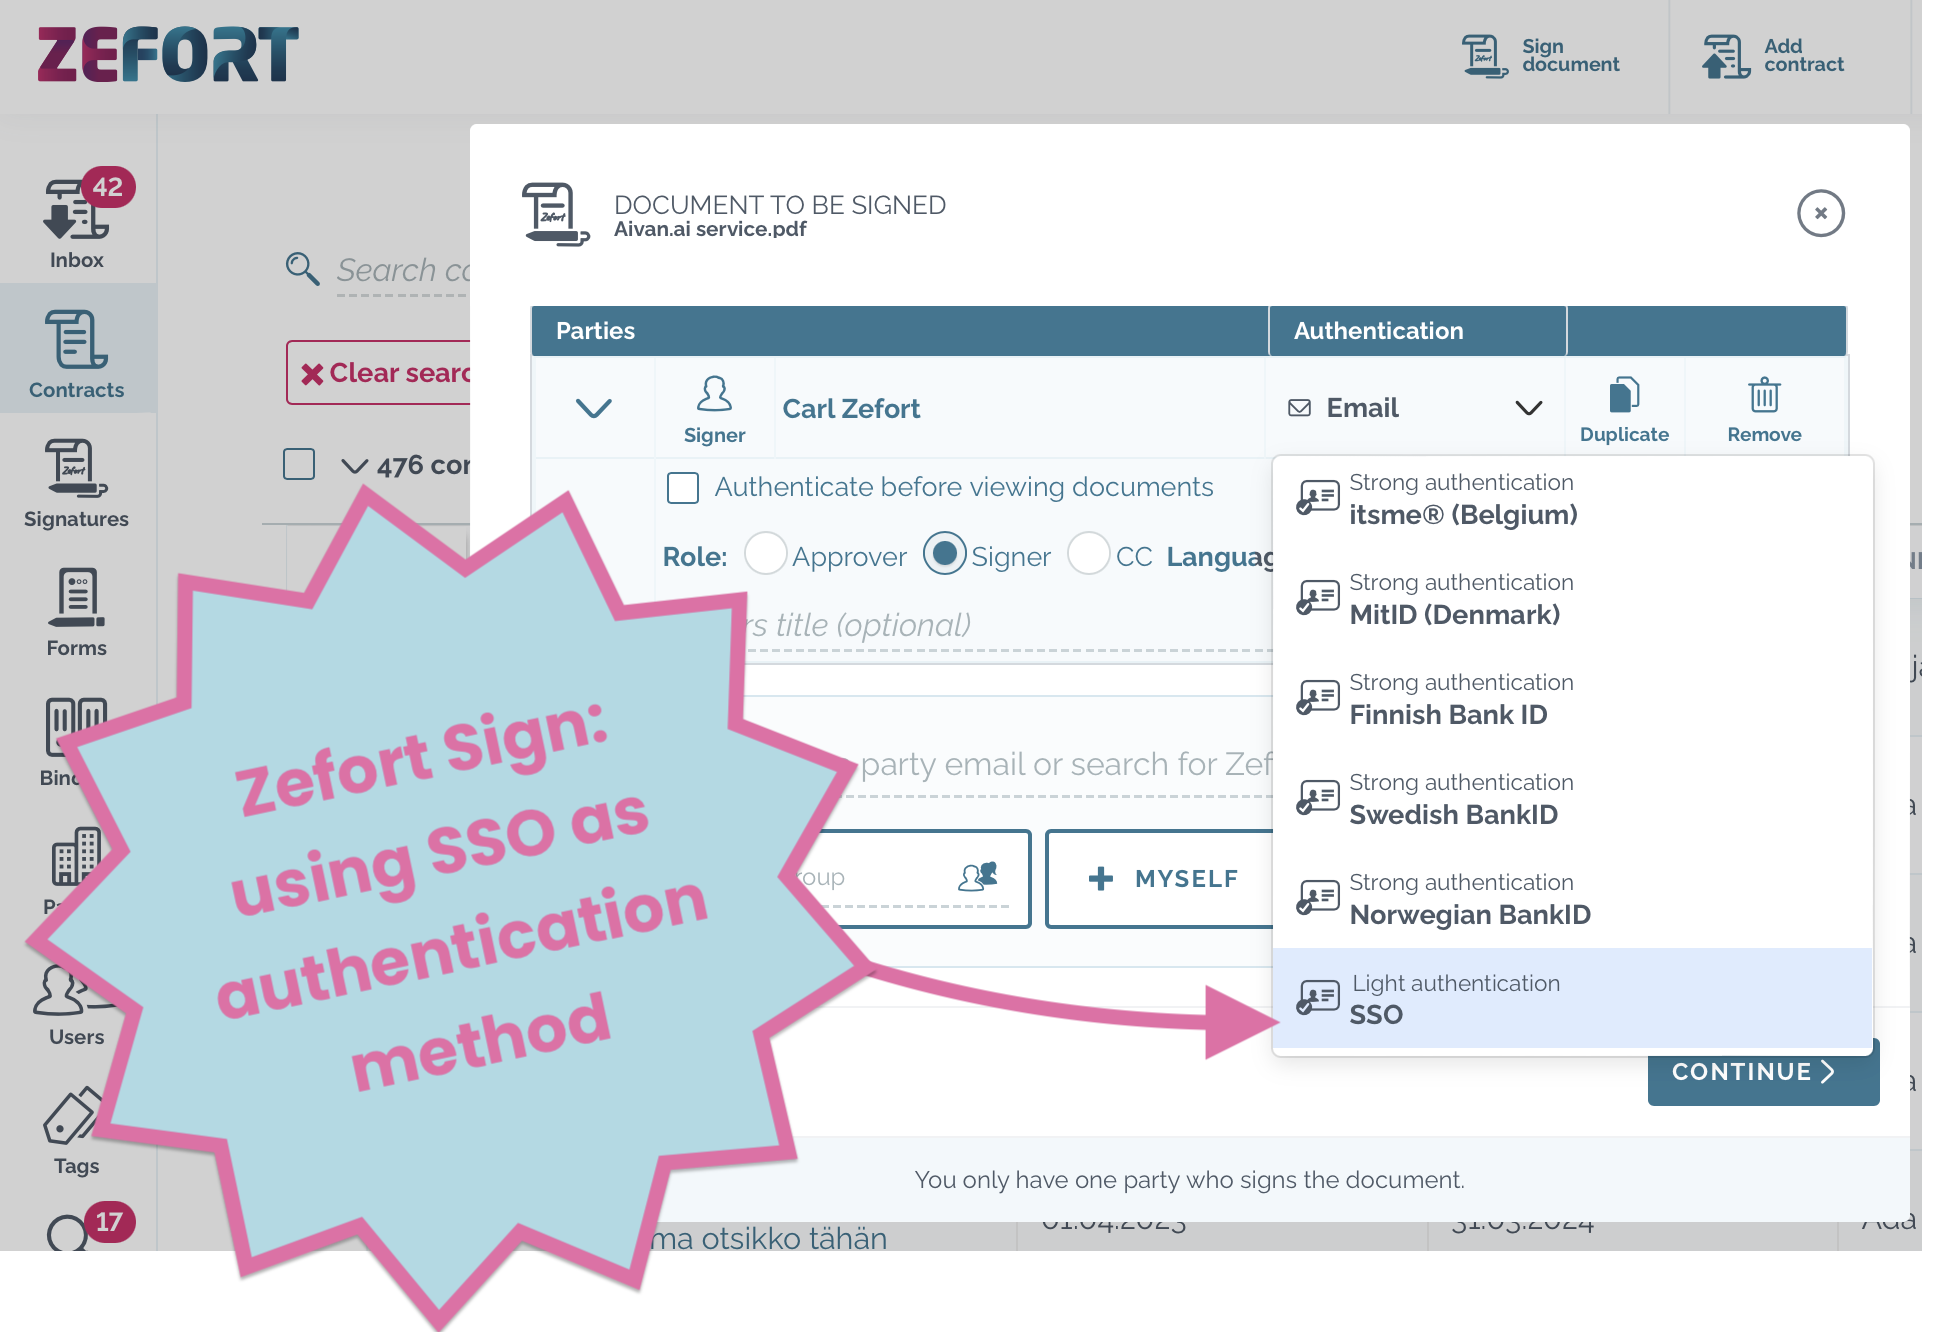
SSO can now be used as an authentication method in Zefort Sign!
If Single sign-on is configured in your account, you can now select SSO as authentication method for other members of your organization, even if they are not Zefort users.
- « Previous
- 1
- 2
- 3
- 4
- Next »