Zefort inboxes
Streamline your contract workflow by sending contracts and related files directly to your Zefort account. By creating dedicated Zefort inboxes, you can easily forward emails with contract attachments, send scanned documents from a network scanner, or automatically CC Zefort from your e-signing tool.
This article explains the different types of email inboxes available in Zefort and how to manage them.
Types of Zefort email inboxes
Zefort offers three main types of email addresses, each designed for a specific purpose: a personal inbox, a binder inbox*, and a contract inbox.
- Personal inbox: This is your private, general-purpose inbox. Contracts sent here are owned by you, but they are not automatically added to any binder. Unless the contract is later added to a binder, it is only visible to you (the contract owner) and admins with full access.
- Binder inbox: This type of inbox is always linked to a specific binder. It comes in two forms:
- Personal binder inbox: this is a private inbox that only you can see. Contracts sent here are owned by you and are automatically added to the selected binder.
- Public binder inbox: this inbox is visible to all users who have edit or full permission to the binder. You can also assign another user to be the default owner for contracts sent to this inbox.
- Contract inbox: Every contract in Zefort has its own unique email address. Use this to attach new files or email conversations to an existing contract.
Here’s a quick comparison of the different inbox behaviours:
| Inbox type | Contract owner | Purpose | Who can see and manage the inbox? |
| Personal inbox | You | Adds contract in Zefort (but not in any binder) |
Only you (in My settings) |
| Binder inbox (personal) | You | Adds a new contract directly to a specific binder. |
Only you (in My settings or binder’s inboxes) |
| Binder inbox (public) | Chosen user | Adds a new contract directly to a specific binder. |
Users with edit or full access to the binder (in My settings > Email inboxes, or Binders) |
| Contract inbox | N/A | Adds files/emails as attachments to an existing contract. |
Editors and admins with access to the contract (on contract’s “Files & emails” tab) |
* Please note that the binder inbox feature (= email routing) is not included in all subscription plans. If you are interested in adding this feature to your account, please contact our sales to learn more.
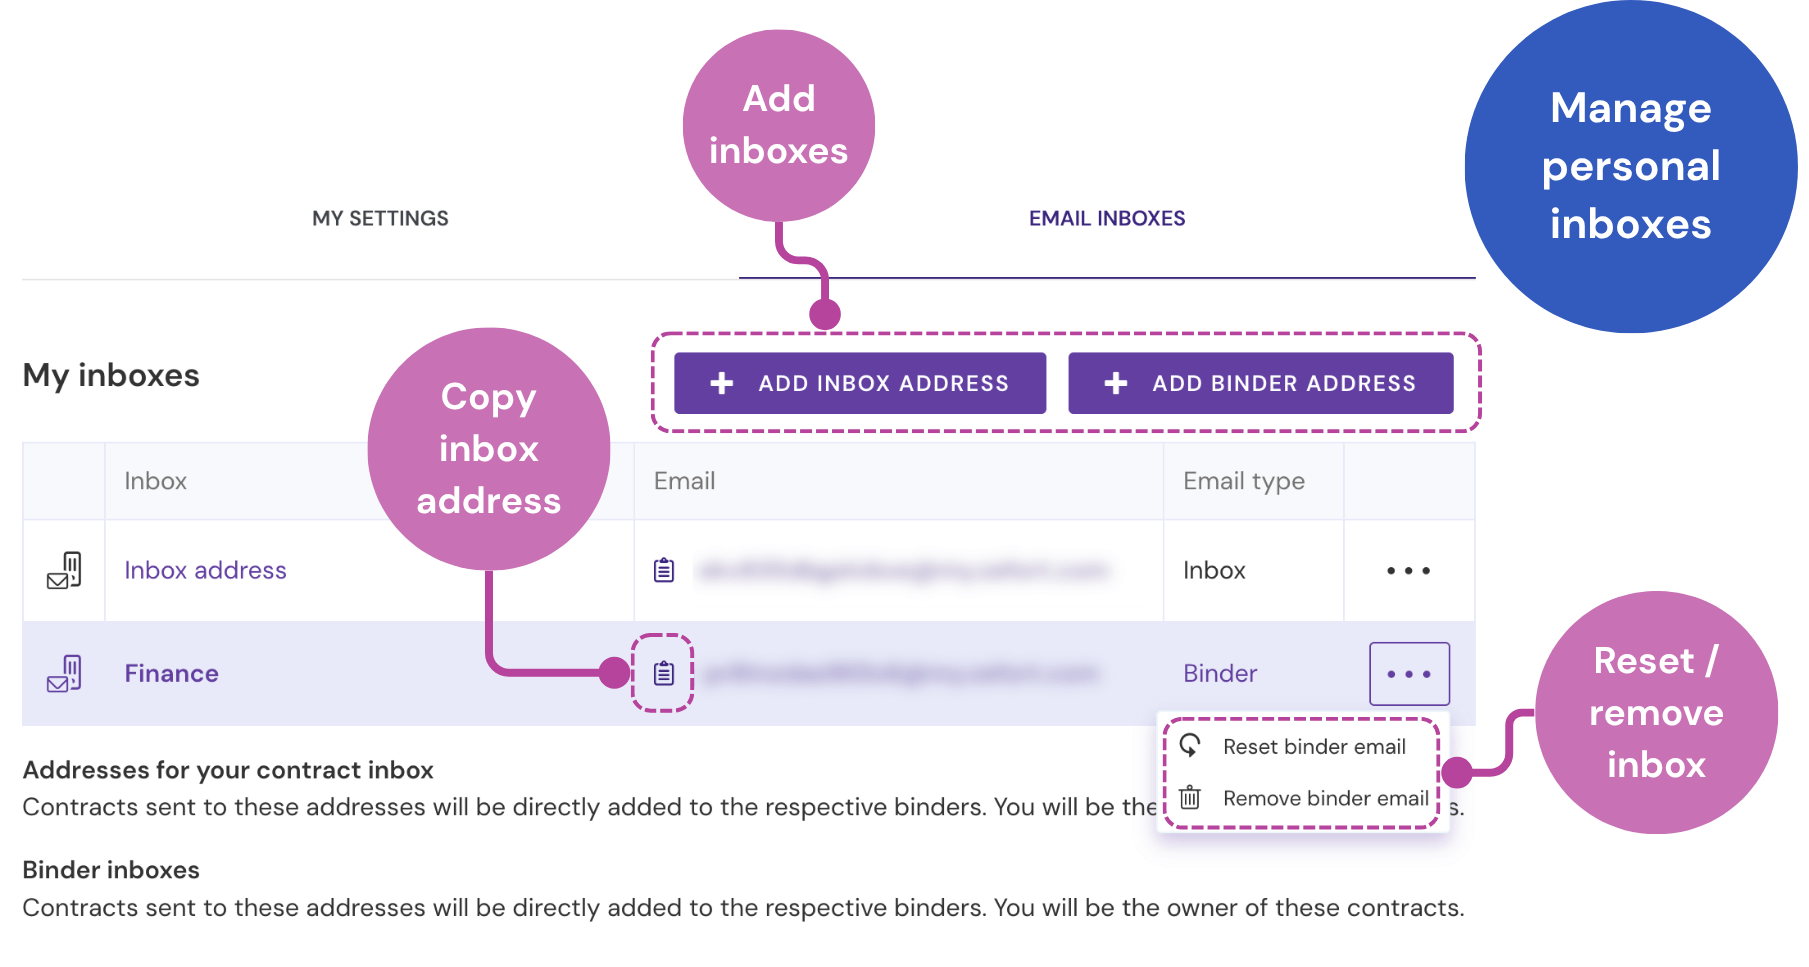
Personal inboxes
You can manage all your personal and binder inboxes from one central location.
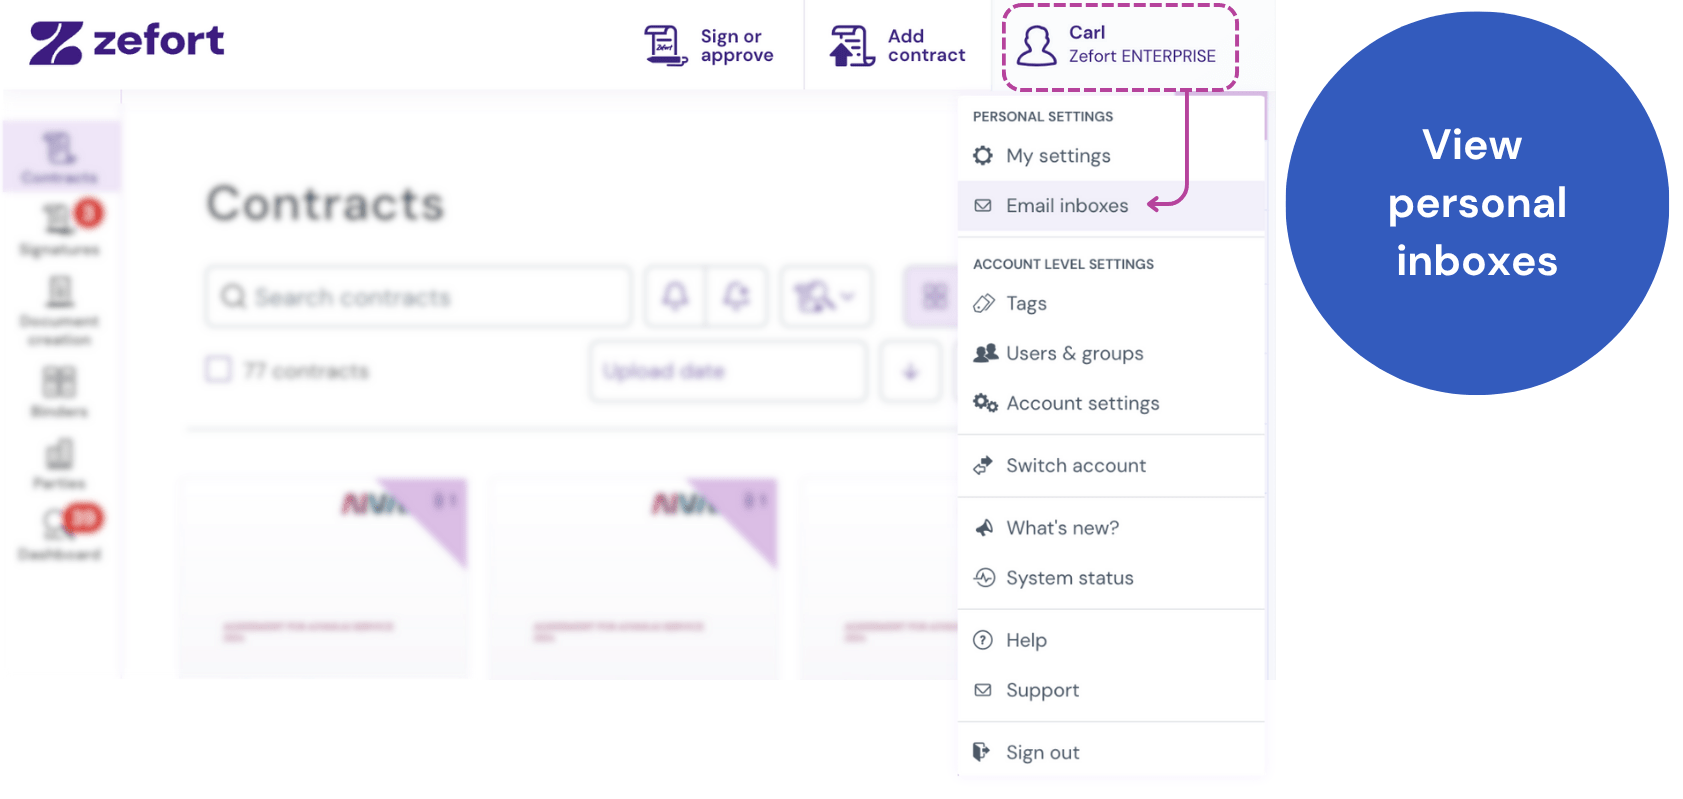
From this page, you can:
- Add a new personal inbox: click + add inbox address
- Add a new personal binder inbox: click + Add binder address
- Reset or remove inboxes: click the options menu ••• of the inbox
- Copy inbox address: click the copy icon next to an address to copy it to your clipboard
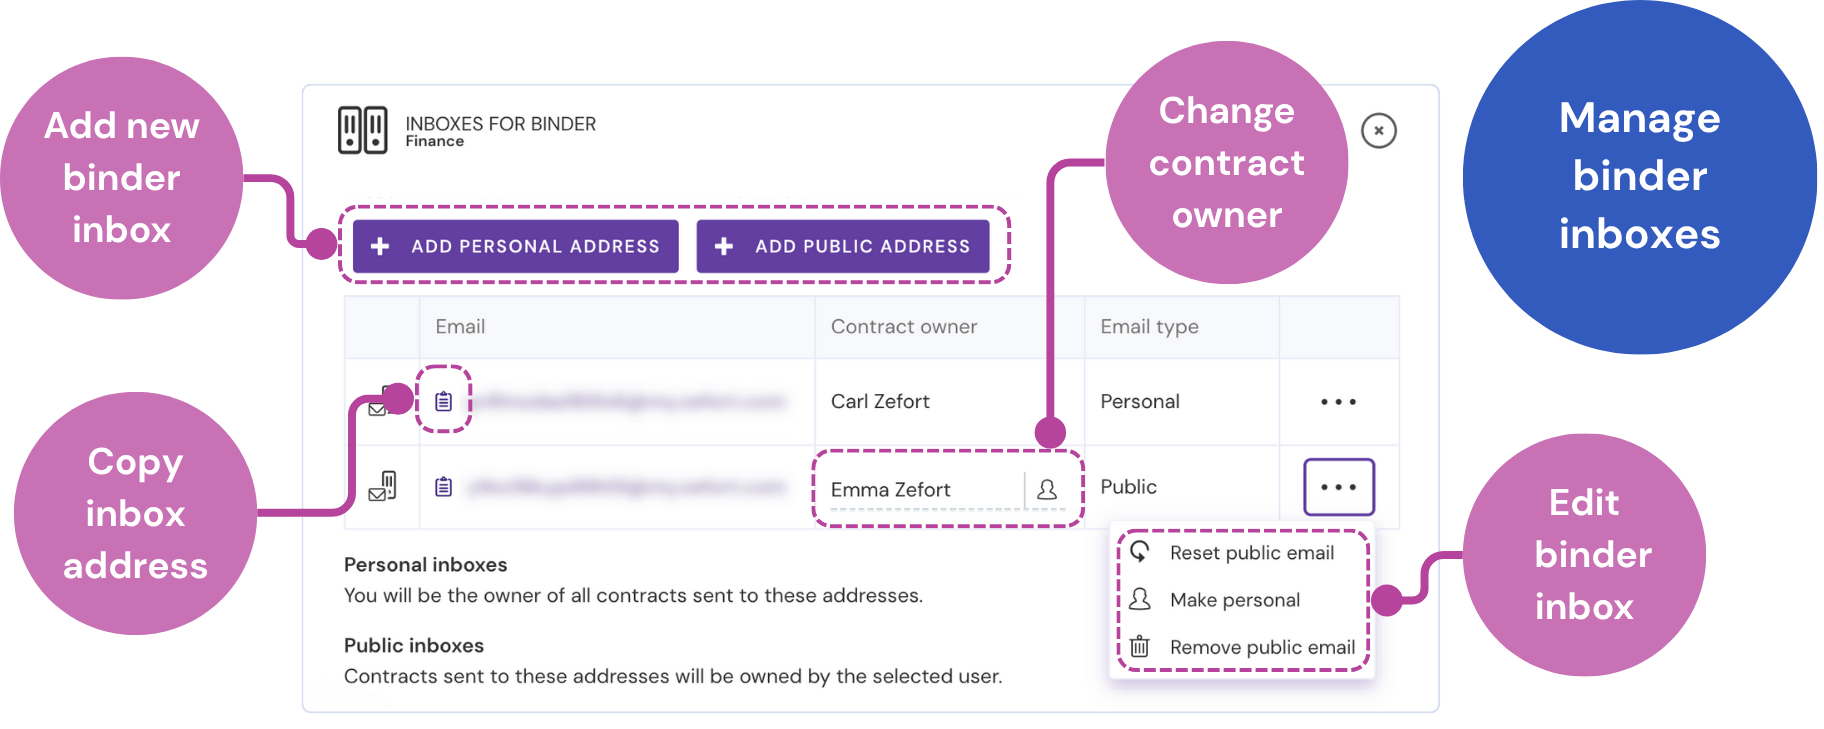
Binder inboxes
You can manage a binders’ inboxes directly from the binder view.

- Navigate to the Binders tab.
- Find the desired binder and click its options menu •••.
- Select Inboxes….
- In the dialog that appears, you can:
- Add a new personal or public binder inbox
- Change the default contract owner for a public binder inbox to another user
- Change the type of an existing inbox (personal / public)
- Reset inbox email address
- Remove inbox
Permissions required for managing binder inboxes
For editing binder inboxes, user must have editor or admin license.
Users with viewer license are not able to access the binder inboxes.
| Editing binder inboxes |
Action | Binder permission | ||||
| Full | Edit | View | ||||
| View binder inboxes | yes | yes | no | |||
| Add personal binder inbox | yes | yes | no | |||
| Add public binder inbox | yes1 | no | no | |||
| Change contract owner | yes1 | no | no | |||
| Change email type (personal / public) | yes1 | no | no | |||
| Reset public binder email | yes1 | no | no | |||
| Remove public binder email | yes1 | no | no | |||
| Notes | 1 requires user permission “can manage binders“ | |||||
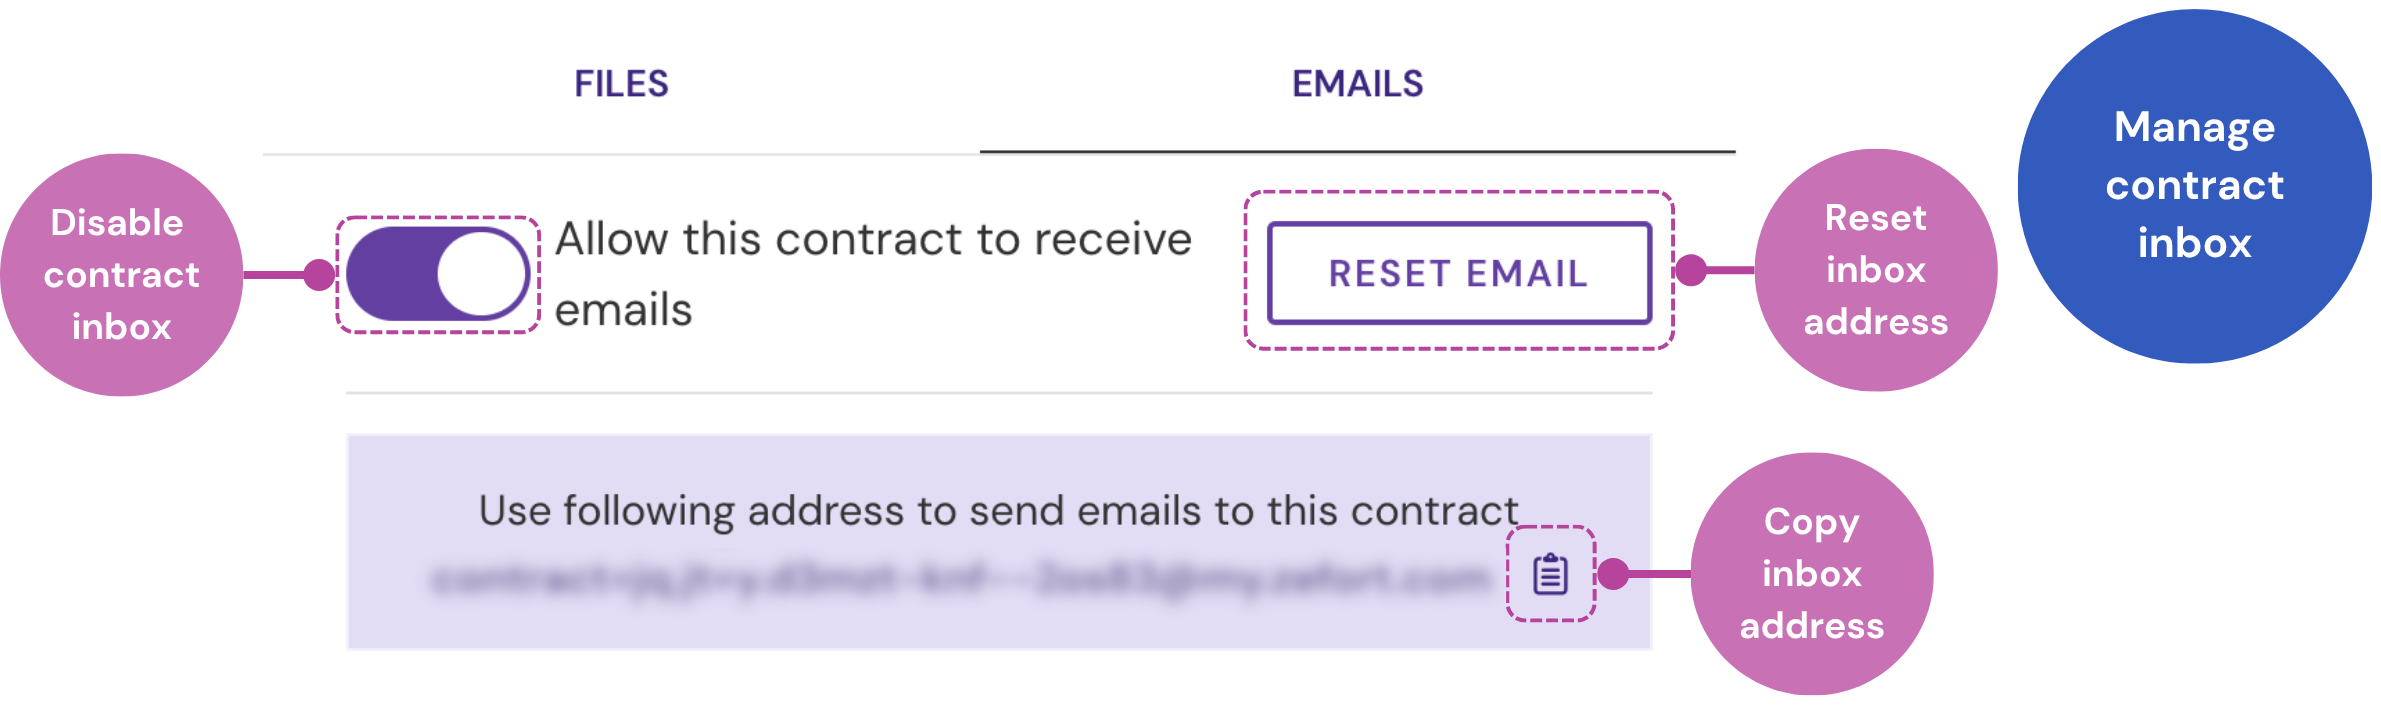
Contract inbox
Need to add a new version of a file or an important email thread to a contract that’s already in Zefort? Use its dedicated contract inbox.

- Open the contract you want to add files to.
- Go to the Files & Emails tab.
- Find the Emails section. If an email address has not been created yet, turn on the “Allow this contract to receive emails” toggle switch.
- Click the copy icon next to the address to copy it to your clipboard.
- Send your files or emails to the copied address. The email itself will appear in the Emails list, and any attachments will be added to the Files list within this tab.