Configure single sign-on (SSO) with Entra ID (Azure AD)
Zefort supports SSO with Entra ID (previously known as Azure AD), and various other identity providers, using SAML 2.0.
Note: you probably want OIDC instead
You may be aware that Zefort also support OIDC for SSO, and you may be wondering if you should use OIDC or SAML for this.
For a new deployment, it’s best to go with OIDC unless you are sure you need to use SAML. OIDC is a modern protocol and has gained widespread use in enterprise scenarios. Zefort will continue to support SAML for the foreseeable future, so there is no urgent need to migrate existing deployments to OIDC.
Terminology
With these instructions, you can set up basic single-sign-on, where users for particular domain name (e.g. yourcompany.com) are delegated to Entra ID for authentication instead of using Zefort’s built-in password authentication.
In this scenario, Zefort is the Service Provider (SP) and Entra ID is the Identity Provider (IdP).
A single Zefort account can be configured for SSO with multiple different domains (IdPs). A single domain can also be configured to be used for multiple Zefort accounts. Users who have access to multiple accounts will be able to choose which account to use at any time.
Prerequisites
You need:
- A Zefort administrator user account with the ”can manage account settings” permission
- Access to configure the DNS records for your domain
- Administrative access to your Entra ID
Sidenote: as a best practice, organisations using Zefort often reserve some administrator user accounts for IT personnel, who only have access to configure account settings (and possibly manage user accounts), but no access to actual contracts or other content.
Overview
In nutshell, the steps to configure SAML integration with Entra ID are:
- Create a new SAML integration in Zefort’s Account settings
- Verify your domain name by entering a validation token in your domain’s DNS configuration
- Add a SAML application in your Entra ID tentant
- Copy IdP metadata URL from Entra ID to Zefort
- Finish configuration in Zefort
Check the detailed instructions below.
Configuring SAML integration
1. Add and verify domain name(s)
In order to use SAML; you must first add and validate the domain name(s) for which authentication is delegated to Entra.
Sign in to Zefort with your administrator account, navigate to Account settings → Domains, and add your domains. Follow instructions to configure your DNS and verify the domains.
Once the domain is verified, you will see a green indicator in the Domain name section, and you can move to the next step.
For security reasons, Zefort periodically re-checks the presence of the TXT record. Do not remove the TXT record to ensure SSO with Zefort continues to work.
2. Create a SAML integration in Zefort
In this step, you create a new SAML integration object in Zefort.
Browse to Account settings → Integrations, and select “Add another” or “Install” for SAML Single Sign-On.
Enter the domain name(s) you wish to use for SSO (e.g. yourcompany.com) and click Save.
3. Add an application in your Entra ID tenant
In this step, you create the SAML application in your Entra ID tenant configuration.
Add Zefort as a “non-gallery” application in Entra ID. Follow Microsoft’s instructions here.
You can use this image as a logo:

Zefort-logo-social.png
Configure SAML-based single sign-on for the app. Copy the values for the Entity ID and ACS (Assertion Consumer Service) URL from Zefort. You should leave the Sign-On URL empty to ensure IdP initiated logins work.
For the Unique User Identifier (or Name Identifier using SAML terminology), change the setting from UPN to a more stable identifier which will not change even if users’ email addresses or names change. We recommend using user.objectid.
Define the following in User Attributes and Claims:
| SAML attribute | Entra ID attribute |
|---|---|
| givenname | user.givenname |
| surname | user.surname |
| emailaddress | user.mail |
| Unique User Identifier | user.objectid |
When the application is configured, find the IdP metadata URL for the application. It is of the format https://login.microsoftonline.com/<Directory ID>/federationmetadata/2007-06/federationmetadata.xml?appid=<Application ID>
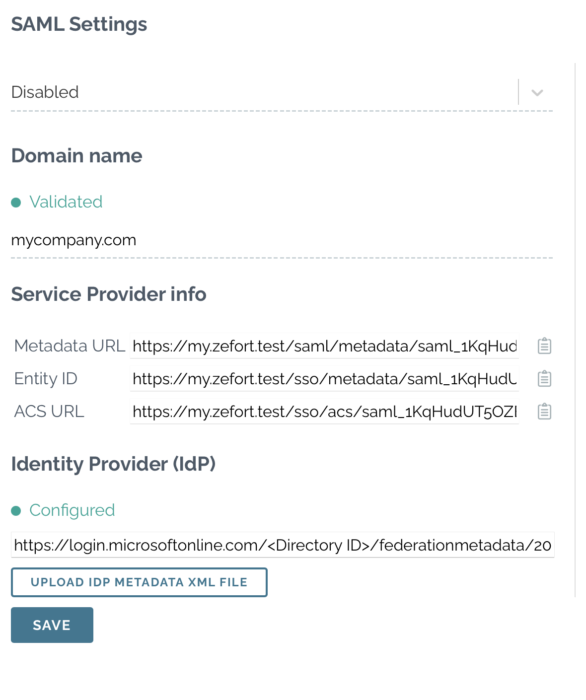
4. Add IdP metadata to Zefort
Enter the IDP metadata URL in the integration configuration page under “Identity Provider (IdP)” and press Save.
You should now get green indicator for the Identity Provider (IdP) section, and the SAML integration is ready to be used.
5. Configure user provisioning
Note! If you also use SCIM for user provisioning, *do not* configure user provisioning for SAML, and leave it in the ”Add users manually” setting.
There are two alternatives for this: manually managing users in Zefort, or just-in-time provisioning of users as they sign in via SSO for the first time.
To manually manage users, choose ”Add users manually”. Even if a user has access to the Zefort application on Entra, they will not be able to sign in to Zefort unless they are first manually added by an administrator user with the “Can manage users” permission.
To configure just-in-time provisioning, choose ”Add new users automatically upon login”. Subject to limitations with number of user licenses on your Zefort account, users are automatically added when they sign in via SSO for the first time.
7. Enable and test signing in
Change the integration status from “Disabled” to “Active” and press Save. Try signing in on a different machine, a different browser, or an incognito window. If there are problems, turn the integration status back to “Disabled” to avoid locking yourself out.
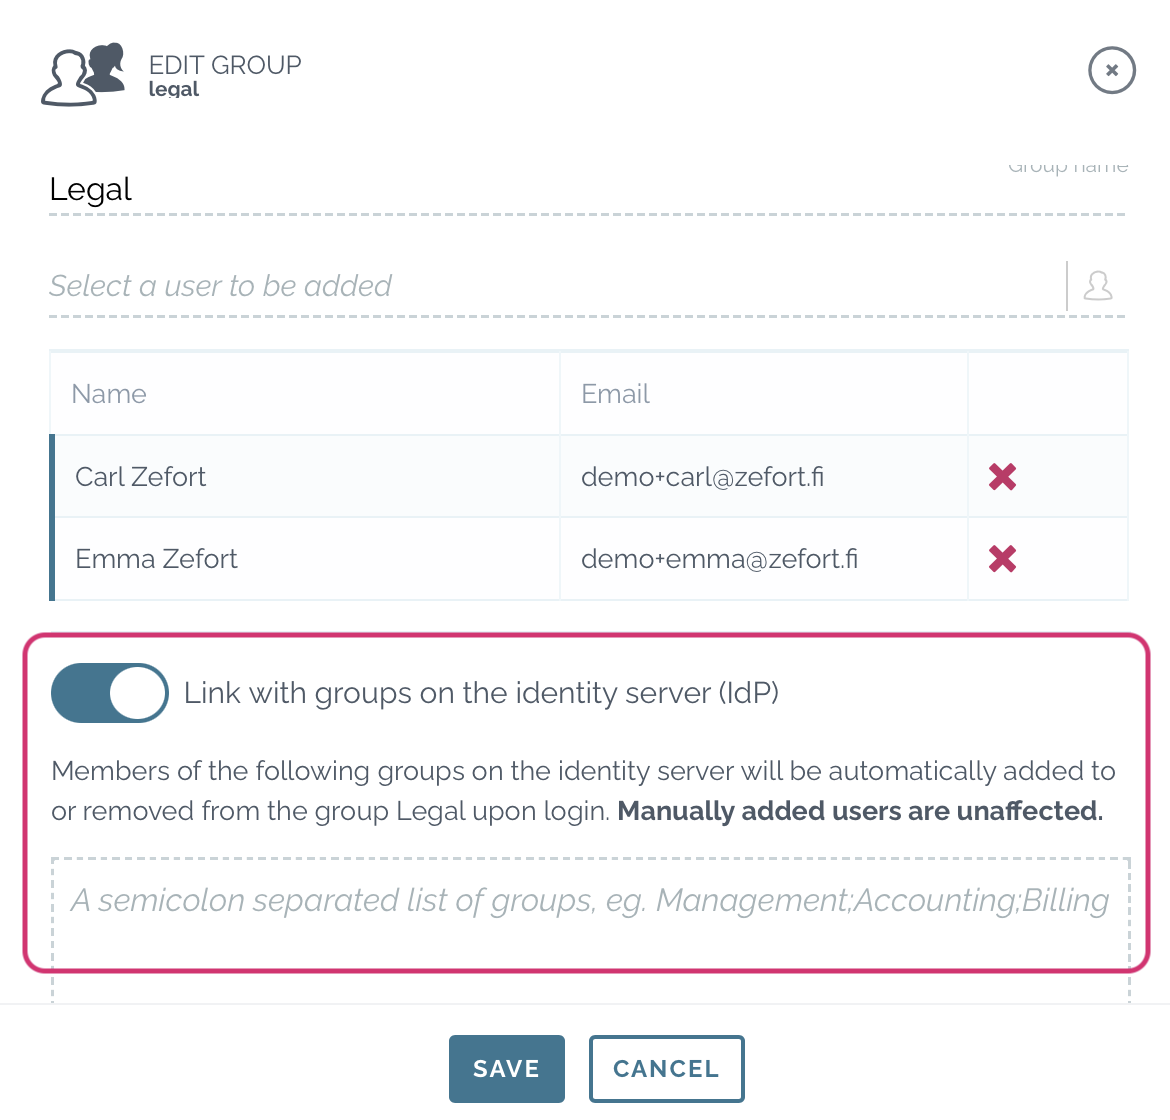
Linking AD group with Zefort user group
- In Zefort, go to User management and open Groups tab.
(this requires admin license with permission “Can manage users and groups“) - Open the group which you want to link with AD group
- Switch on option “Link with groups on the identity server (IdP)”
- Type the name of AD group in the box, use semicolon to separate multiple groups
- Save
Renewing certificates
If you’ve configured Zefort using the XML metadata URL, Zefort will automatically fetch the metadata file from the IdP once a week. Any new certificates included in the metadata will be trusted automatically. To update SAML certificates:
-
Add the new certificate to the enterprise app several weeks before the old one expires.
-
Keep the old certificate active, so both certificates are valid at the same time.
-
Wait at least one week to allow Zefort to fetch and trust the new certificate(s).
-
After the old certificate expires, it can be safely removed.
This process can be fully automated to avoid manual certificate renewal steps.