Configure user and group provisioning with SCIM and Azure AD
Zefort supports SCIM user and group provisioning with Azure AD (and various other SCIM providers).
With these instructions, you can set up SCIM, where users and groups from Azure AD are automatically provisioned to Zefort.
How is SCIM different from SAML?
SAML is mainly used for Single-Sign-On (SSO), while SCIM is only used for user and group provisioning. SAML does provision users in Zefort as they are logged in; this is sometimes called Just-in-Time (JIT) provisioning. With SCIM, users are created almost immediately as they are created by Azure AD, keeping your systems in sync without users needing to log in. SCIM also supports creating groups, which Zeforts SAML integration does not.
Prerequisites
You need:
- To create the integration in Zefort, you need a user with an administrator license and the “Can manager account settings” permission. Also recommended is the “Can manager users and groups” permission to verify the user list.
- To create this app, you need admin rights in your Azure AD; you need one of the following roles Application Administrator, Cloud Application Administrator, or Global Administrator.
Sidenote: as a best practice, organisations using Zefort often reserve some administrator user accounts for IT personnel, who only have access to configure account settings (and possibly manage user accounts), but no access to actual contracts or other content.
Overview
The steps to configure SCIM integration with Azure AD are:
- Create a SCIM integration in Zefort
- Create an Enterprise application in Azure
- Set up provisioning with tenant URL https://my.zefort.com/scim/v2 and token from the Zefort integration page
- Set up User and Group mapping to match what Zefort supports
- Enable provisioning
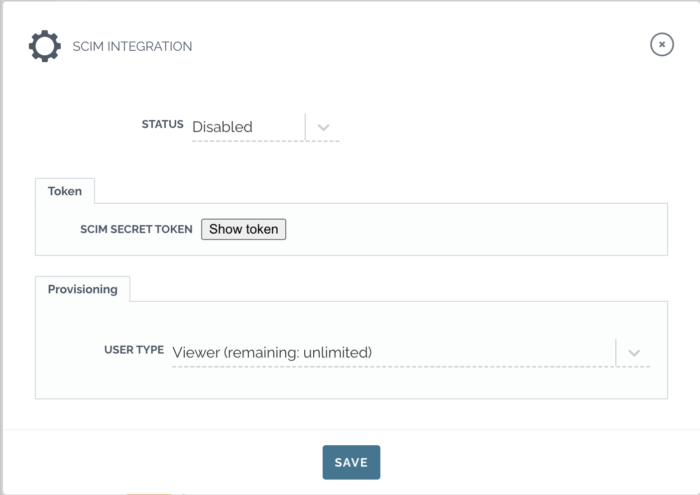
1. Create a SCIM integration in Zefort
In this step, you create a new SCIM integration object in Zefort.
Sign in to Zefort with your administrator account, and browse to Account settings → Integrations.
Select “Connect” or “Connect another” for SCIM.

Select which user type all new users should have under the “Provisioning” section.
Click “Show token”and take note of it, we are going to use it when settings up things in the Azure side.
After that, change the status to “Active” and press the “Save” button.
2. Create an Enterprise application in Azure
In this step, you create an application in your Azure AD tenant configuration to be used for provisioning users and groups.
Microsoft’s instructions guide you through the creation, but in short, do the following:
- Log in to the Azure Active Directory portal.
- Go to Manage > Enterprise Applications in the left pane, and click + New application to create a new enterprise application.
- Click + Create your own application.
- Enter a name and select Integrate any other application you don’t find in the gallery (Non-gallery)
You can use this image as a logo:
![]()
Zefort-logo-215.png
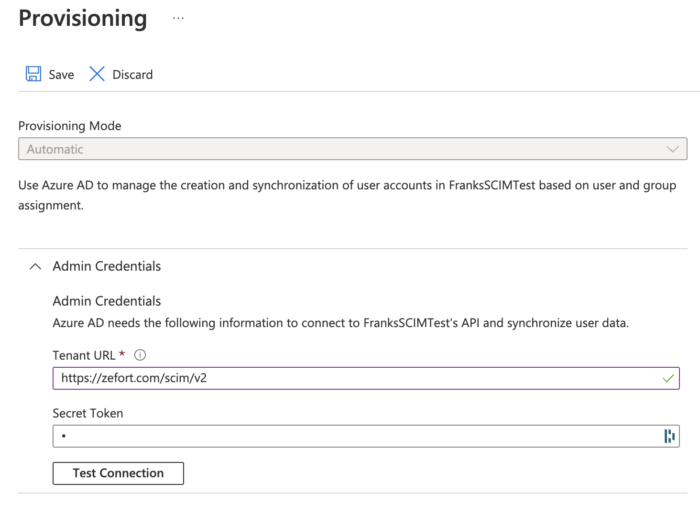
3. Set up provisioning
- Go to the app’s Provisioning section.
- Click Get Started.
- In the provisioning properties, set the following:
- Provisioning Mode: Set to Automatic.
- Open the Admin Credentials section and set the Tenant URL to:
https://my.zefort.com/scim/v2 - Secret Token: Enter the token that we got from the SCIM integration in Zefort
- Click Test Connection to test whether the new app can connect to your SCIM API. If there are errors, ensure your tenant URL and secret token are correct and that the integration status is set to “Active” and try again.
- Click Save
4. Set up User and Group mapping
Zefort only needs part of the fields that Azure AD can provision; for that reason, we need to configure the user and group mapping to match what Zefort supports.
Attribute mapping can be set by going to the Provisioning page and then clicking Edit attribute mapping. Then open the Mappings section.
We will configure Users and Groups separately. Remember to press Save after making the changes.
(Note that depending on your Azure setup, Users and Groups might be called “Microsoft Entra ID Users” and ” Microsoft Entra ID Groups”)
User Mapping
|
Azure Attribute / MS Entrada ID Attribute |
SCIM Attribute / customappsso |
Required |
|
userPrincipalName |
userName |
Yes |
|
Switch([IsSoftDeleted], , “False”, “True”, “True”, “False”) |
active |
Yes |
|
displayName |
displayName |
Yes |
|
mailNickname |
externalId |
Yes |
|
preferredLanguage |
preferredLanguage |
No |
Note regarding preferredLanguage
Zefort internally only supports shorthand language names such as sv. For SCIM we support longer names such as sv-fias well, but still store sv internally. This means that your iDP will find a mismatch if you use the longer syntax when provisioning and try to update this value. This will work but it will do an extra unnessecary PATCHrequest to our servers. For that reason, if you are using the longer language syntax, we kindly ask you to use an expressionattribute for the preferredLanguage and set it to Mid([preferredLanguage], 1, 2), this will limit the value sent to just two characters. This is a limitation that might dissapear in the future.
Zefort does not currently support multiple languages in the preferredLanguageparameter, i.e en-us,sv-fi will currently not work. This is however something that will supported at a later date. If you want to work around this, please use the same expression as mentioned above, which will only send the first language in the list.
Group Mapping
|
Azure Attribute/ MS Entrada ID Attribute |
SCIM Attribute / customappsso |
Required |
|
displayName |
displayName |
Yes |
|
objectId |
externalId |
Yes |
|
members |
members |
Yes |
Enable provisioning
Before enabling provisioning it is important to understand that SCIM becomes the master data of some of the users attributes after provisioning starts.
While you can still change things such as the user’s language and name in the UI of Zefort, SCIM will overwrite these values as soon as runs its provisioning again.
Automatic provisioning
If you want to provision all users and groups automatically as they come in, do the following. On the Provisioning page, click the Start provisioning to start syncing users and groups.
On-demand provisioning
If you only want to provision certain users and groups, want to handle the provisioning manually, or want to test out the integration with just a single user or group, then go to the Provisioning page, and click Provision on demand.
Managing user licenses via SCIM
With Zefort SCIM integration admins can maintain Zefort users and user groups in the identity provider. Read more here.
Deleting a user
When you want to delete a user, you first need to remove the user from the IdP. This will change the status of user as pending deletion. Next you will delete the user profile in Zefort and select who will inherit the contracts, binders etc. of the deleted user.