Search Automations
Automating contract tasks with search automations
Search automations act like a digital assistant for your contract workspace. You can create simple rules to automate routine actions – like organizing contracts, changing contract statuses, and sending notifications – without manual effort.
This feature works best for screening new contracts and applying one-time changes. Note that it is not designed to monitor or respond to continuous changes in contract metadata.
For example, you can set up automations for:
- Notifying a team member or contract’s owner if a contract’s status is still “Not Reviewed” or it is missing a binder.
- Changing the contract owner automatically when the contract has been reviewed.
- Adding a contract to a specific binder when a certain company is listed as a party.
- Archiving contracts with end date in the past.
- Deleting contracts with a termination date older than ten years.
Before you begin: a quick note on permissions
Required permissions
To keep your contract data safe while giving you powerful tools, access to automations is based on user permissions. While all users can create notifications, only admins can set up automations that change contract metadata.
- Admin with permission “can manage all contracts and binders“: You can create, edit, and manage automations that modify contract data – like adding binders or changing contract owners.
- Other users: You can create search automations to send notifications to yourself, contract owner or some other user.
Limitations
Once you have turned on an automation, the system starts to look for contracts that match your criteria. As soon as a contract matches, the automation performs the assigned action.
Important: Automations do not monitor contracts for ongoing changes after the initial match. So, if you or your team members modify the metadata of that contract later, the automation will not run again for the same contract. This prevents duplicate actions and keeps your inbox clear of repeated alerts.
If you need regular, ongoing alerts for a single contract, use recurring activities instead of search automations. While search automation is a one-time trigger for new matches, a recurring activity will remind you about the same contract at any interval you choose, regardless of metadata updates. To set recurring activities, see these step-by-step instructions.
Keep rules simple to avoid conflicts
While you can build highly complex automations, keeping your rules simple makes them much easier to manage.
If you set up multiple automations, you can accidentally create conflicting rules. These conflicts lead to unexpected results – like one rule setting a contract status to “reviewed” while another sets it to “not reviewed”.
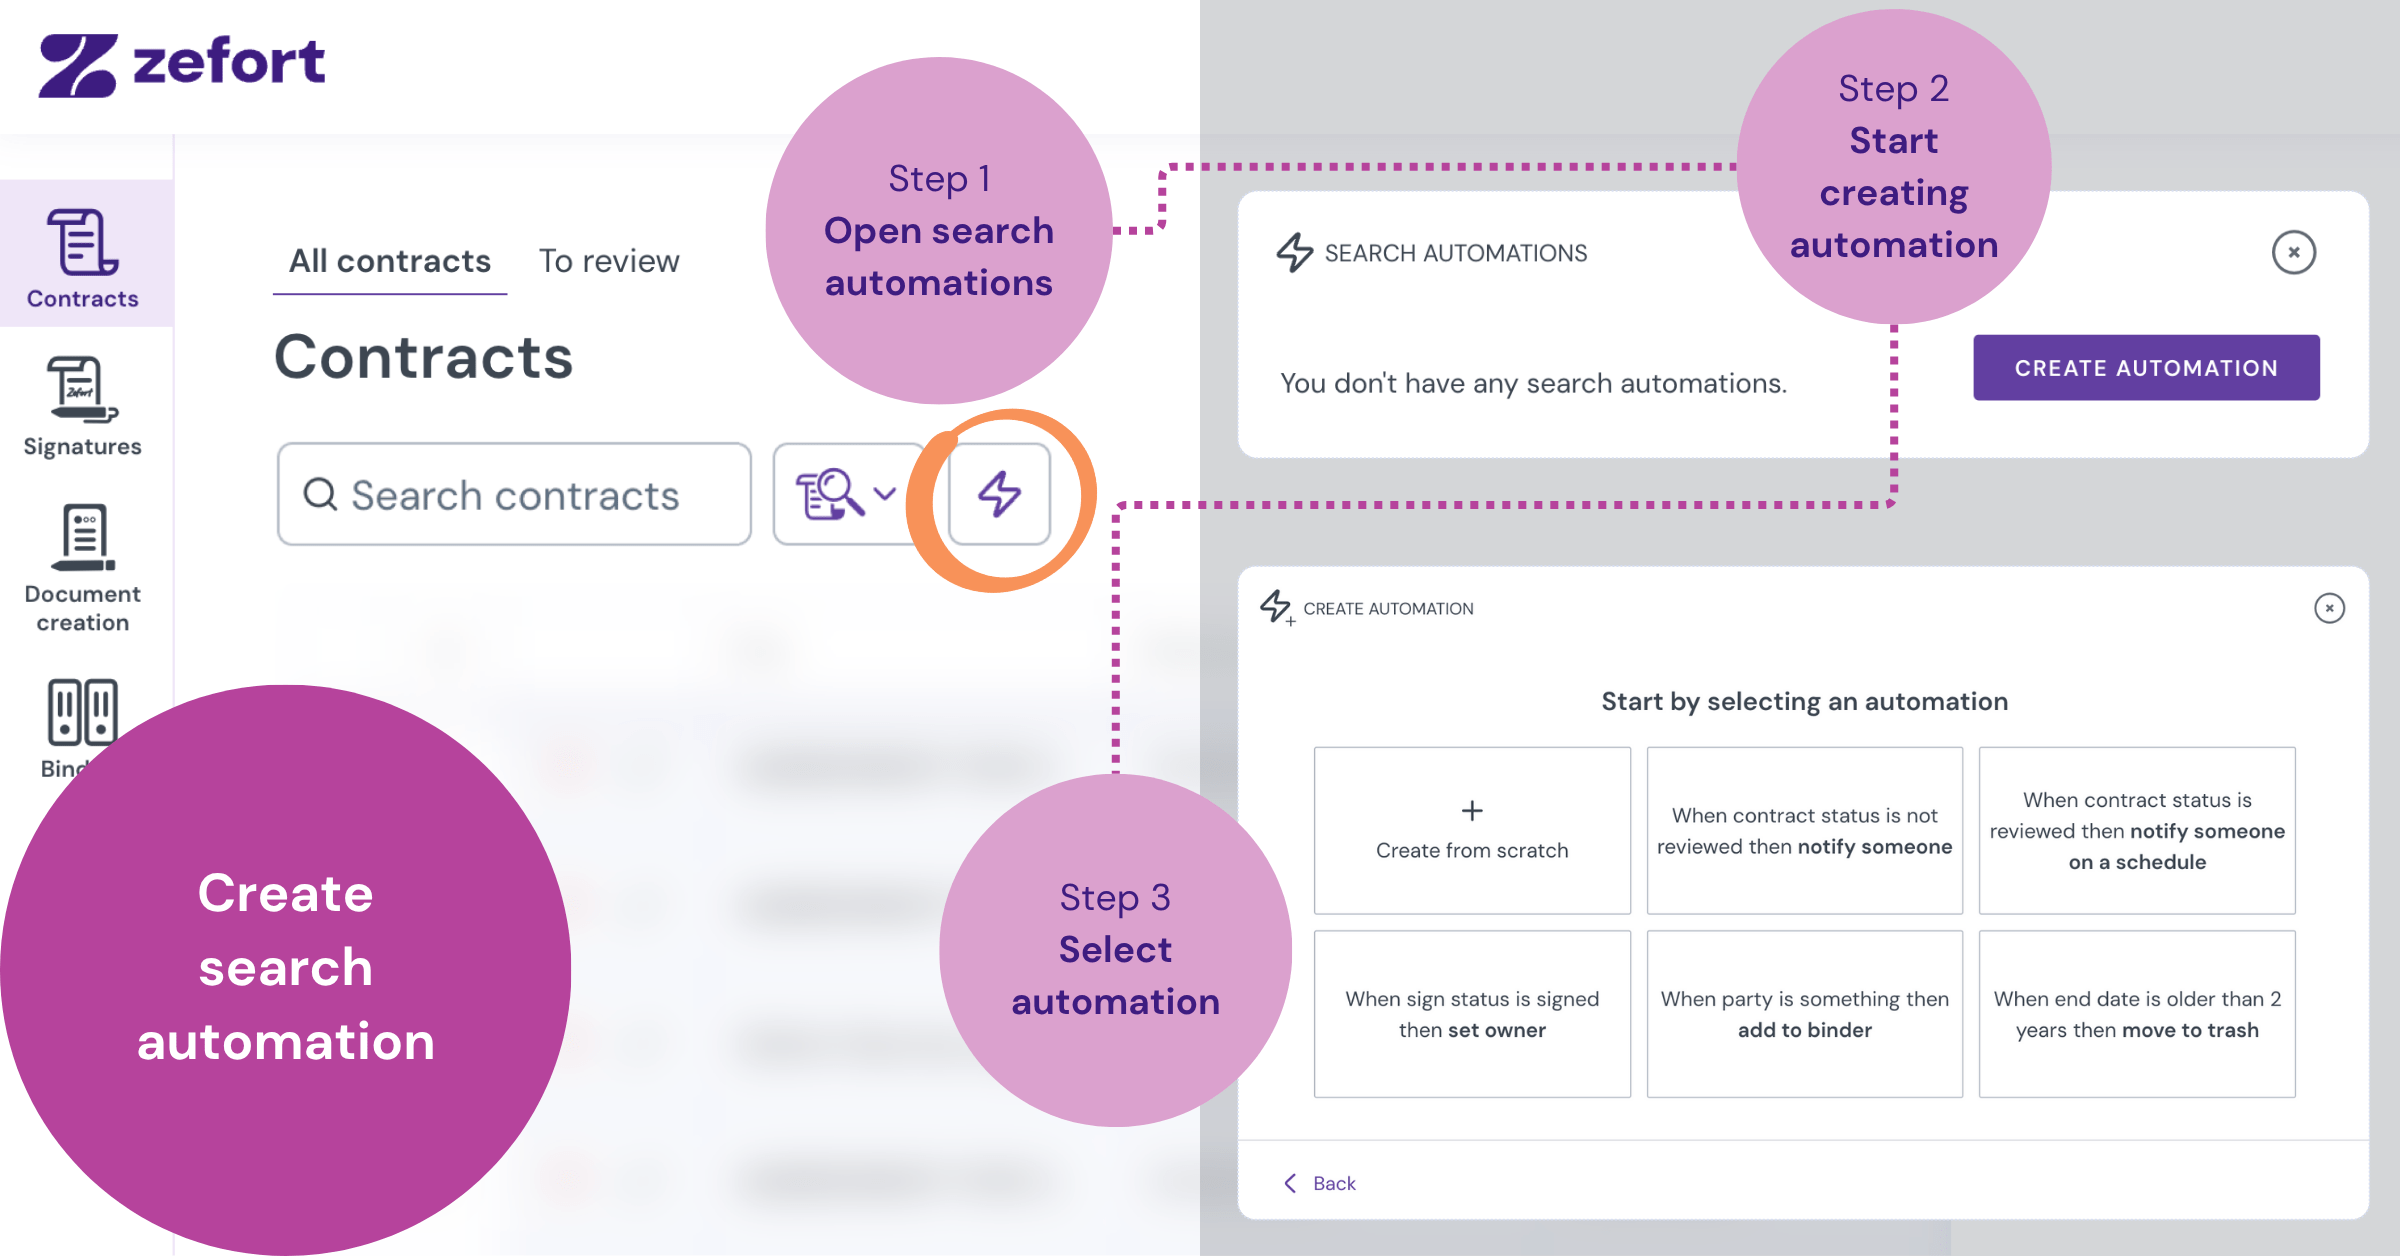
How to create a new search automation
-

On the contracts desktop, click the search automations button (with the lightning icon ⚡️), located right next to the search bar.
- Click the Create automation button.
- Choose your starting point. You can either create an automation from scratch or select a pre-built template to get a head start.
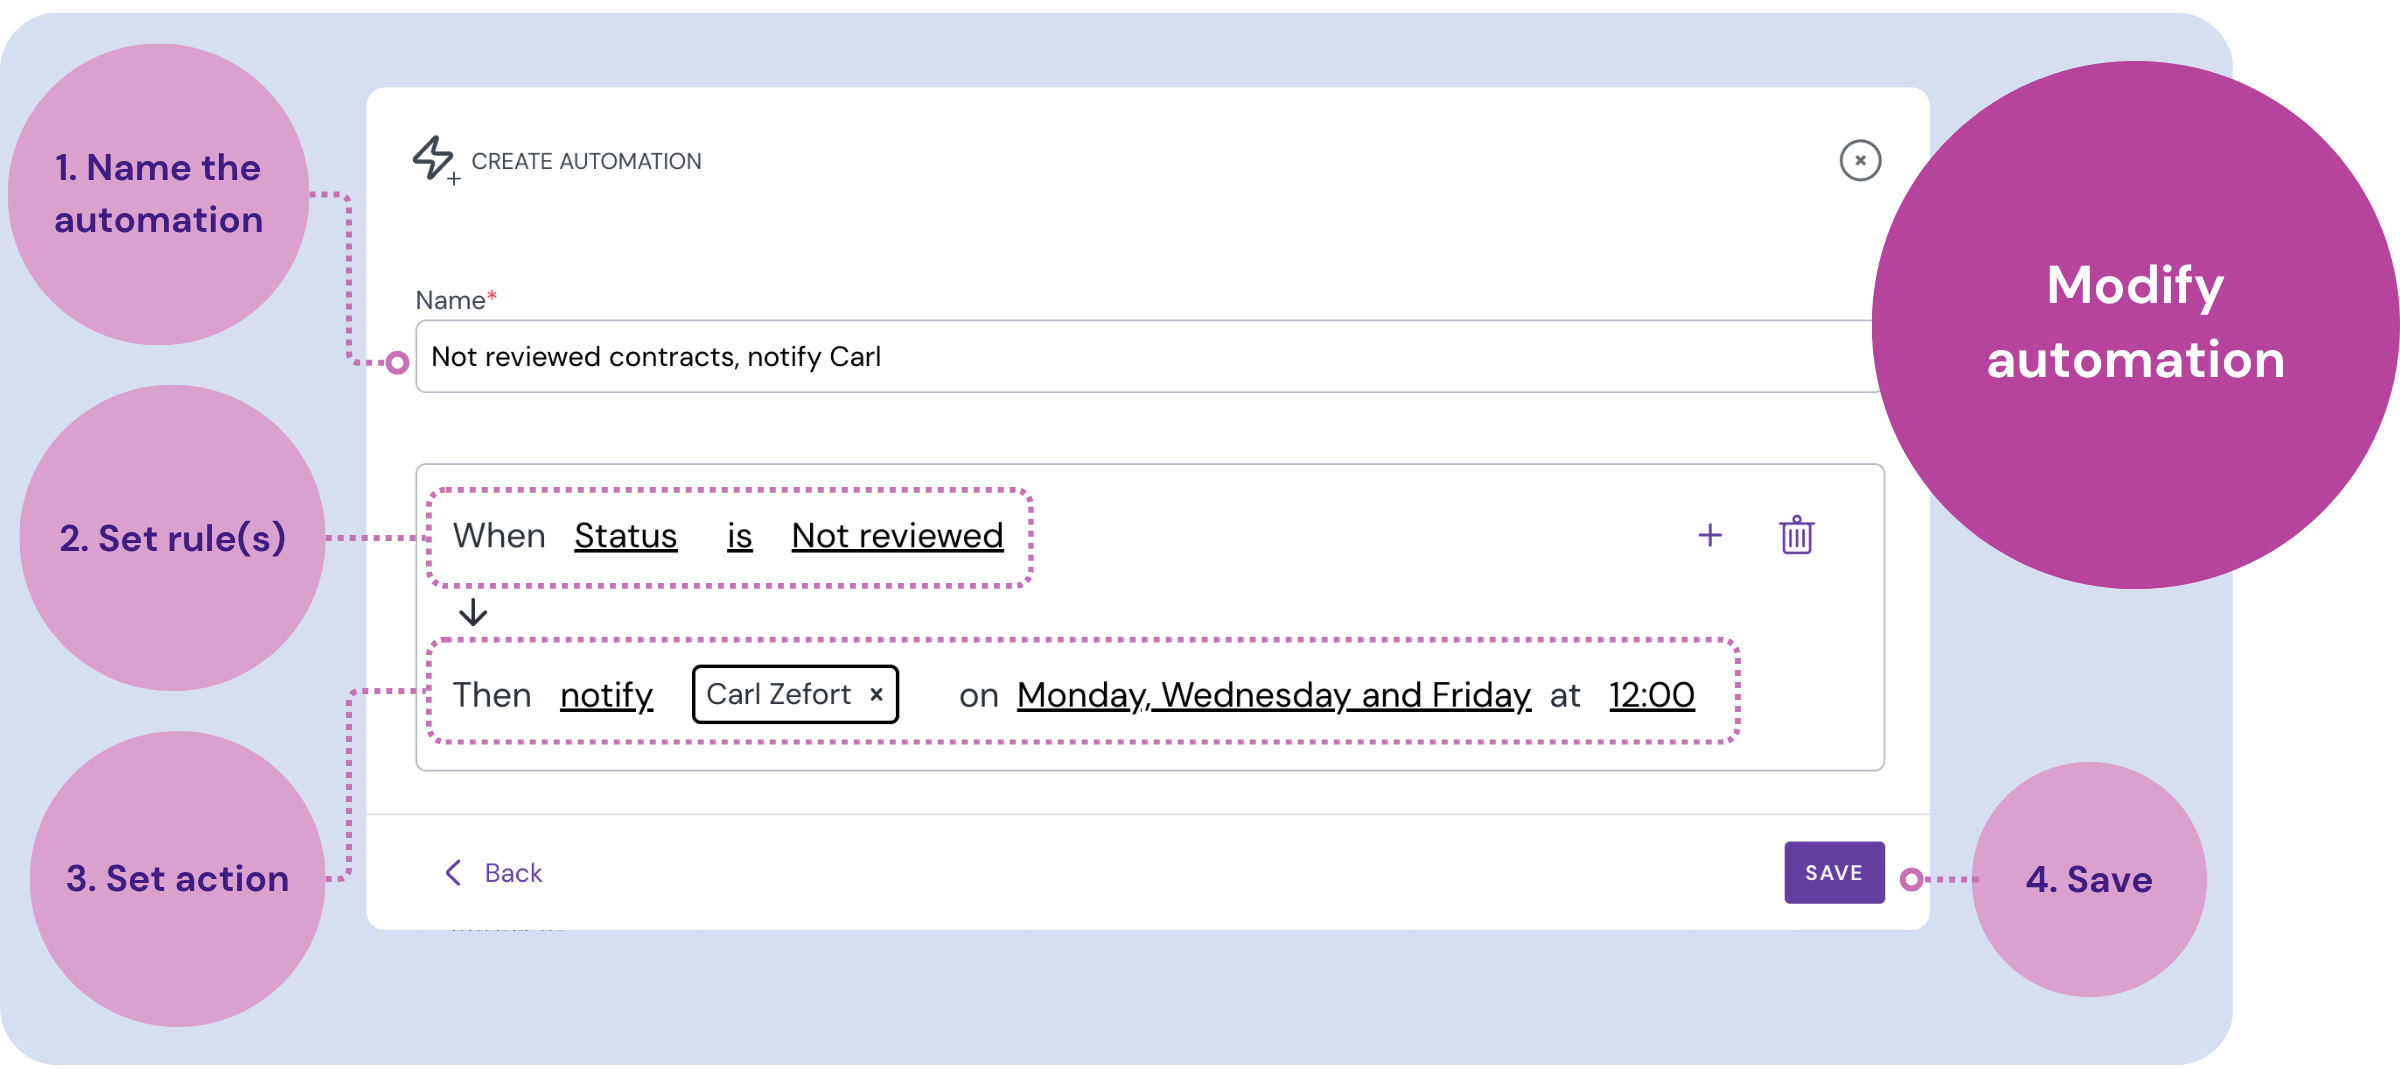
- Give your automation a clear name, like “Add NDA’s in binder ‘NDAs’”
- Set the rules for your automation. This works on a simple “if this, then that” logic.
- Conditions are the “if.” These are the triggers, and you can add multiple conditions by clicking the + button.
- For example:
If contract type is "NDA"
- For example:
- Action is the “then.” This is what Zefort will do for you. You can add multiple actions by clicking the + button.
- For example:
Then add contract to binder "NDAs"
- For example:
- Conditions are the “if.” These are the triggers, and you can add multiple conditions by clicking the + button.
- Click Save
You’ve now created the automation, next step is to activate it.
How to activate your automation
Note that your new automation is turned off by default. An automation can change data for many contracts at once, so it’s a good idea to double-check your conditions before activating it.
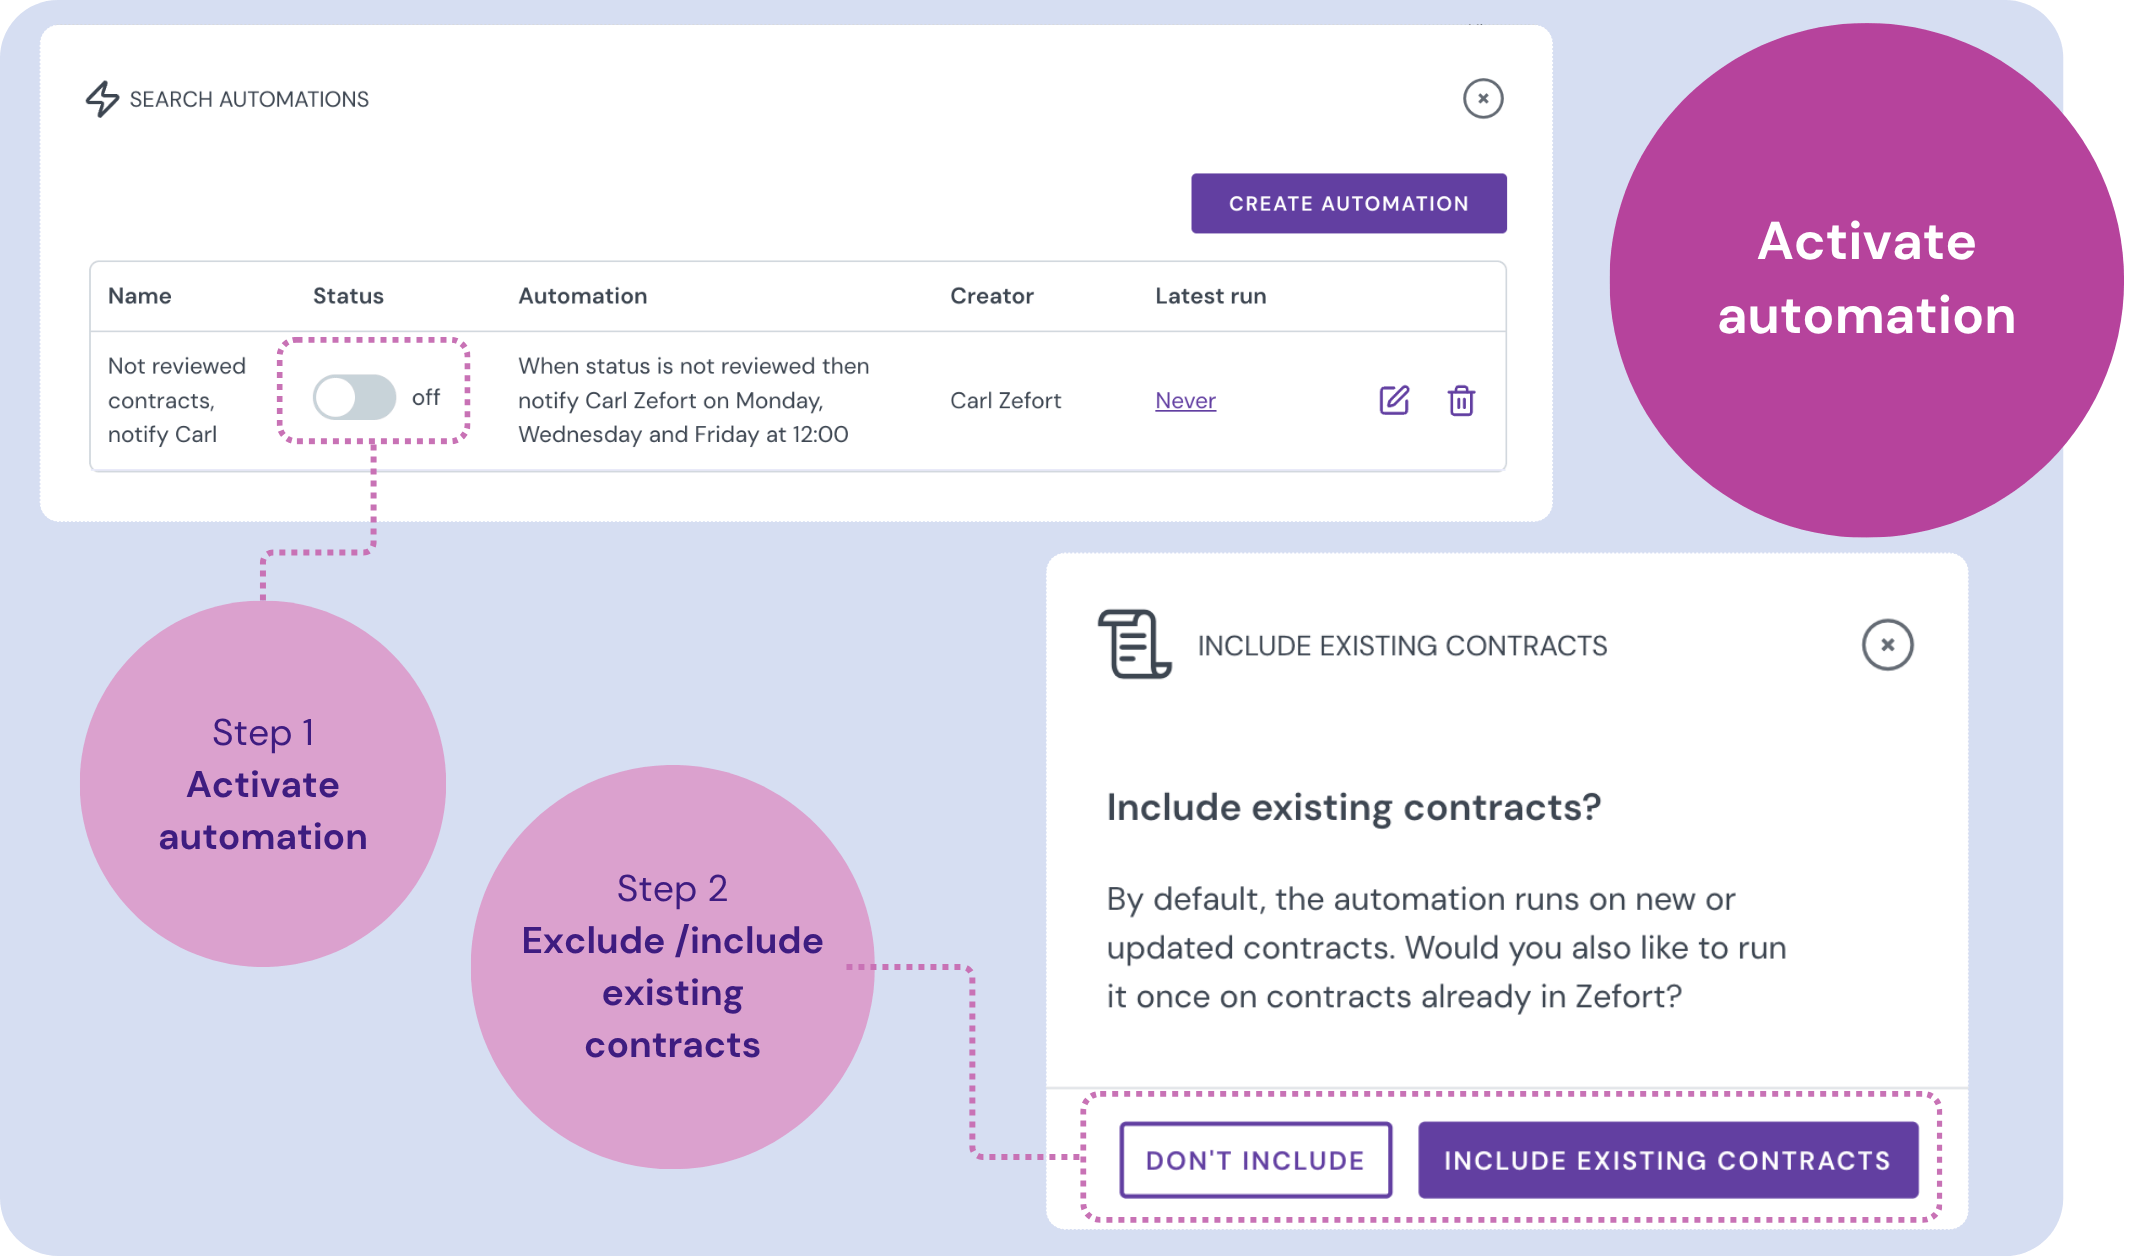
- Find your automation in the list and click the status toggle to turn it on.
- Choose how you want to apply it:
- Run for new contracts: The automation will apply to new contracts that match your criteria after you turn it on.
- Run for all existing and new contracts: The automation scans your current contracts immediately, performs the action once for any matches, and then monitors all future contracts.
Automations run about every five minutes, so you’ll see the changes appear shortly.
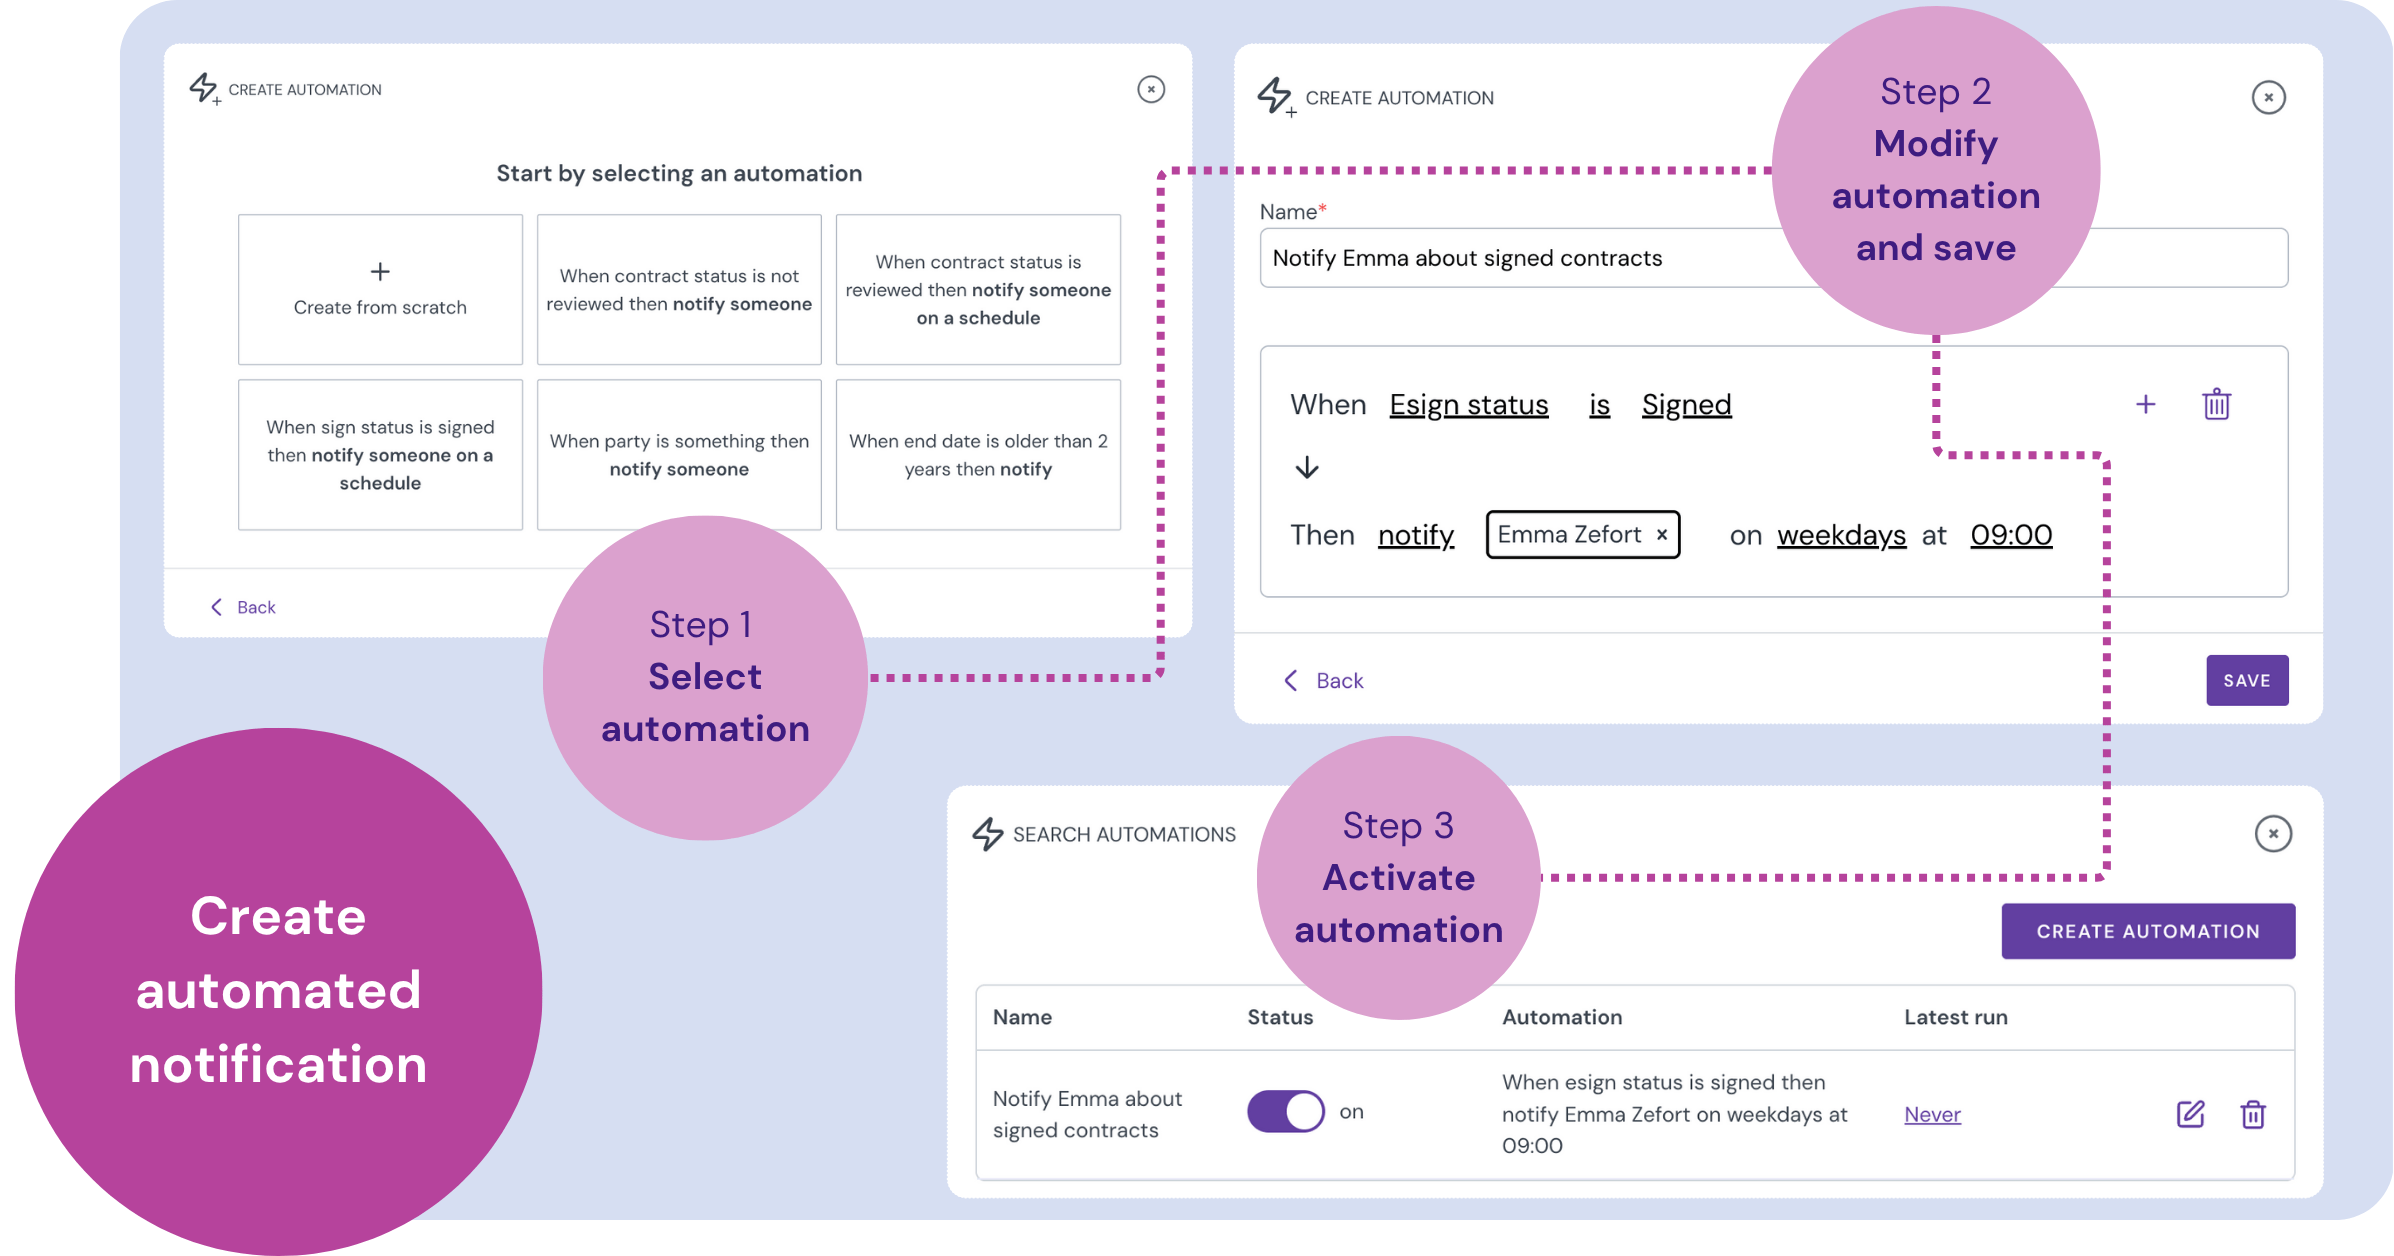
Creating search notifications
You can create automations to send you notifications for contracts that match specific rules, like an upcoming deadline or a change in status.
-
On the contracts desktop, click the search automations button, located right next to the search bar.
- Click the CREATE AUTOMATION button.
- You can now set up your notification. Choose your starting point:
- Create from scratch: Build your own rule from the ground up.
- Start from a template: You can use a pre-built template.
- Set the rules for your automation. This works on a simple “if this, then that” logic.
- Conditions are the “if.” These are the triggers, like If contract status is “Not Reviewed”.
- Action is the “then.” This will be to notify a specific user(s) or contract owner. You can select to notify user immediately or on schedule.
- Give your automation a clear name and click Save.
Your automation is now created and ready to be activated from the main list.
Keep in mind that any user you set as a notification receiver can easily stop receiving those notifications at any time if they are no longer needed.
How to manage and monitor your automations
What you see on this page depends on your user permissions:
- Admins (with “can manage all contracts and binders” permission): You can see all automations that change contract data across the account. For search notifications, you only see the ones assigned to you.
- Other users: You can see the search notifications you created yourself and any notifications you are set to receive.
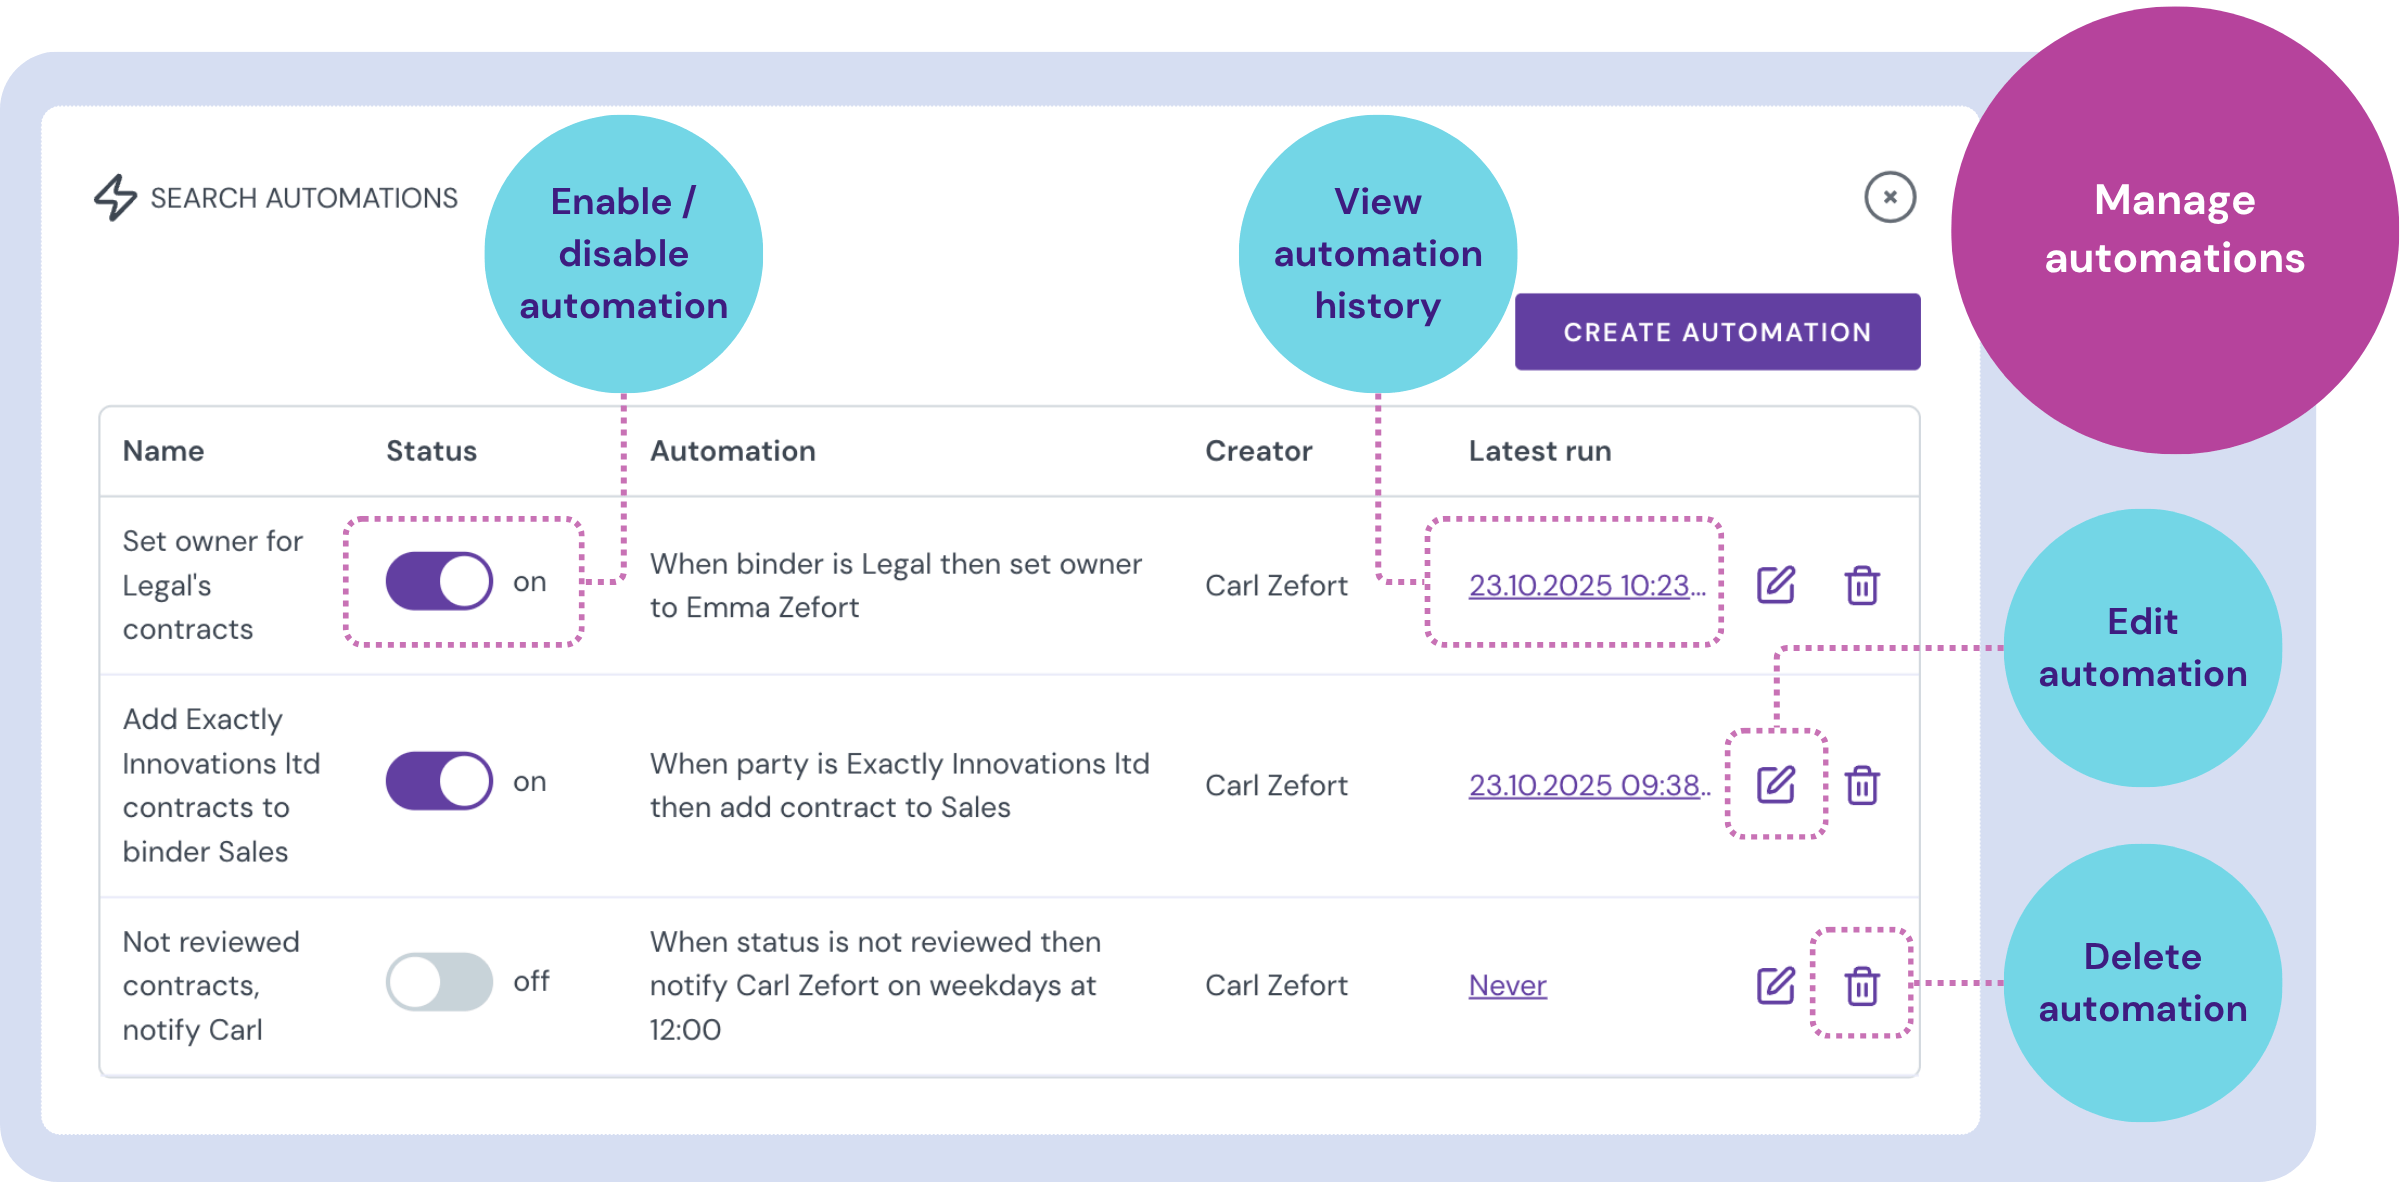
To see what your automations are doing, click the search automations button on the contracts desktop. In the list you’ll find a list with each automation’s name, its status (on/off), and when it last ran.
From this view, you can also:
- Enable or disable an automation with the status toggle.
- Edit an automation to adjust its conditions or actions.
- Delete an automation you no longer need.
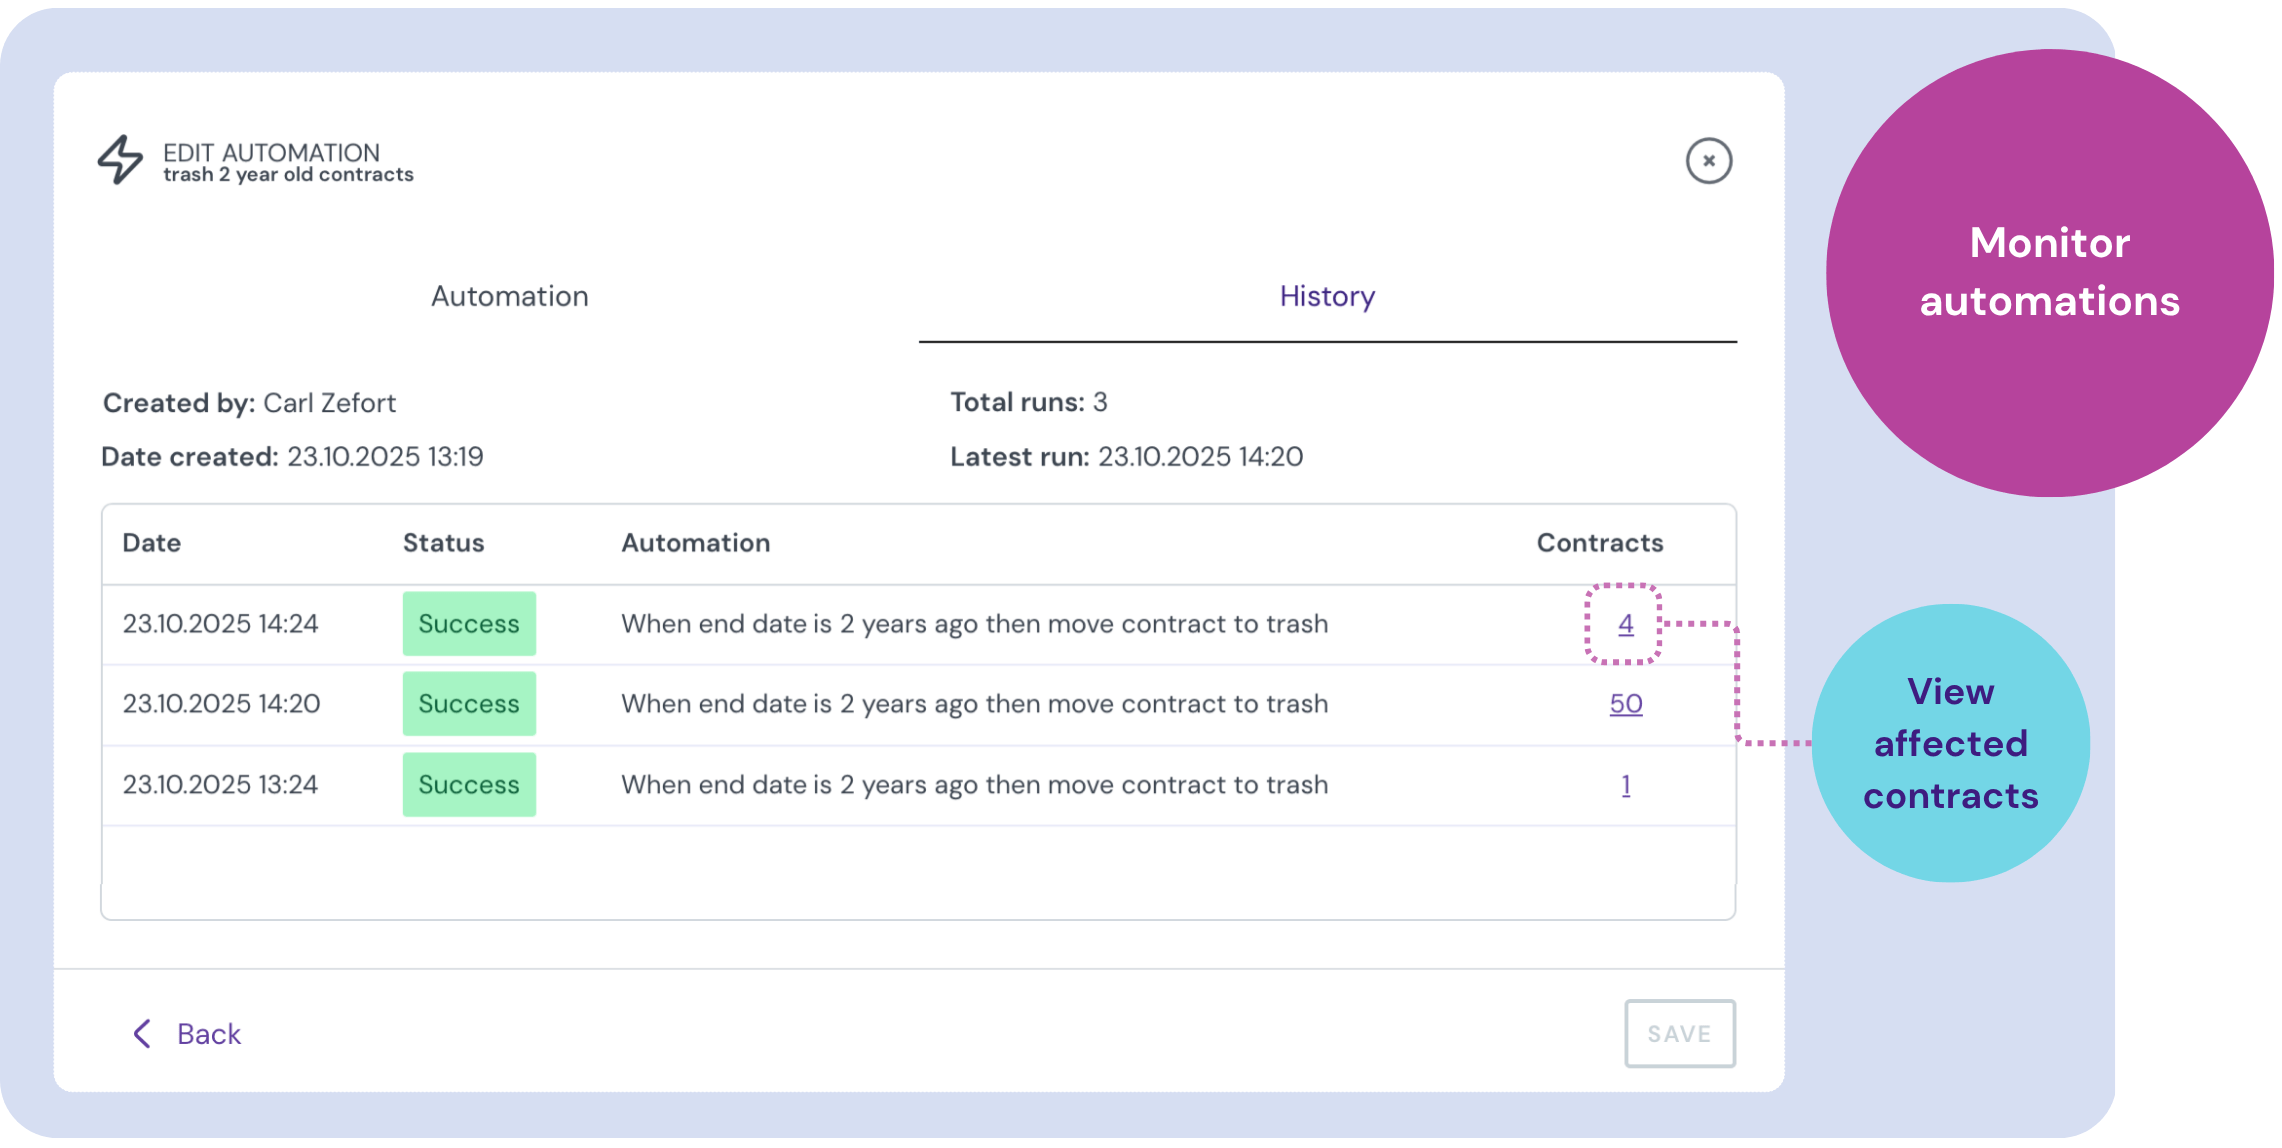
- View the history by clicking on an automation. This shows you exactly what changes were made and gives you links to the contracts that were affected.
- Stop receiving automated notifications.
How to stop receiving automated notifications
If you are set as a receiver for an automated notification, you can easily stop those notifications at any time.
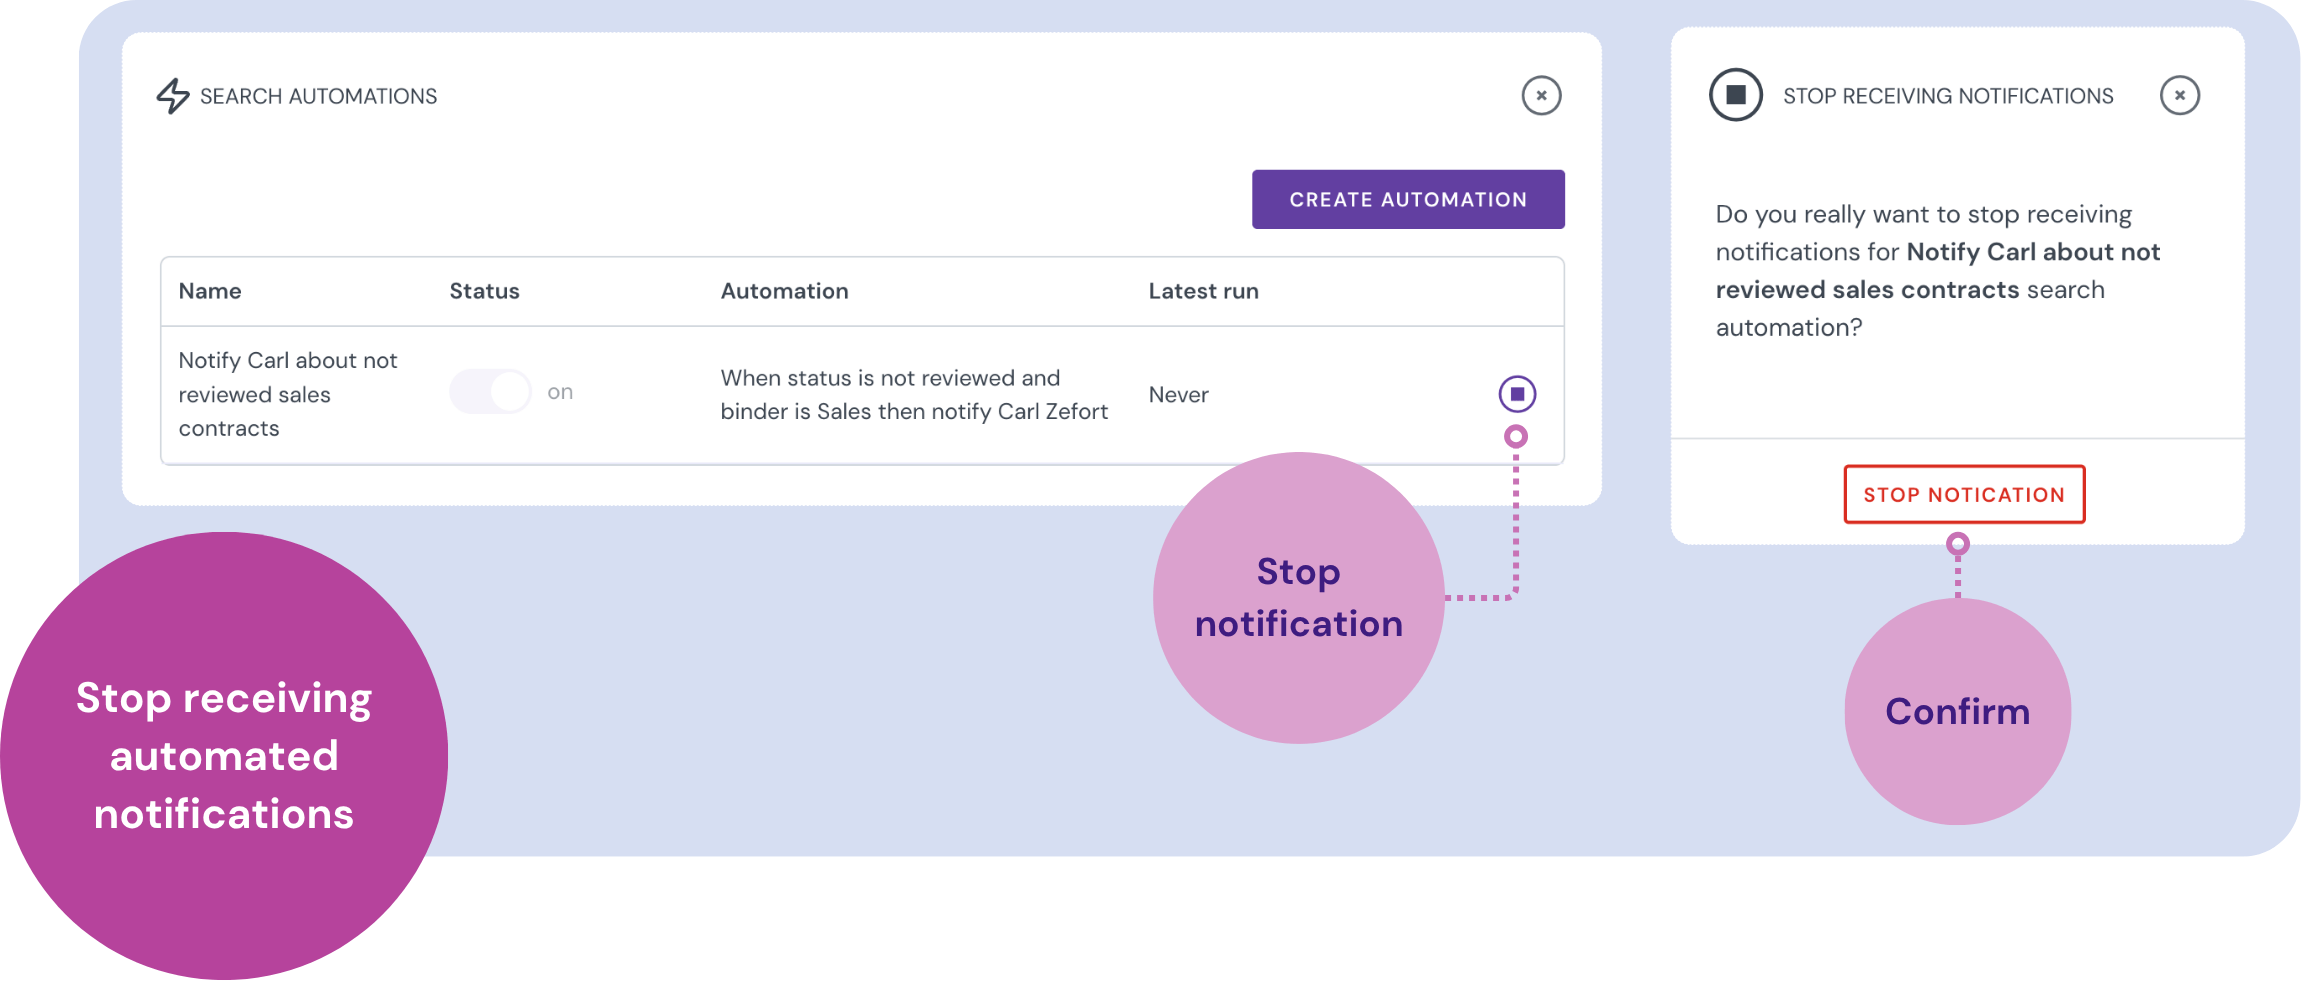
- On the contracts desktop, click the search automations button
- Find the automation you want to stop and click the pause button
- Confirm your choice by clicking the Stop notification button.
You will no longer receive notifications from this automation, and it will be removed from your personal automations list. The automation itself is not deleted, and any other people set to be notified will continue to receive their notifications.