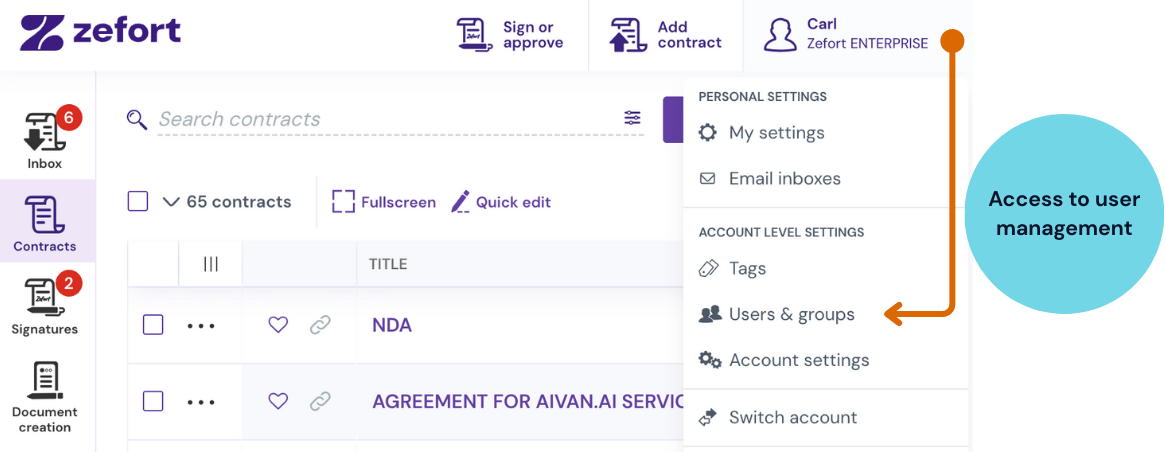
User management (admin)
As an administrator with the “Can manage users and groups” permission, you can add, edit, inactivate and delete users in Zefort.
On this page:
- Adding new users
- Creating users manually (login with password)
- Creating API users (login with API key)
- Importing users from IdP (login with SSO)
- User licenses and permissions
- Editing users
- Inactivating vs. deleting users
- Viewing and editing a user’s binder permissions
- Searching users
- Downloading binder access report
- Creating and editing user groups
- Default settings for new users
Adding new users
There are three different ways to create users in Zefort:
Creating users manually (login with password)
To manually add a user:
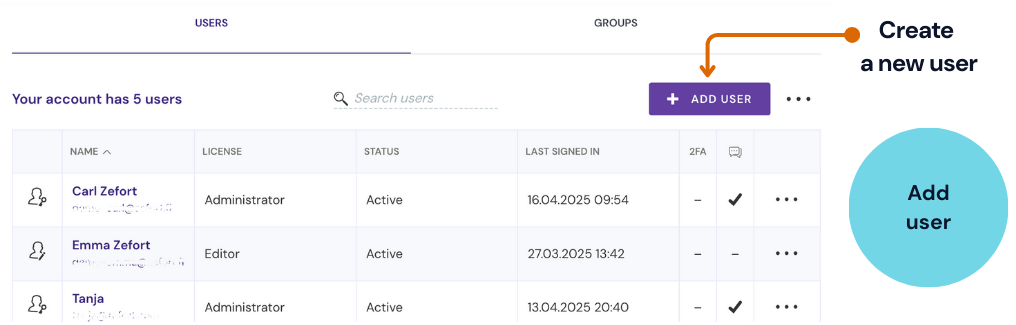
- Click + Add user
- Fill in user details:
- Name
- Email address
- Phone number (optional)
- User interface language
- Default search (optional)
- Select license level: Signer, Viewer, Editor or Admin
- Set permissions:
- Can start a signature process
- Can mass download contracts and metadata report
- Can use AI Chat
- Can add contracts
- Can create tags
- Can manage binders
- Can manage parties
- Can manage forms
- Can perform bulk operations
- Can manage users and groups
- Can manage account settings and tags
- Can manage custom metadata
- Can manage all contracts and binders
- Click add user

The user will receive an email with an activation link to create their account and set a password.
If the activation link expires, administrators can resend it.
Creating API users (login with API key)
If you’re using Zefort via API:
- Follow the same steps as for manual user creation.
- Leave the email field empty.
Then, create an API key:
- Go to Account settings > API keys
- Click + create API key
- Name the key and select the Zefort user
- Copy and store the secret key securely (it won’t be visible again)
(note: you won’t see the secret key once you have closed the window)
Read more in our article on API connections.
Importing users from IdP (login with SSO)
If you use Single Sign-On (SSO) and want to sync users from your organization’s IdP (e.g., Entra Id), check out these guides:
- Setting up single sign-on (SSO) with OpenID Connect (OIDC)
- Configure single sign-on (SSO) with Azure AD
- Configure user and group provisioning with SCIM and Azure AD
- Managing user licenses via SCIM
User licenses and permissions
In the below table you can check which permissions can be granted to which license.
| Permission | LICENSE | |||
| ADMIN | EDITOR | VIEWER | SIGNER | |
| Can start a signature process (1 | x | x | x | x |
| Can add contracts (1 | x | x | x | x |
| Can mass download contracts and metadata report | x | x | x | |
| Can use AI chat (2 | x | x | x | |
| Can create tags | x | x | ||
| Can manage binders | x | x | ||
| Can manage forms | x | x | ||
| Can manage templates (2 | x | x | ||
| Can manage parties | x | x | ||
| Can perform bulk operations | x | x | ||
| Can manage users and groups | x | |||
| Can manage account settings and tags | x | |||
| Can manage custom metadata | x | |||
| Can manage all contracts and binders | x | |||
| Notes
1) Permission “can add contracts” is included in permission “can start a signature process” |
||||
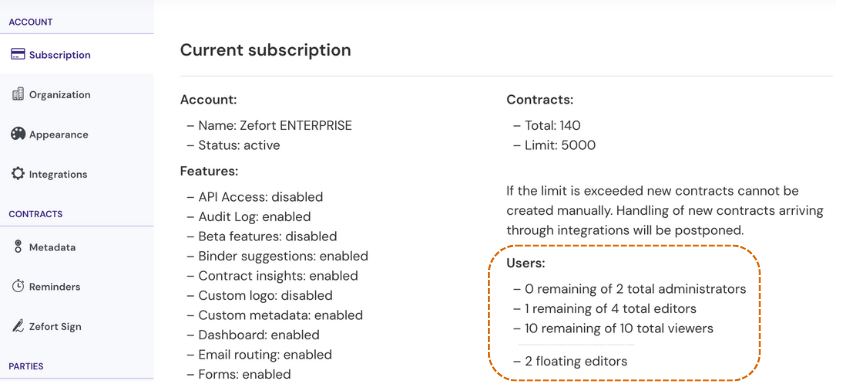
Viewing account licenses
In the account settings you can:
-
Review your subscription details
-
Check the number of total and available user licenses
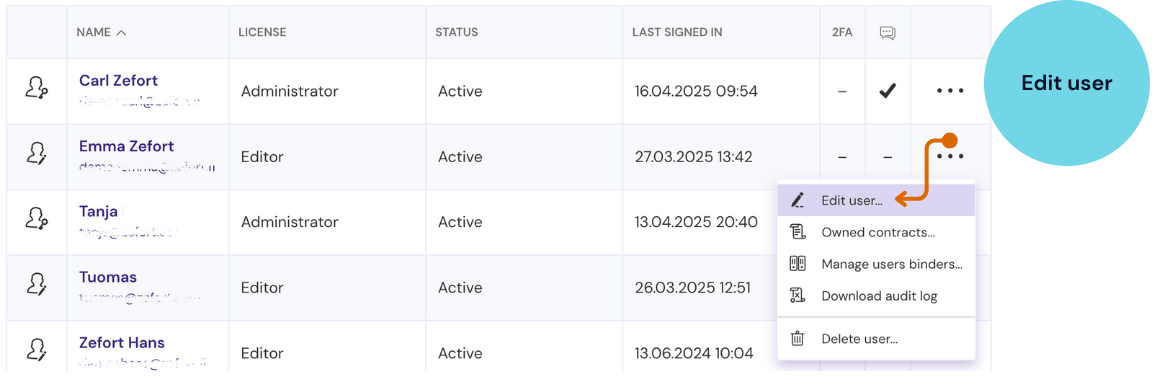
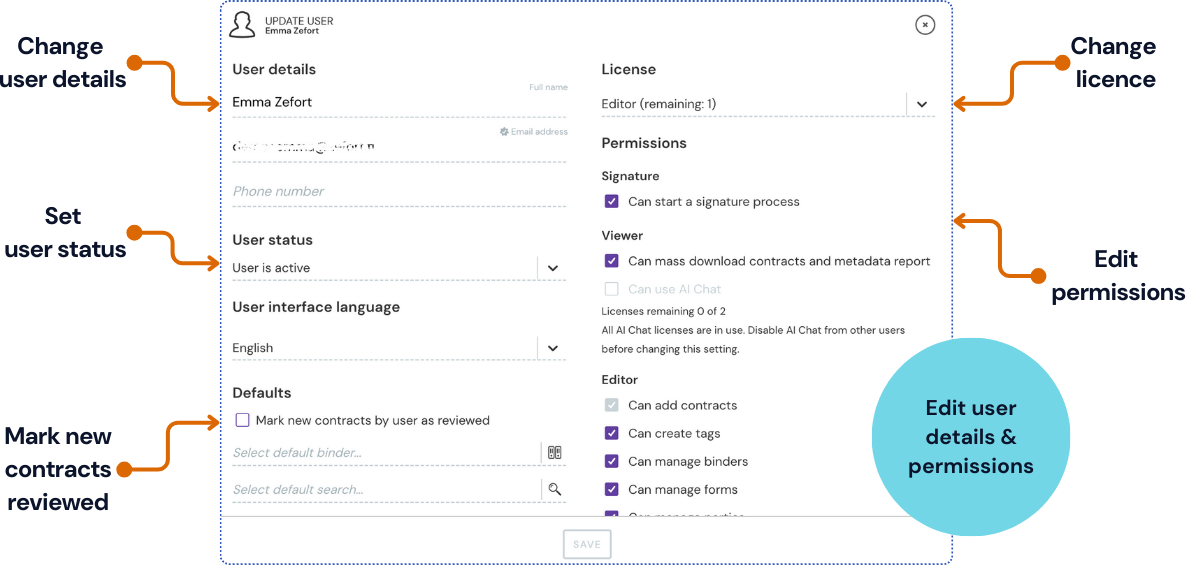
Editing users
To edit an existing user:
- Click the menu ••• > Edit user…
- Or click on the user to open the profile
You can:
- Update user details (e.g. change user’s email address)
- Set user status (active / inactive)
- Set UI language
- Mark new contracts by user as reviewed (note: the document will skip inbox)
- Choose default search and default binder
- Edit licence and permissions
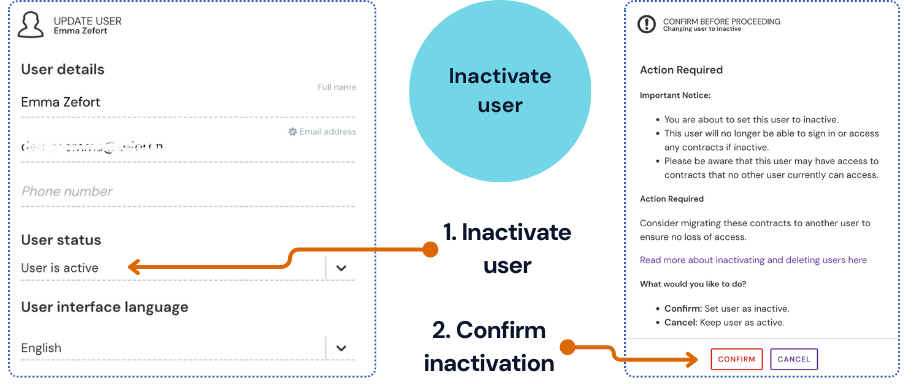
Inactivating vs. deleting users
| Feature / Impact | Inactivate User | Delete User |
| User data | Name, email, and details are retained | All user data is permanently deleted |
| Contract ownership | Stays unchanged * | Contracts are reassigned to a new owner |
| Reactivation possible | Yes – user can be reactivated anytime | No – user would need to be re-created |
| Data retention considerations | Personal data is retained; may need to be deleted later due to legal requirements | Personal data is removed immediately |
| * Note: While inactive users cannot access the system, they may still own contracts or be recipients of reminders. If needed, contract ownership can be changed using bulk actions (permission “can manage all contracts and binders” is required). | ||
To inactivate a user:
- Open user profile
- Select User is inactive in the dropdown
- Click Confirm to proceed
- Once you’ve made your changes, click save
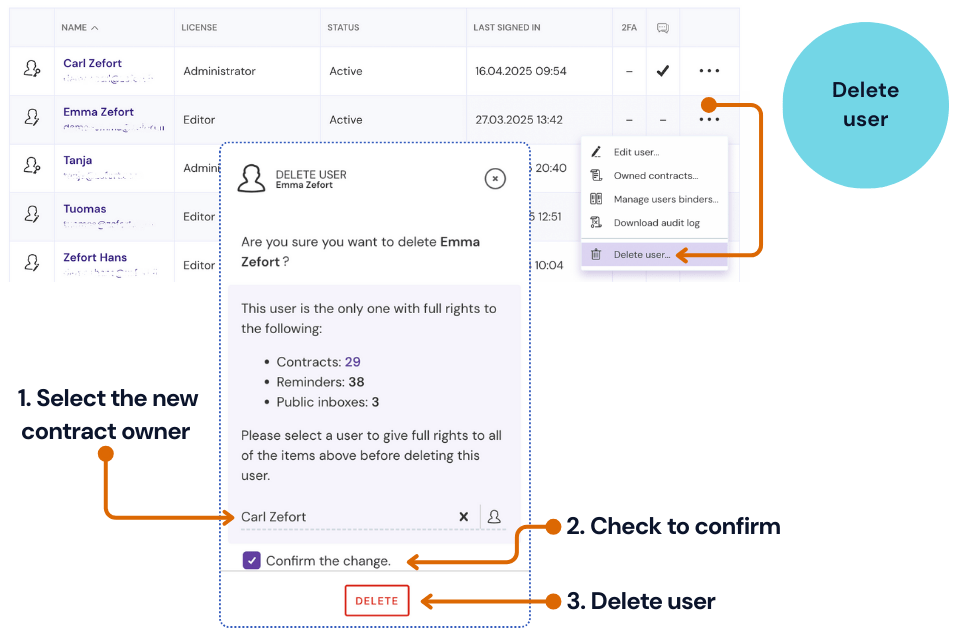
To delete a user:
- Click the menu ••• > Delete user…
- Choose a user to inherit the deleted user’s items (contracts, reminders, etc.)
- Check the box Confirm the change.
- Click delete
Viewing and editing a user’s binder permissions
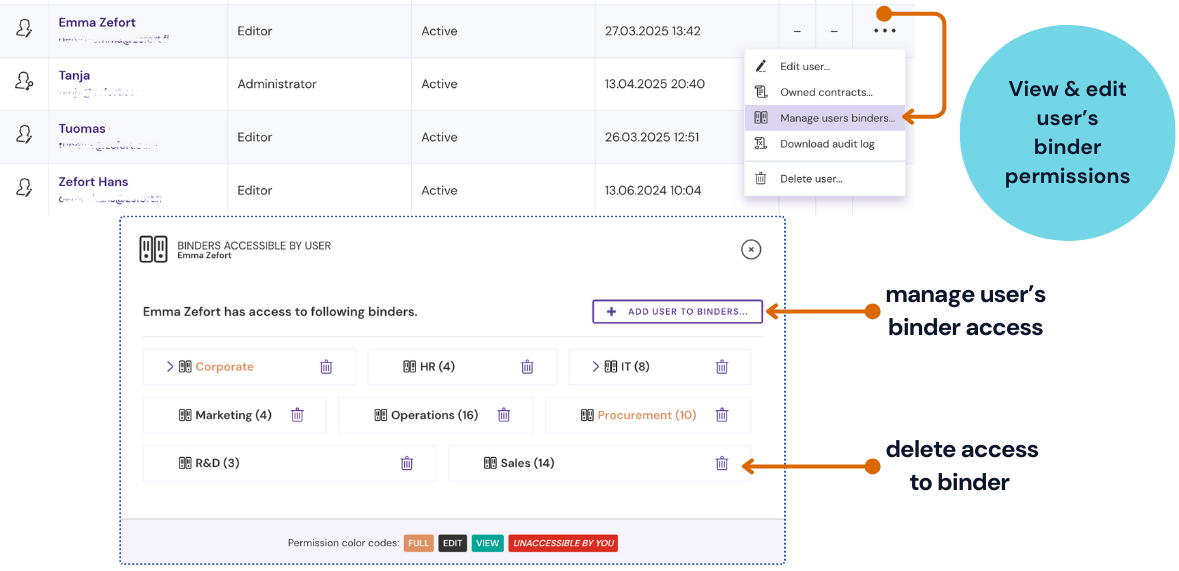
To manage a user’s binder access:
- Click the menu ••• next to the user
- Select Manage users binders…
- To remove access: click trash icon next to the binder name
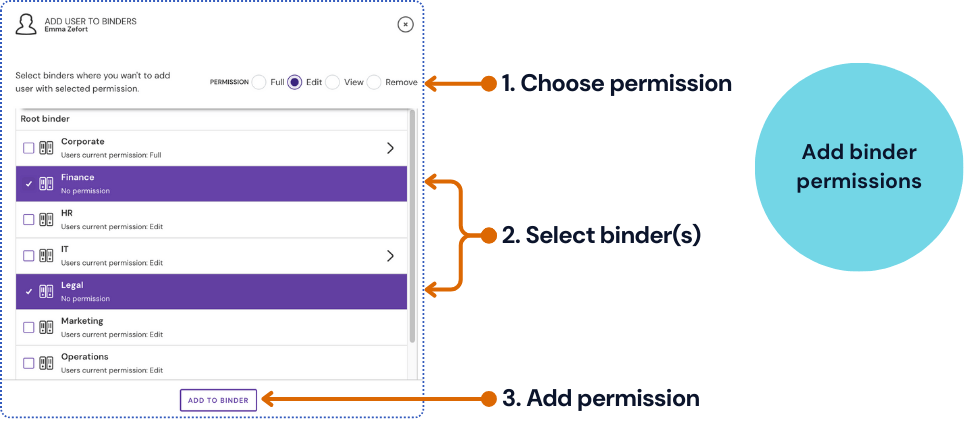
To assign new binders:
- Click + Add user to binders…
- Choose the appropriate access level (view, edit, or full)
- Select the binder(s)
- Click add to binder
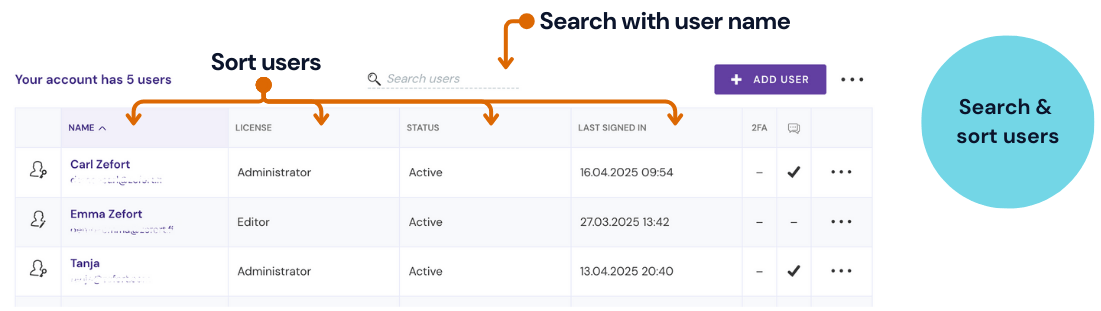
Searching users
- Use the search field at the top of the user list
- Click column headers to sort users
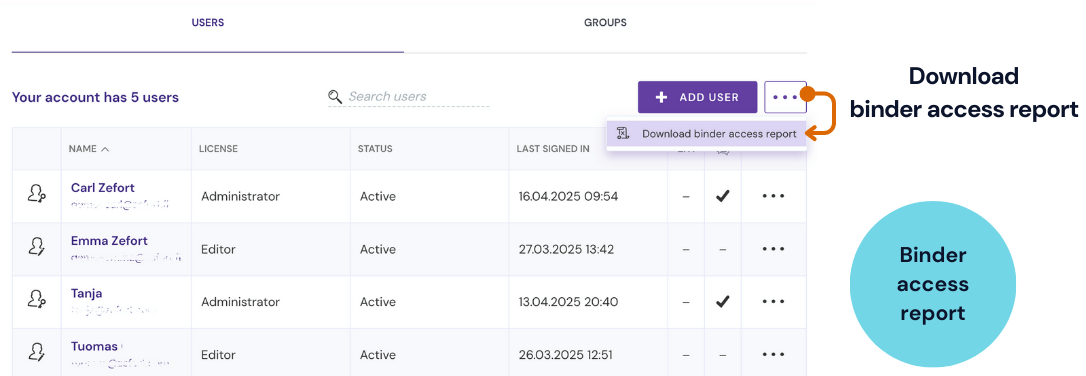
Download binder access report
- In USERS view, open menu •••
- Select Download binder access report
In binder access report you can review:
- access by user
- access by user, separated
- access by binder
- access by group
Creating and editing user groups
- Go to the Groups tab
- Click + Add user group
- Enter a group name
- Select users to include
- Optional: choose a default binder for contracts uploaded by group members
- Click Add group
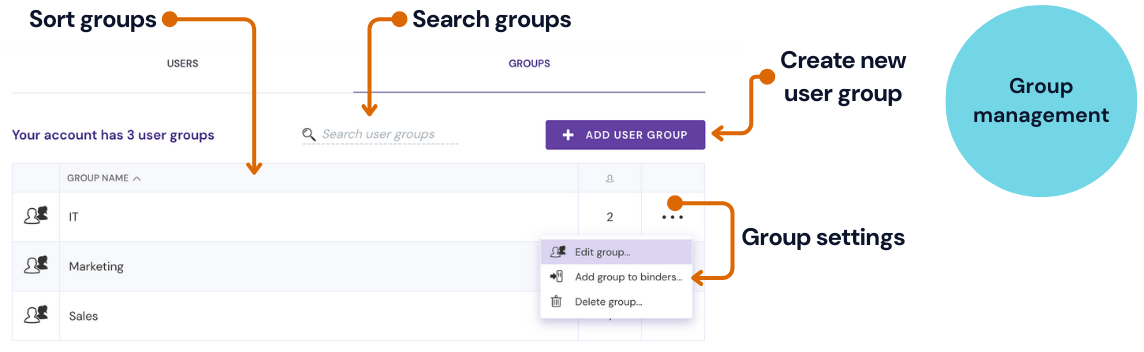
From the group’s ••• menu, you can:
- edit or delete the group
- assign binder permissions to the group
You can also search, sort, and view member count for each group.
Default permissions for new users
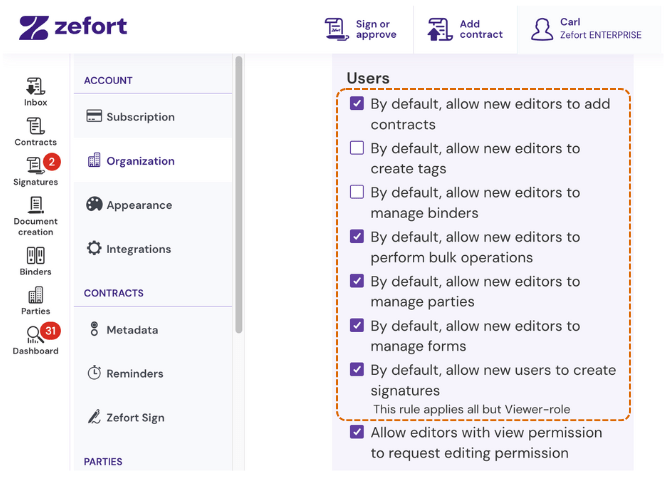
Set default permission for new users:
- By default, allow new editors to add contracts
- By default, allow new editors to create tags
- By default, allow new editors to manage binders
- By default, allow new editors to perform bulk operations
- By default, allow new editors to manage parties
- By default, allow new editors to manage forms
- By default, allow new users to create signatures
These settings will apply to all new users, but you can customize permissions per user later.