Zefort Sign: Sending documents for signature and approval
Zefort Sign is a feature that allows you to easily send documents for electronic signature. This guide explains how to send a document for signing and what the signing process looks like for the recipients.
- Initiating the signature request
- Managing the signature process
- Approving / signing the document
- Accessing the signed document
Please see our overview video of how to create and send signature request:
Initiating the signature request
This section covers the steps you take to send a document for signing or approval.
1. Select documents for signing
You can begin by either uploading a new document or selecting one that already exists in Zefort.
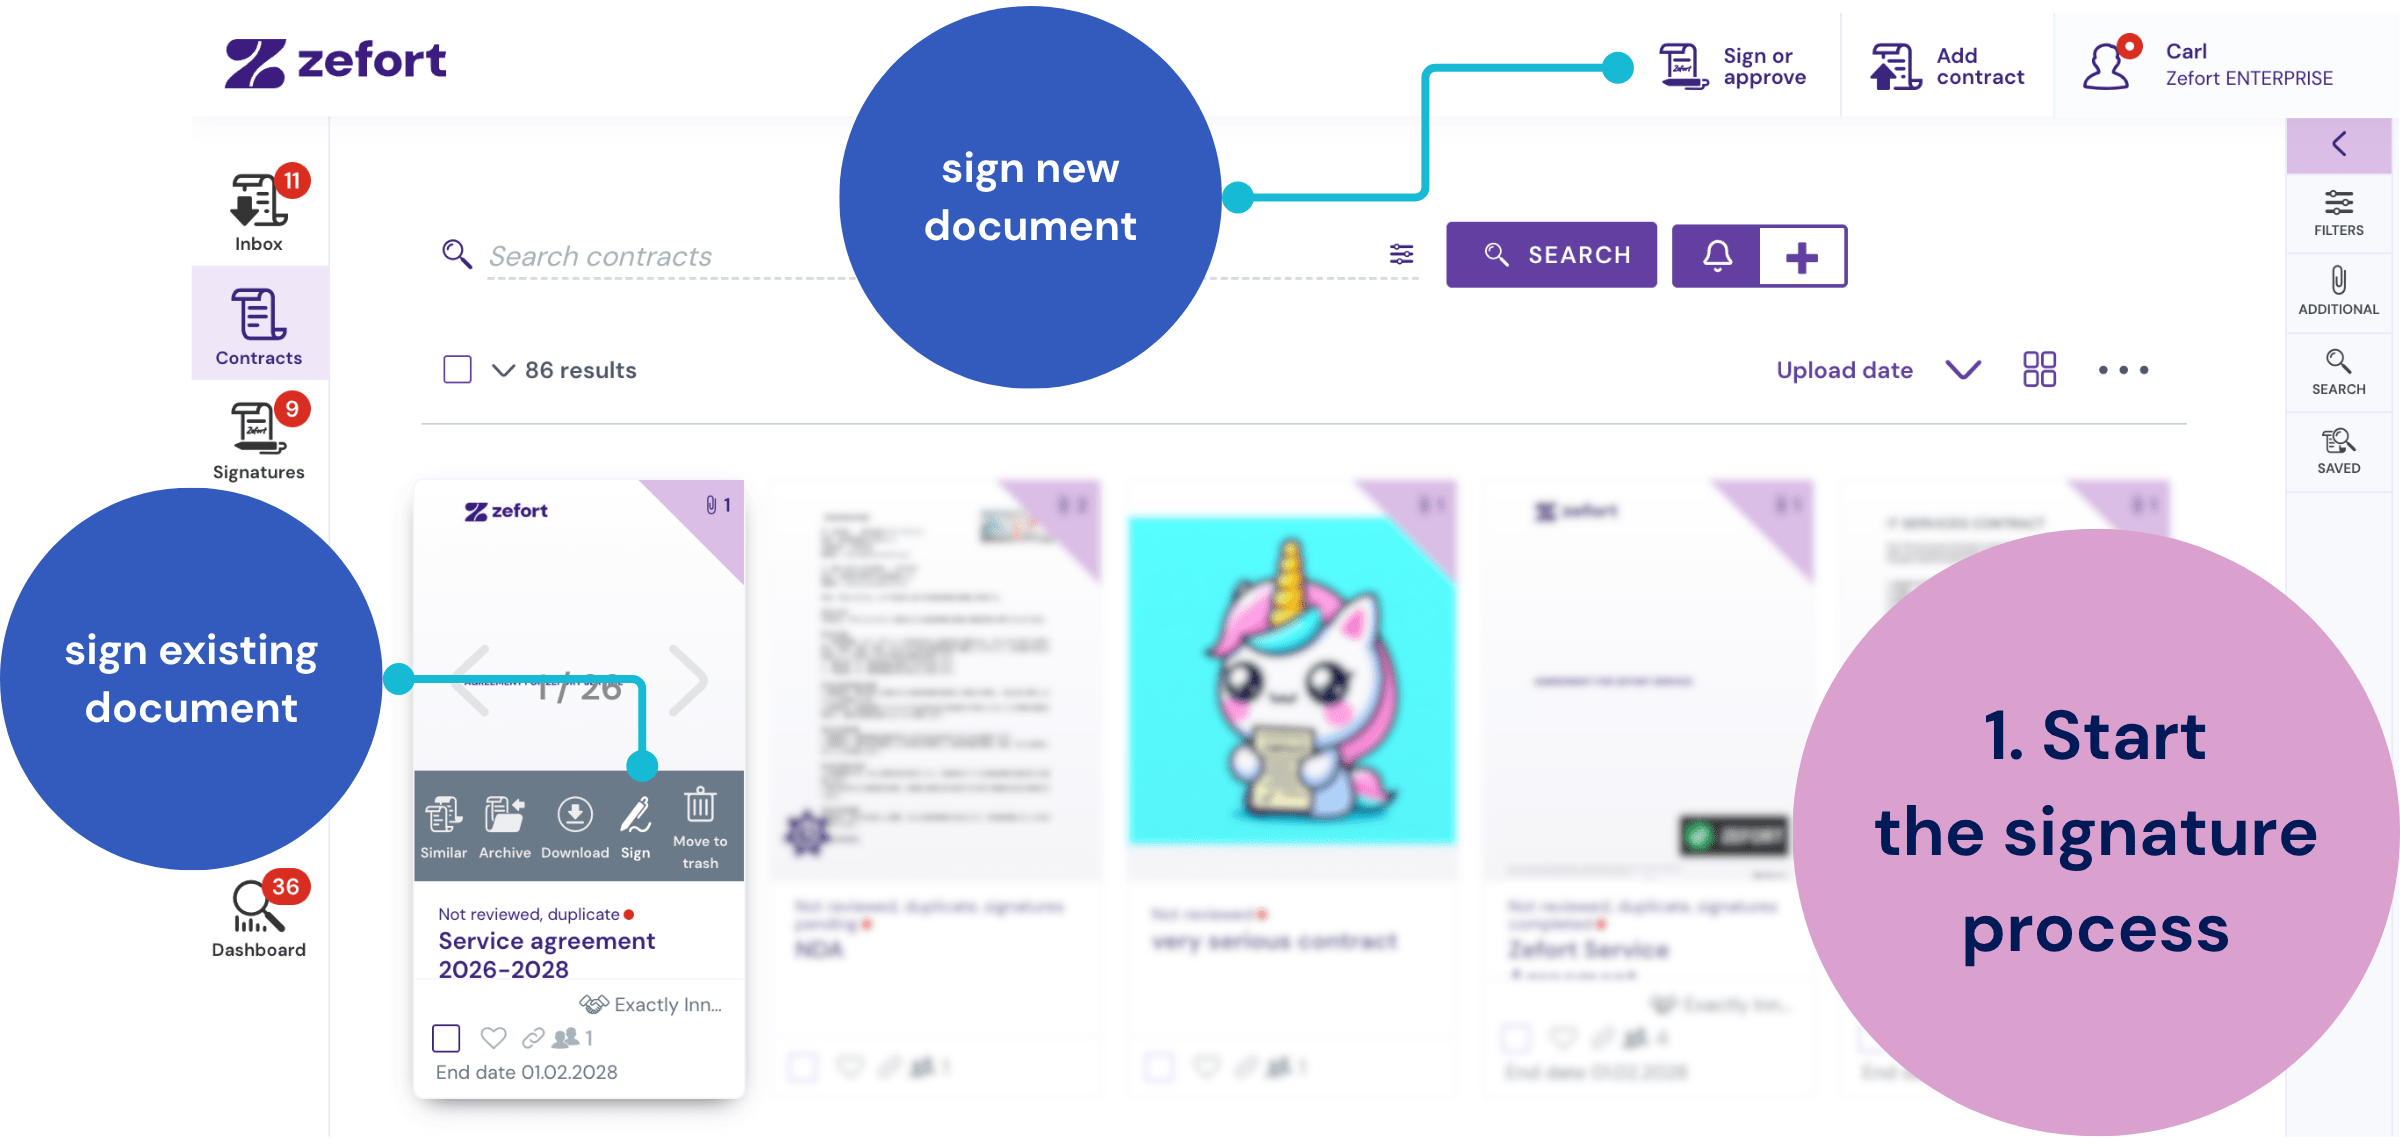
- Upload new document: Click the “Sign or approve” button, found in the top right corner and then “Select document” or drag and drop your file(s).
- Use existing Zefort document: You can initiate the process from various locations:
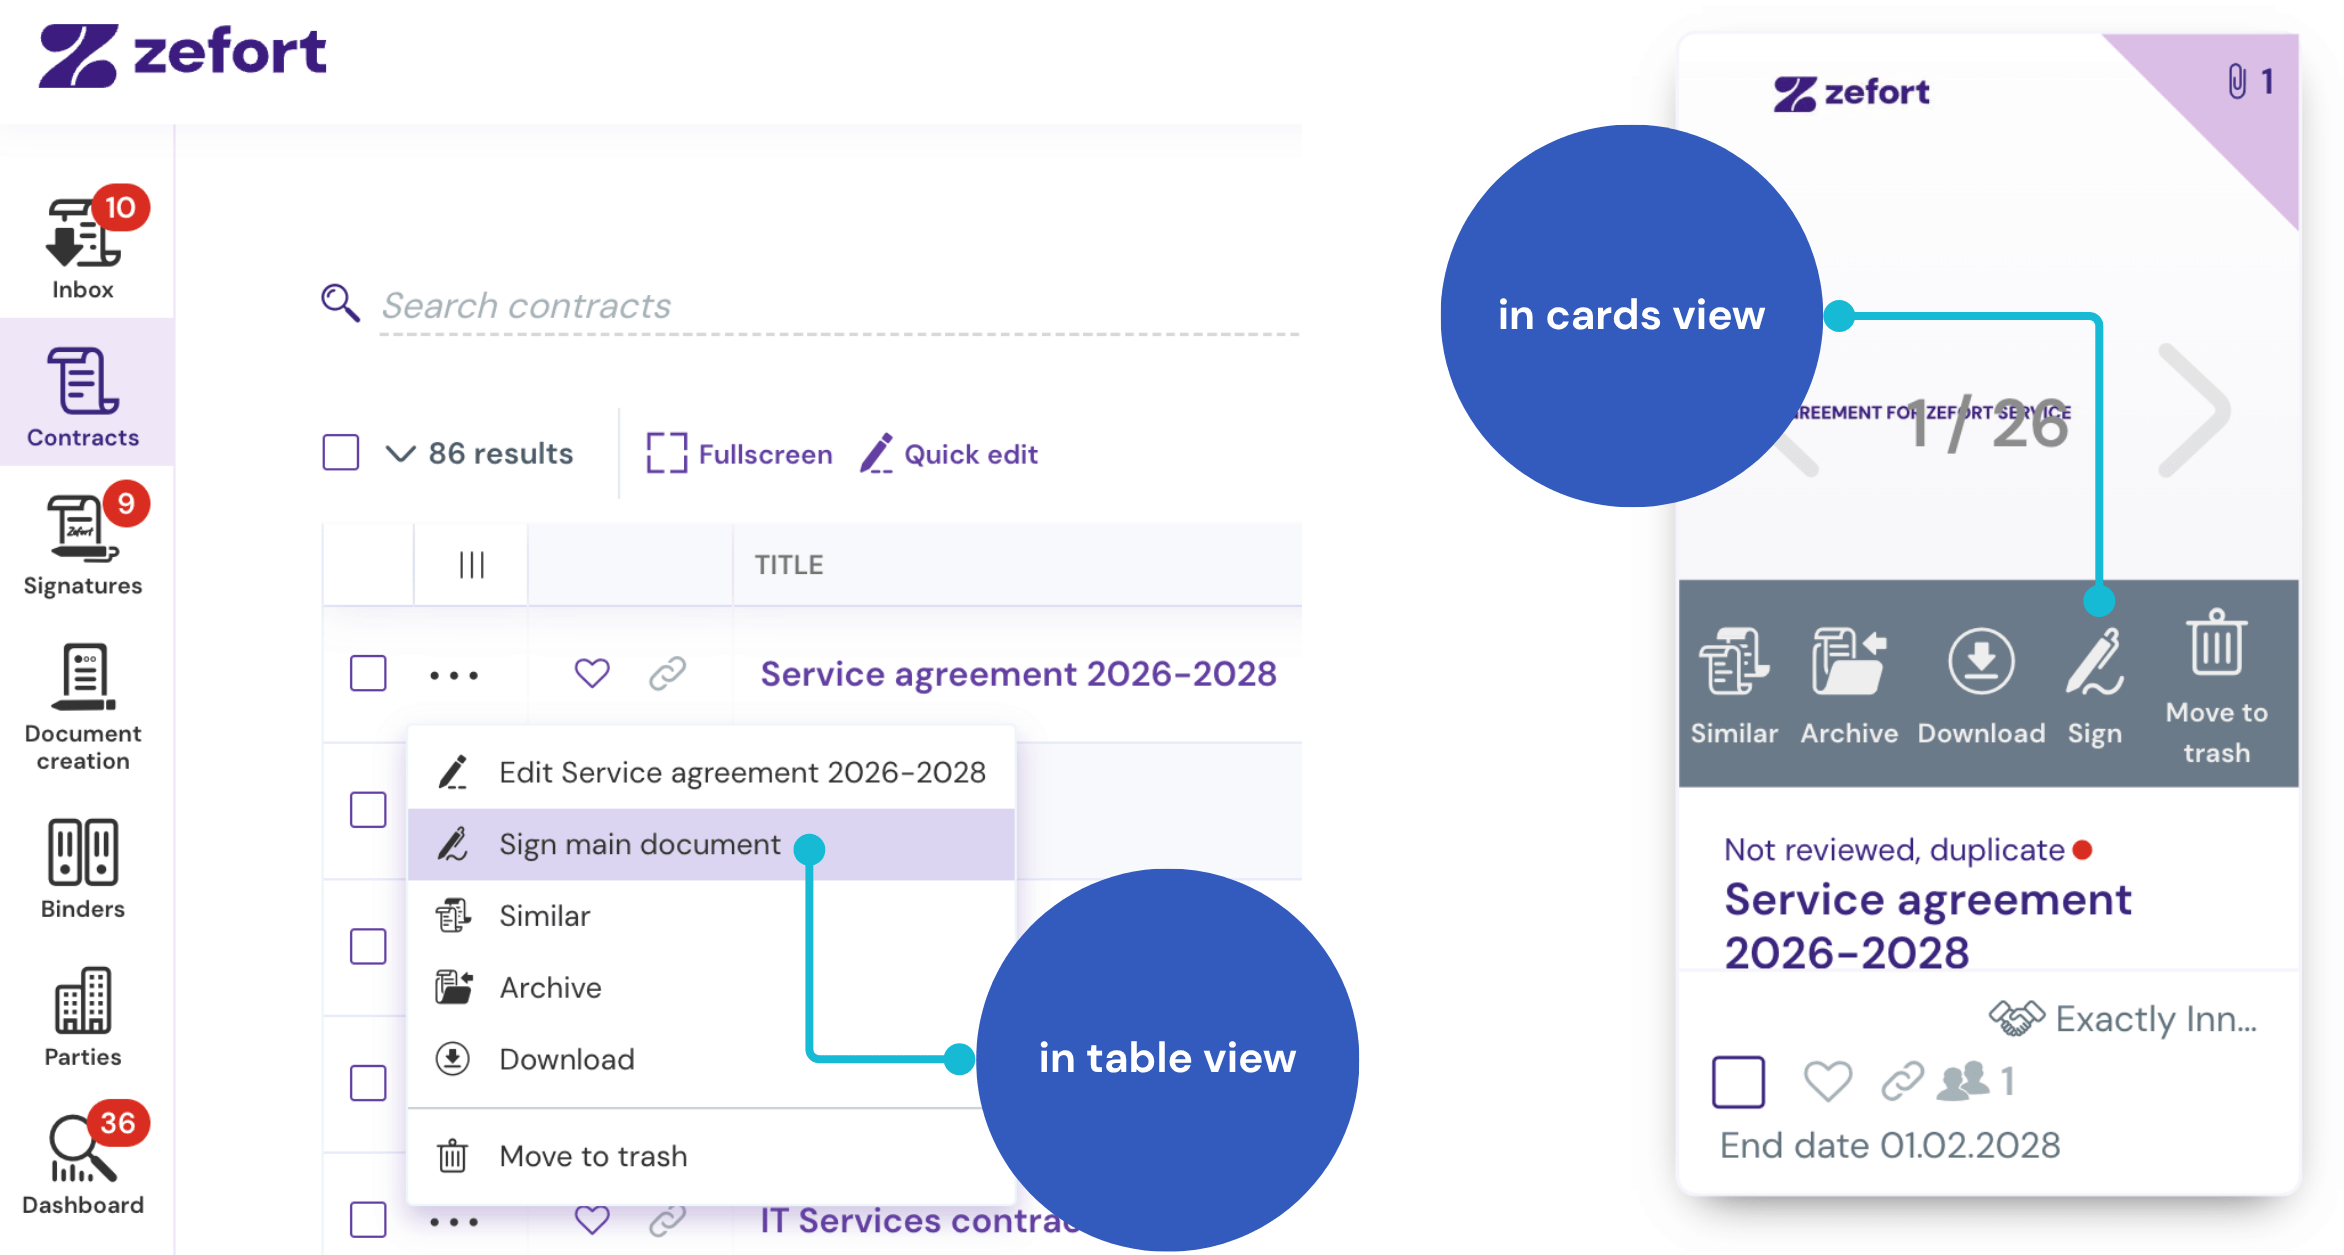
- Contracts desktop (cards view): Click the “Sign” icon on the contract card
- Contracts desktop (table view): Click the contract’s menu (•••) > “Sign main document”
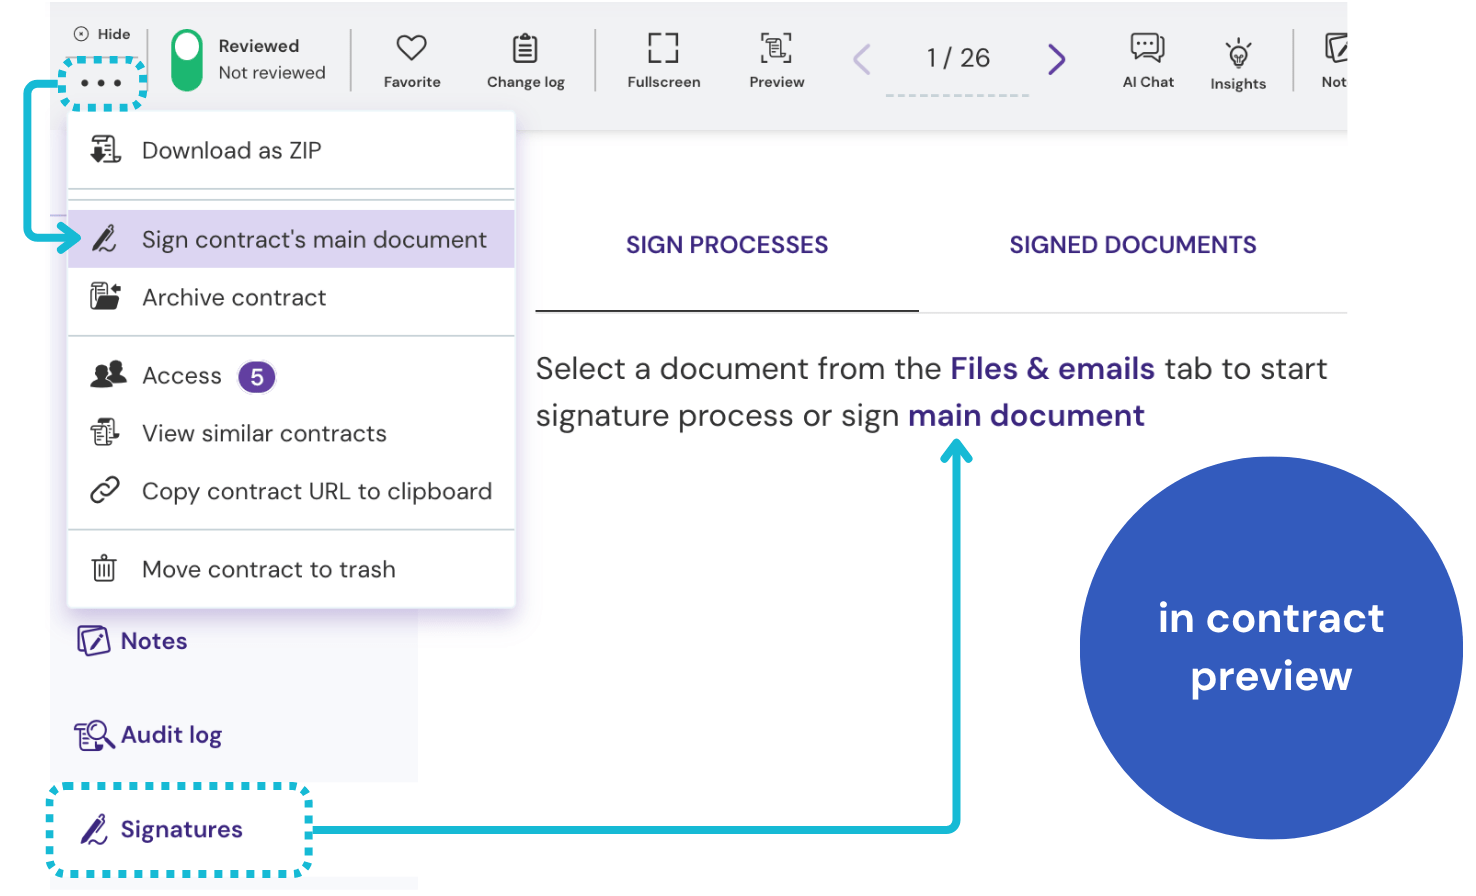
- In contract preview: Via the toolbar menu (•••), the “Files & emails tab menu (•••), or the “Signatures” tab
2. Manage contract document and attachments
In this step, you can review the documents you’ve selected for the signature request and add any necessary attachments.
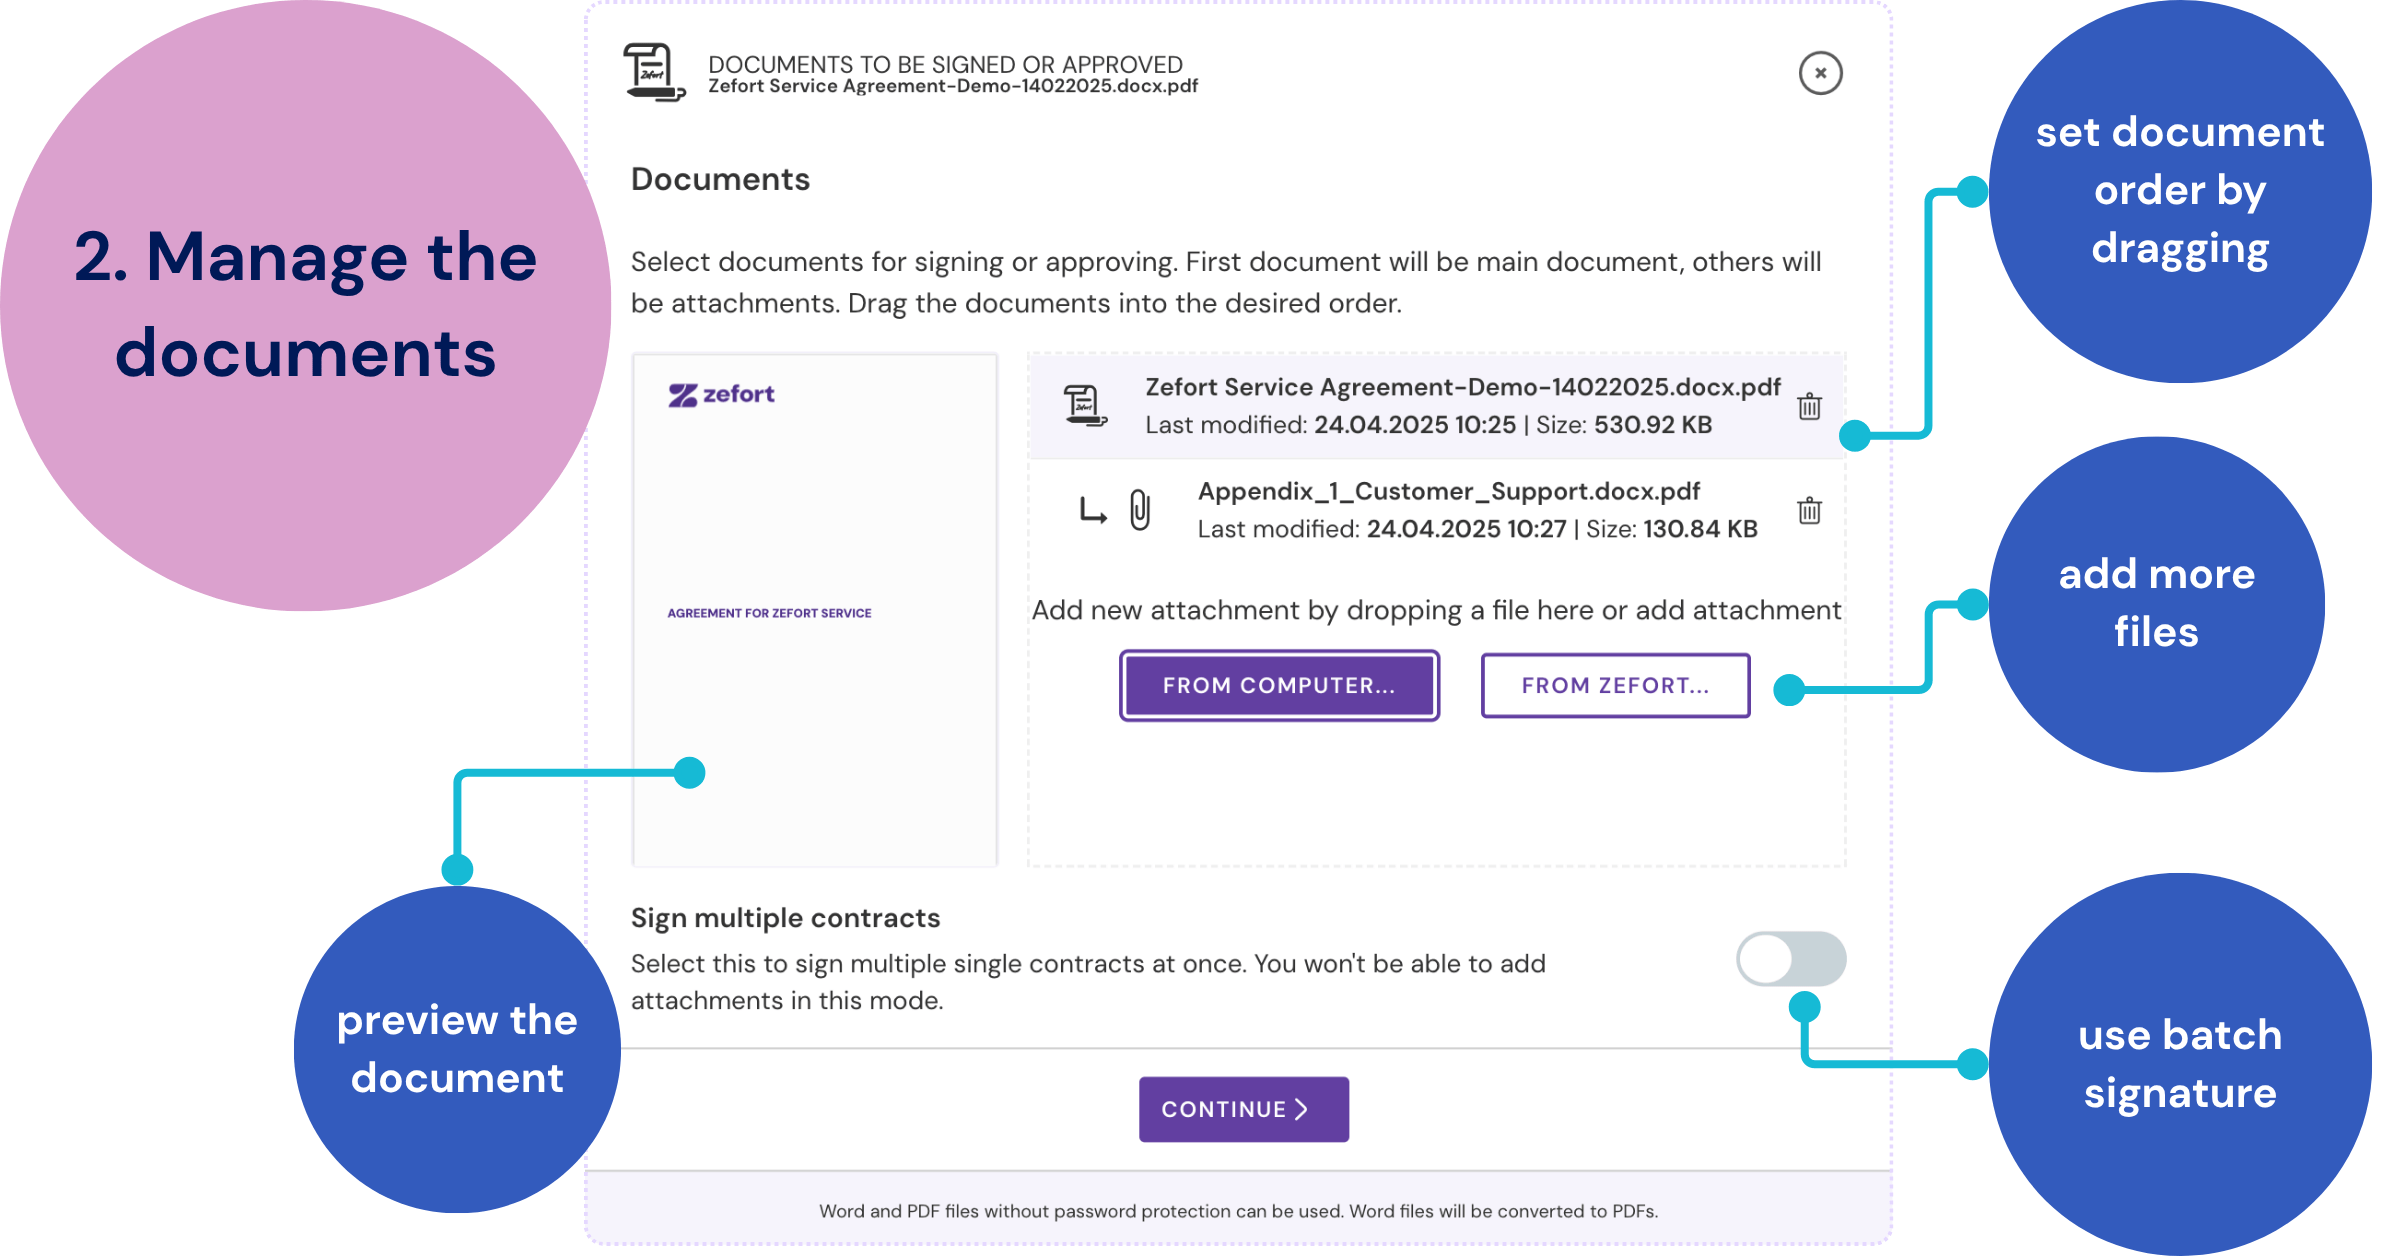
Manage the selected documents:
- The main document for signing is at the top of the list, indicated by a signature icon.

- Attachments are listed below, each shown with a paperclip icon.

If the order isn’t right, and you need to change which document is the main signing document, you can simply drag and drop the correct main file to the top.
You can also add new attachments at this point, either from your computer or from your Zefort files. Drag and drop also works for adding these attachments.
Send multiple contracts (batch signing)
To send several, separate documents for signature to the same counterparties simultaneously, use the “Sign multiple contracts” option in Zefort Sign. Please note that batch signing feature works with single file documents only.
When you activate this feature:
- The assigned approver(s) / signer(s) will see and be able to sign all the contracts in one go.
- You will receive each contract as a separate, individually signed file.
For more detailed instruction, check this article: Batch signing with Zefort Sign
3. Add and configure signature parties
In this step, you’ll specify who needs to approve, sign, or be copied on the document, and adjust their settings.
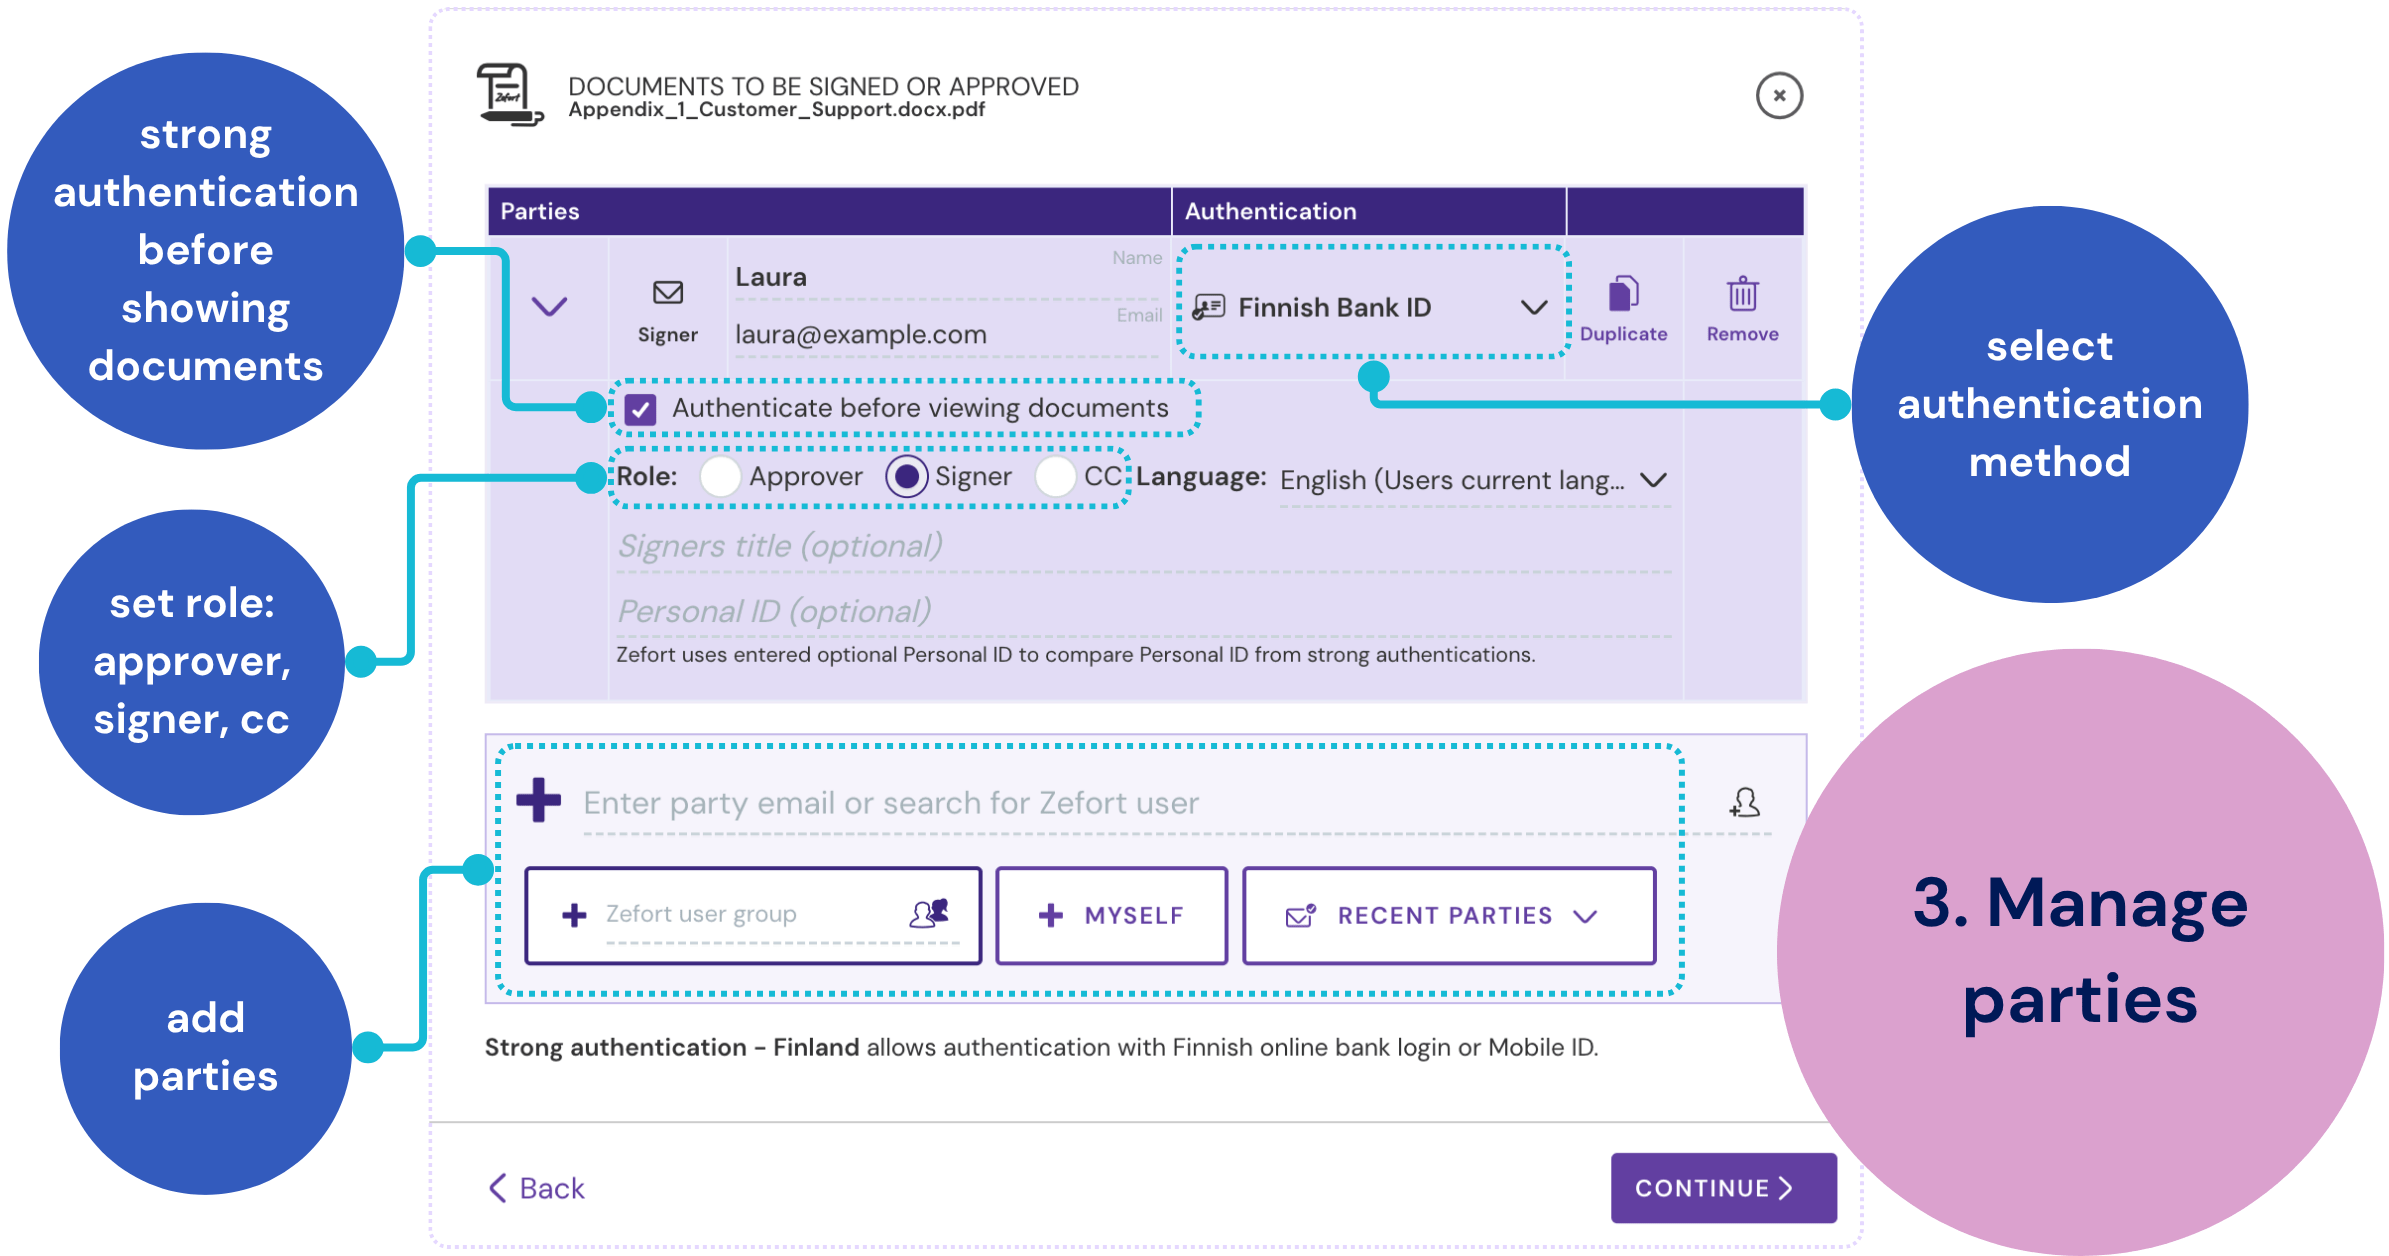
Adding parties:
- Add Zefort users from your account
- Add Zefort user groups from your account
- Add yourself + MYSELF
- Add the contract owner + OWNER
- Add recently used parties
- Add external parties: Type the recipient’s email address and press Enter
- Important: The system will automatically suggest a name based on the email address. Please check and edit the name if it’s incorrect.
Editing party details
For each party, you can configure:
- Authentication method: (email, SMS, or bank authentication, learn more about the Zefort Sign authentication levels)
- Require authentication before viewing documents: Check this option to require the selected party to authenticate their identity before they can view the document
- Role: approver, signer, or CC
- Email notification language: Choose the preferred language for email notifications for this party
- Signer’s title (optional): Add a title for the signer (shown on the signature summary page)
- Edit external party name: To change the automatically generated name of an external party, simply click on their name and type the correct one.
Pro tip for account admins: You can manage Zefort Sign settings, such as available authentication methods and the default for requiring authentication before viewing documents.
4. Define the party order (signing order)
Specify the order in which parties receive the signing or approval request.
- Parallel order: All approvers will receive the approval request at the same time. Once all of them have approved, all designated signers will then receive the request to sign simultaneously. After all signing is done, signers and CC’d parties will receive an email with a link to the signed contract.
- Consecutive order: The approvers will receive the approval request one after the other in the order you’ve listed them (you can change this order by dragging and dropping their names). Once all approvers have approved, the signers will then receive the signing request in the order you’ve specified. Finally, the signers and CC’d parties will get the link to the signed contract.
- Flexible order: You can set a specific order for each party, regardless of whether they are an approver or a signer. To do this, you type a number next to their name to indicate their place in the sequence. If multiple people have the same number, they will receive the request at the same time. You can also change the order by dragging and dropping the names.

Show signature process to participants
You can choose to let signers and approvers see the signing flow and progress.
- Select option Show signature process to participants
- Next, select which parties are shown and which are hidden.
- Showing: Make a participant’s name and status visible to everyone involved in the signature process.
- Hidden: Keep participants names hidden from the view (they will be displayed as “Anonymous” in the signature process).
5. Checking and sending the request
On this final page, you can check all the details of your signature request before sending it. Once checked, click SEND > to send the request and add the contract to Zefort, or SAVE AS DRAFT to continue later.
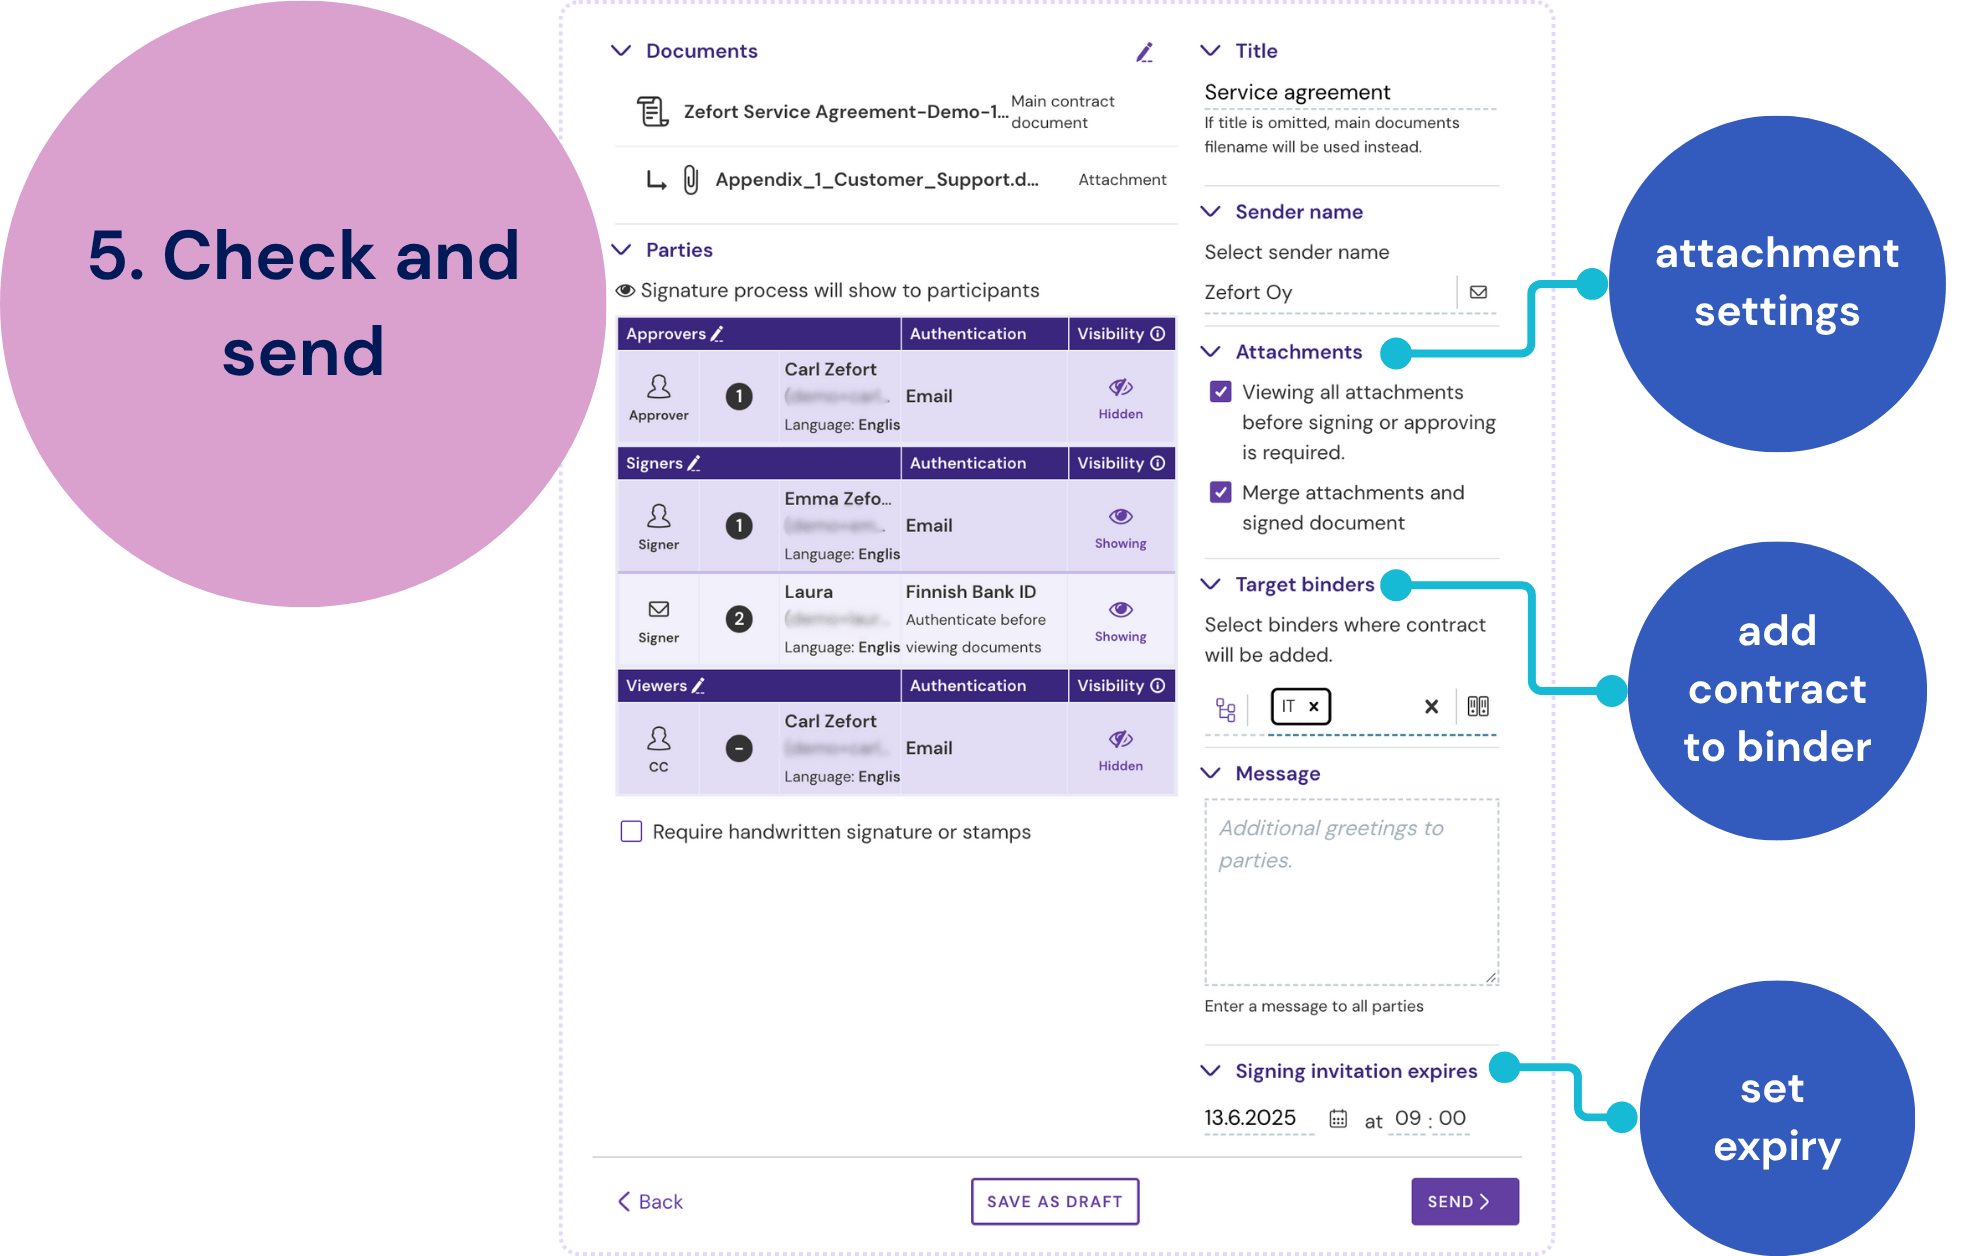
| Documents | Check the selected documents. If you need to make changes, you can do so here. |
| Signing parties | Double-check the recipients, authentication levels, and signing order. |
| Require handwritten signature or stamps | You can choose to add placeholders for handwritten signatures, initials, or signature stamps to the document.
Here is the detailed instruction: Using handwritten signatures and signature stamps |
| Title (Optional) | Set a title for this signature process. This title will be used in several places:
If you leave this blank, the filename of the main document will be used instead. |
| Sender name | Choose the name to be displayed on the signature request email. The available options are defined by the account administrator in the Zefort Sign settings.
See more details in the article Selecting signature request sender. Note: the signature request email will also contain the initiator’s name and email address in the “reply-to” field. |
| Attachments | Choose whether viewing all attachments before signing or approving is required
You can also select the option to merge attachments and signed document.
|
| Target binder | Select the specific binder within Zefort where the contract should be automatically saved.
Note:
More information about target binders: Using binder as signature target |
| Message (optional) | You can add a message here. This message will be included in the signature request email sent to all recipients (in addition to the standard text that is automatically included in the email). |
| Signing invitation expires | Set a deadline for approving and signing the document (by default it is two weeks). The link becomes inactive after expiry; for reactivating expired signature process, please check the instruction here. |
Managing the signature process
Once you’ve sent a document for signing or approval, you can track the status and make some changes in the Signatures tab of that document in Zefort.
For details on how to do this, see Review and edit signature process.
Recipient experience – signing the document
This section describes what happens after you send the request, from the recipient’s perspective. For more in-depth information about the recipient’s signing process, you can refer to this article: Signing with Zefort Sign
All designated approvers / signers will receive the signature request sent to their email addresses. This email notification will include your name (or the selected sender name), either the title you set for the signature process or the filename of the document, the expiration date for signing, and any custom message you may have added.
The email contains a link that directs the recipient to a secure web page where they can carefully review the document. On this page, the recipient has the option to either approve/sign the document or decline. If a recipient declines, you will receive an email notification informing you of this action.
Accessing the completed document
Once all signatures are completed, you, the signer(s), and CC’s will be notified via email. The email includes a secure download link that can be used for downloading the signed document. Please note that the email does not contain the signed file directly.
The link is valid for two weeks, after which a new link may need to be requested (check the instruction: Resend download link).
As the document owner, you don’t necessarily need to download it separately, as the signed version is automatically stored within your Zefort account.